Open Graph Meta Tags are pieces of code that help define how your website should look when shared on social media platforms like Facebook and Twitter. By adding Open Graph tags to your website, you can control the way your content is displayed, including the title, description, thumbnail image, and more.
For example, here’s how one of our pages looks when shared on social media.

In this knowledge base article, we’ll discuss the basics of OpenGraph Meta Tags and show you how to add them to your website using Rank Math SEO plugin.
Table of Contents
1 What Are Open Graph Meta Tags?
Just as Schema helps search engines understand the content on websites, Facebook created Open Graph Protocol to transform web properties into rich objects. Similar to Schema, it is a markup that needs to be added to every page of your website so that Facebook and other social networks can read and understand your page and also display it richly on their platforms.
It is important to note that both Schema and Open Graph can work together on the same web page.
Open Graph tags are added to the <head> section of your website’s code and usually look like this:
<meta property="og:title" content="Your Page Title Here" /><meta property="og:type" content="website" /><meta property="og:URL" content="https://www.rankmath.com" /><meta property="og:image" content="https://www.rankmath.com/wp-content/uploads/2022/07/rankmath-og.png" /><meta property="og:description" content="Write your page description here." />
Each Open Graph tag has a property and a content attribute. The property attribute defines what type of information you’re providing, while the content attribute is where you actually provide the information.
2 List of the Required Open Graph Tags for Every Page
Although each Open Graph tag is optional, the tags og:title, og:type, og:URL, and og:image are essential for every page. If you don’t include these tags, Facebook and other social networks will simply create their own title, description, and thumbnail image for your page, which may not be accurate or representative of your website.
We also recommend including the og:description tag on every page. This tag gives you control over the description that is shown when your page is shared on social media and can be a good way to entice people to click through to your website.
In addition to the required properties, many optional properties can be used to further control how your pages are represented. These include tags like the site name, locale, and more.
2.1 OG: Title
The og:title tag is used to specify the title of your page. This is the title that will be shown when your page is shared on social platforms like Facebook or Twitter. It is important to use a title that accurately describes your page and is likely to grab the attention of people scrolling through their feed.
Rank Math SEO Plugin makes it really easy to add this tag to your website and provides you the ability to make use of dynamic variables. For example, if you have a multi-site network, you can use the %sitename% variable to insert the name of the current site.
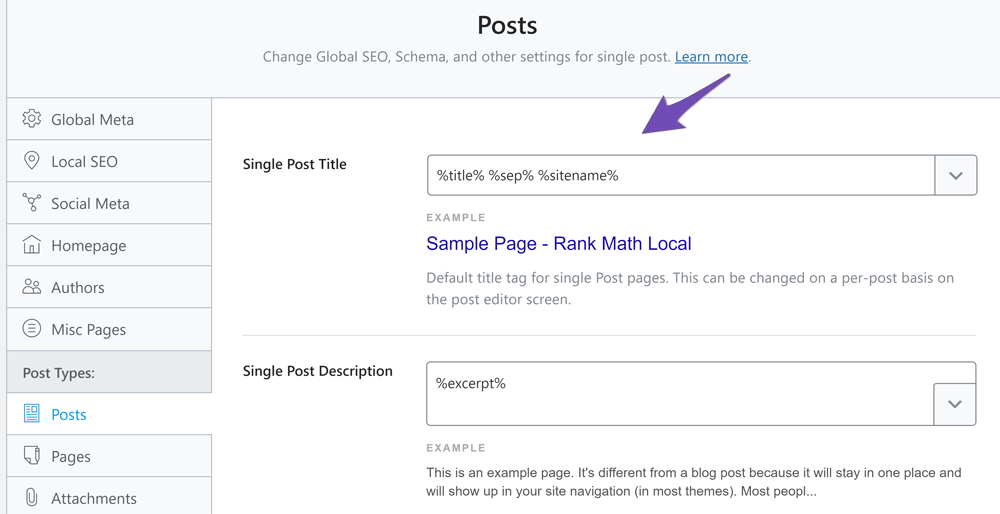
Here’re some other dynamic variables you can use:
%currentdate%– The current date of the post or page%currentyear%– The current year of the post or page%currentmonth%– The current month of the post or page (numeric)%currentday%– The current day of the post or page%currenttime%– The current time of the post or page- And many more.
2.2 OG: Type
The og:type tag allows you to specify the type of content that you’re sharing on your website or blog. This is especially useful if you’re sharing something other than traditional web pages, such as blog posts, articles, or product descriptions.
Some common og:type tags include:
- Website: On the front-page or homepage of your website, you should use
og:typetag with a value aswebsite. - Profile: On profile type of content, such as an author’s or company’s profile, you should use the
og:typetag with a value asprofile. - Article: Similarly in an article, you should use the
og:typetag with the value asarticle. - Product: For a product, you should use the
og:typetag with the value asproduct.
The best thing is that the Rank Math SEO plugin will automatically generate the og:type tag for you based on the content that you’re sharing. However, if you want to specifically control what type of content is being shared, you can do so by specifying the “type” parameter in the filter below.
/**
 * Allows theme developers to change the OpenGraph type of the page.
 *
 * @param string $type The OpenGraph type string.
 */
add_filter( 'rank_math/opengraph/type', function( $type ) {
	return $type;
});
2.3 OG: Image
The og:image tag defines the thumbnail image that is shown when your website is shared on Facebook and different social platforms. It is important to use an image that is representative of your page and is likely to grab the attention of people scrolling through their feed.
Facebook currently supports only jpeg, png, and gif image formats. Rank Math also supports WebP image format for Facebook Open Graph. So if you’re trying to add an image in WebP format, Facebook and similar social media platforms can recognize them. If you’re using any other image format other than these, images may not be displayed while sharing on social media.
Also, the recommended image size is 1200px X 630px. If the image’s dimension is too small or too large compared to recommended image size, then individual social networks may not read your image correctly. In these cases, social networks will pick other images of your page that satisfy these dimensions (if any) instead of your desired social preview image.
2.4 OG: URL
The og:url tag is used to specify the canonical URL of your page. This is the URL that you want people to see when they share your page on social platforms. It is important to use a canonical URL so that people are directed to the right page, even if there are multiple versions of your page floating around on the internet.
Rank Math automatically inserts the canonical URL for you, so you don’t need to worry much about it.
2.5 OG: Description
The og:description tag is used to specify a short description of your page. This description is generally between 2 and 4 sentences long and should be reflective of the content on your page. This description is shown when your page is shared on social platforms, so it is important to use a description that accurately describes your page.
2.6 OG: Image: Secure_URL
The og:image:secure_url tag is used to specify the HTTPS version of the image URL. This tag includes the Open Graph image configured for your page. It also means that your website is served over HTTPS, and you are telling Facebook to crawl your website using a secure connection.
2.7 OG: Image: Width
The og:image:width tag is used to specify the width of your image in pixels. For best results, upload images with a width of 1200 pixels.
2.8 OG: Image: Height
The og:image:height tag is used to specify the height of your image in pixels. For best results, upload images with a height of 630 pixels.
2.9 OG: Image: Alt
The og:image:alt tag is used to specify the alternative text of your image. The alt text may be displayed when the image is unavailable. Search engines and visually impaired readers also use it to better understand your image.
2.10 OG: Image: Type
The og:image:type tag is used to specify the media type of your image. The media type was previously called the MIME type. It specifies the format of your images. For example, the media type will be set to image/jpeg for jpeg images and image/png for png images.
2.11 OG: Locale
The og:locale tag is used to specify the language of your page. This is important if you have an international business or a multilingual website. You can use the og:locale tag to specify the language of your page in order to ensure that your content is properly localized for each user.
Besides, you can change the og:locale tag from your WordPress admin panel. To do this, go to your WordPress Dashboard → Settings → General.
Next, In the Site Language dropdown, select the language you want to use for your website.

2.12 OG: Site_Name
The og:site_name tag is used to specify the name of your website. This name is generally shown alongside the title of your page when it is shared on social media.
Rank Math uses the Website Name that you’ve configured at Rank Math → Titles & Meta → Local SEO.
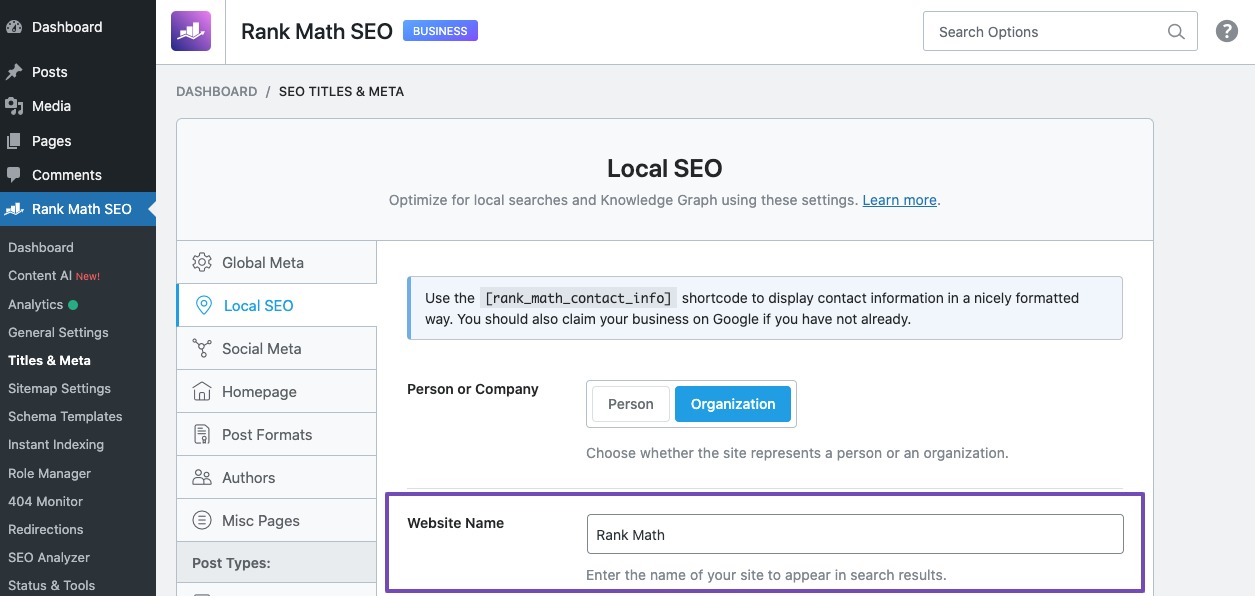
If you haven’t included your website’s name here, then Rank Math would simply use the Site Title from Settings → General as a fallback.

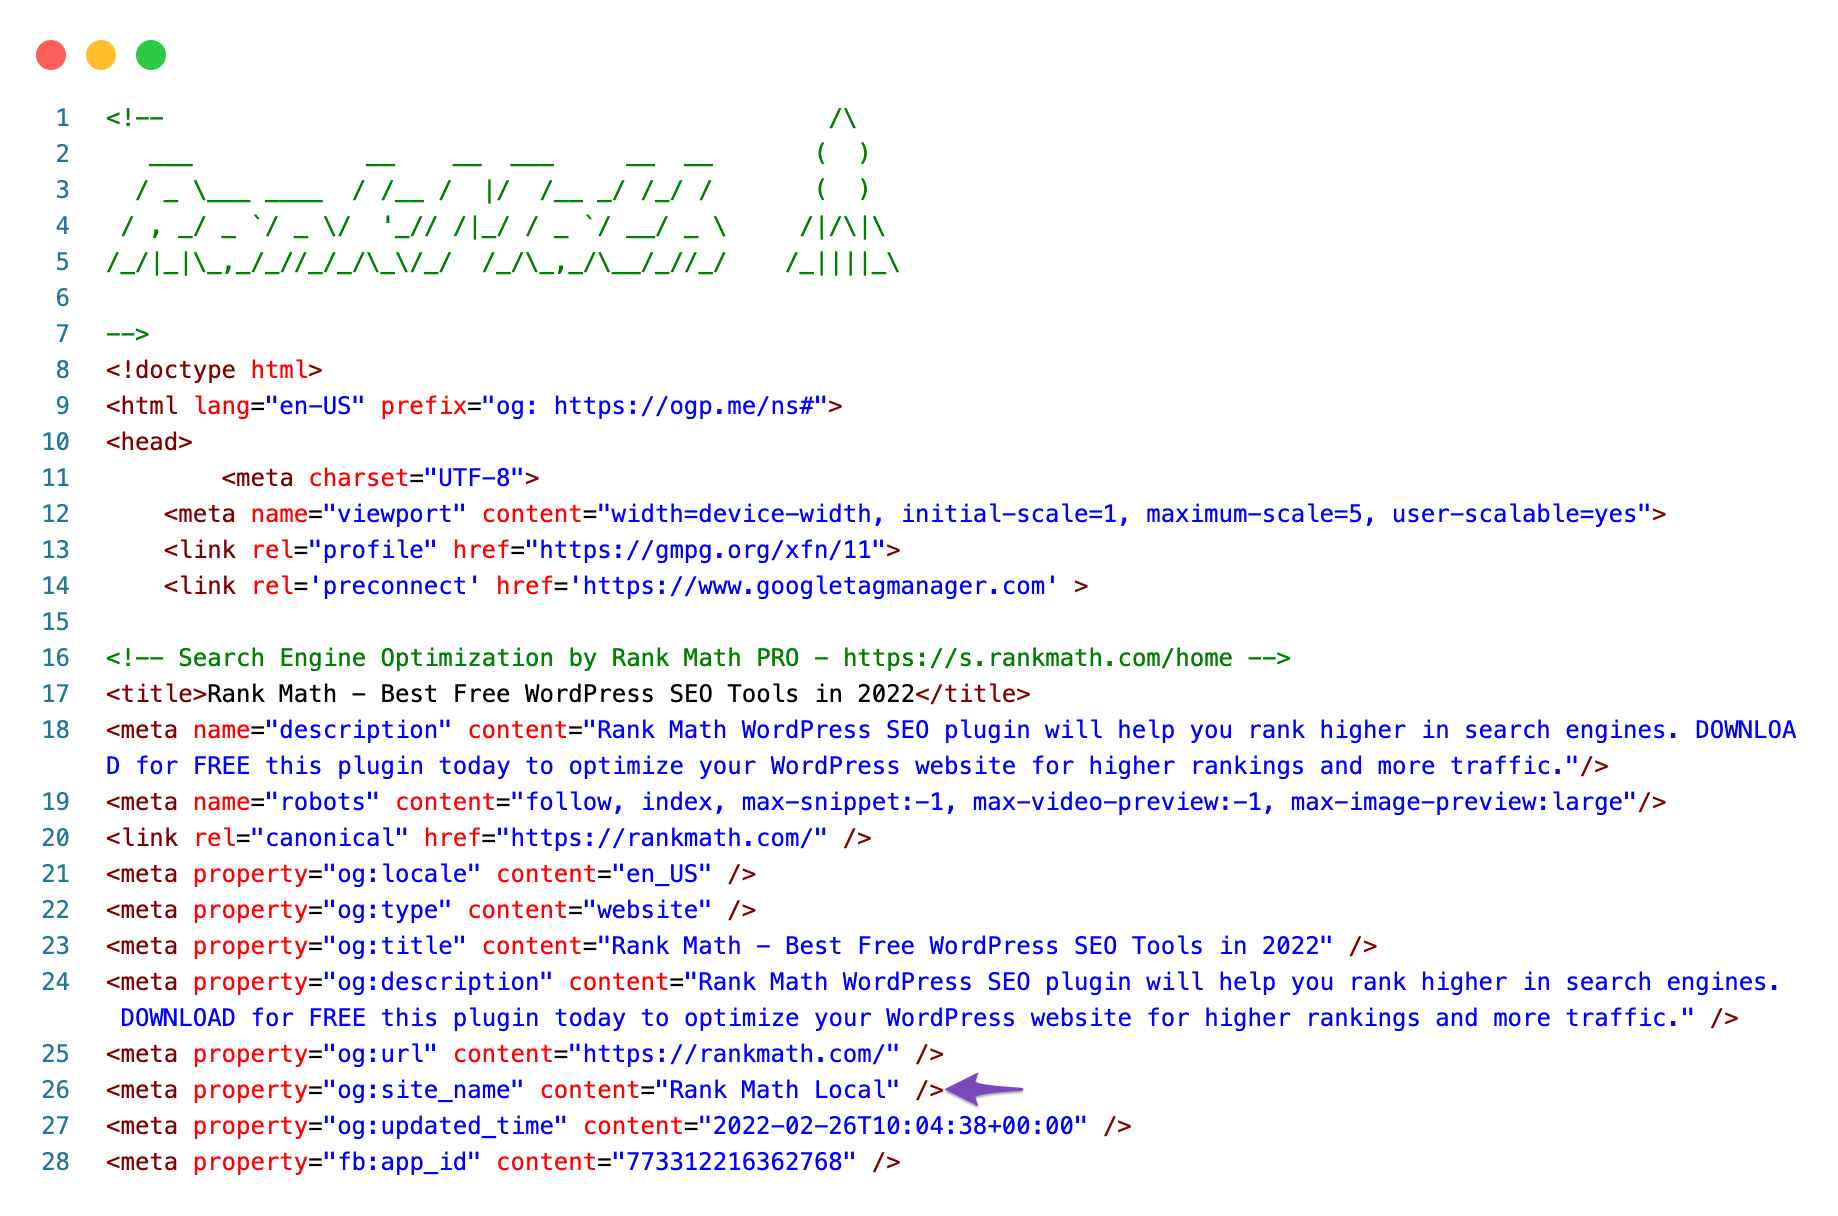
To check the og:site_name tag on your own website, you can view the source code of your page. Simply right-click on your page and select View Page Source or use a shortcut (Ctrl+U on Windows, or Cmd+Opt+U on Mac).
In the source code, search for the og:site_name tag. The content of this tag should be your website’s name.
2.13 OG: Video
The og:video tag is used to specify a video that is associated with your page. This video can be hosted on your website or on a third-party platform like YouTube.
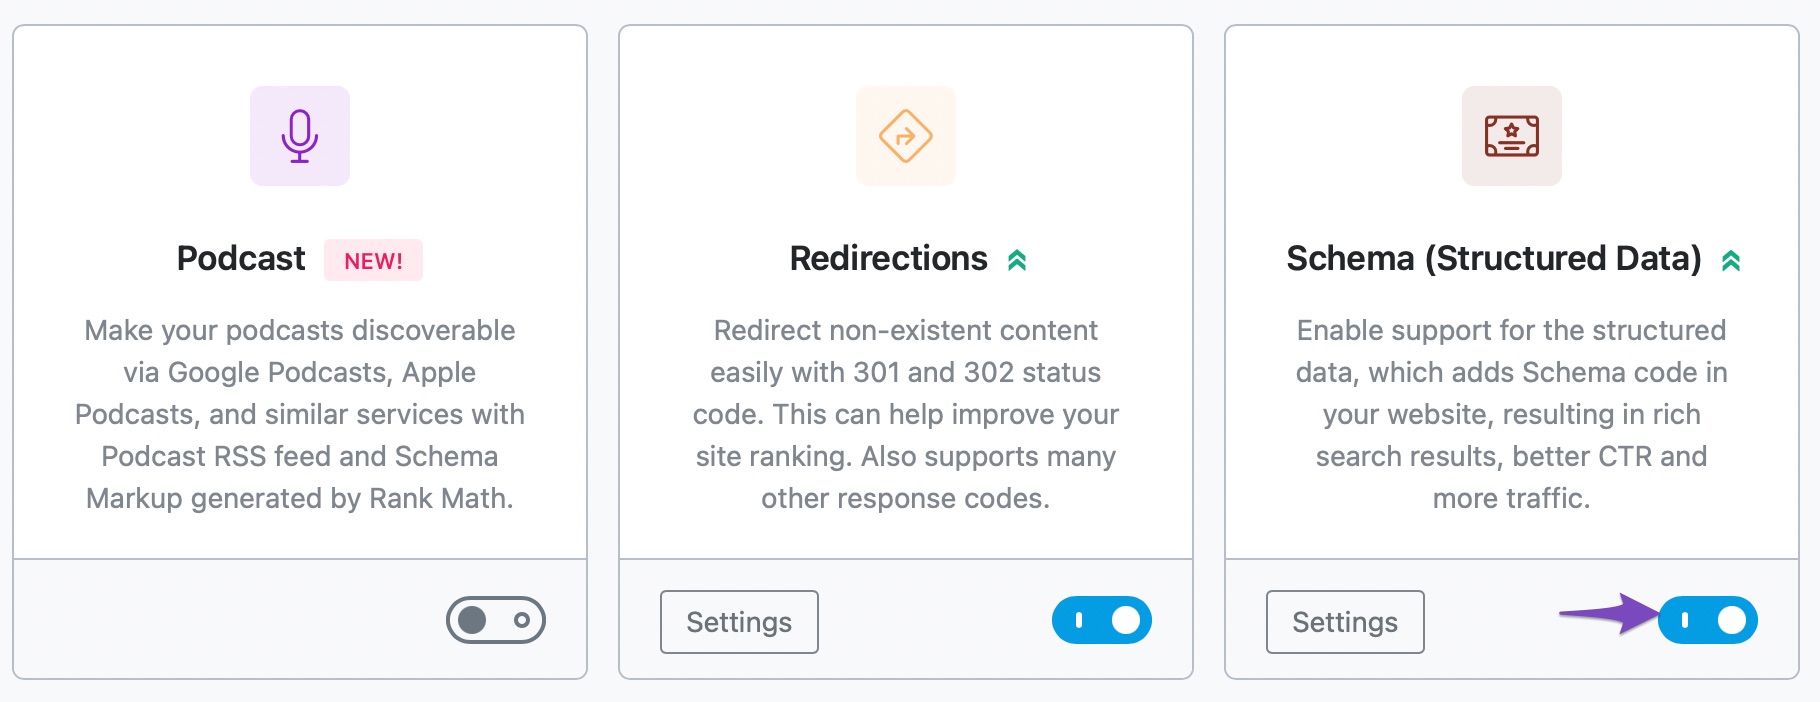
To use the og:video tag, you must first enable the Schema Module by heading over to WordPress Dashboard → Rank Math SEO and then enable the Schema (Structured Data) module.
Next, navigate to WordPress Dashboard → Rank Math SEO → Titles and Meta → Posts and enable the Autodetect Video option. Click Save Changes at the bottom of the page.

Now, Rank Math will automatically add this tag to your website if you have a video embedded on your page.
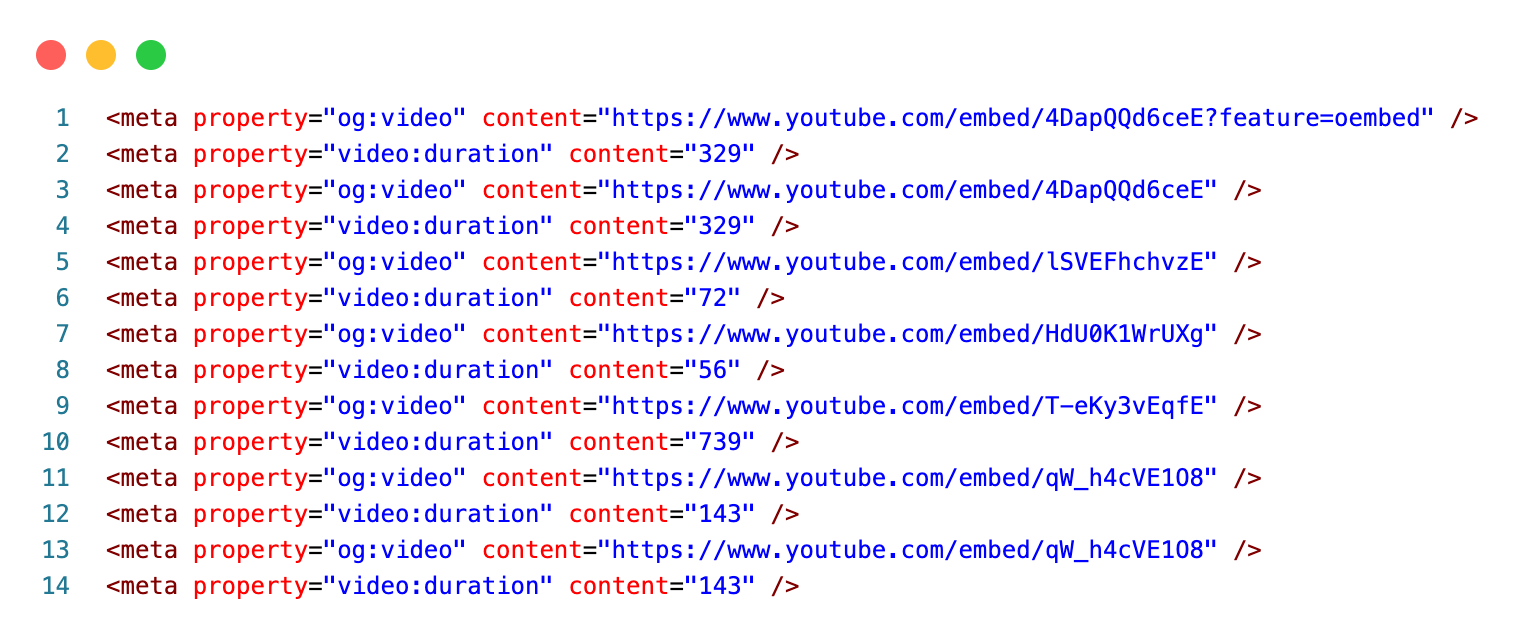
2.14 Video: Duration
The og:video:duration tag specifies the length of your video in seconds and helps social media platforms provide your users with more information about your video.
Rank Math will automatically add this tag to your website if you have a video embedded on your page.
2.15 Article: Publisher
The article:publisher tag is used to specify the publisher of your article. This is generally the name of your website or blog.
2.16 Article: Author
The article:author tag is used to specify the author of your article. This is generally the name of the person who wrote the article.
Rank Math adds the necessary meta tags to all your posts so that every post shared on Facebook has your name on it.

In order to do this, you need to add a link to your Facebook profile in the Title & Meta → Social Meta section of Rank Math.

Note: Facebook might have unofficially discontinued the authorship. Hence, adding your Facebook profile URL in this field to include the Open Graph tag is completely optional, and more of your personal preference.
2.17 Article: Section
The article:section tag is used to specify the category of the article. For example, this could be “WordPress”, “SEO”, or “WooCommerce”. Since it is possible to add only one category here, if a post has multiple categories, Rank Math will automatically use the primary category.
If no category is specified, then the default “Uncategorized” category will be used.
2.18 Article: Tag
The article:tag is used to specify the tags associated with your article. This is generally a list of keywords that describe the topic of your article.
For example, the tags for the article could be “SEO guide”, “WordPress SEO”, “WooCommerce SEO“, and more. Rank Math will automatically display all the tags associated with the article in the order they are specified.

2.19 Article: Published Time
The article:published_time tag is used to specify the time that your article was published. This is used to determine when your article should appear in Facebook’s News Feed.
The article:published time tag, unlike other OG tags, will only be added to your Open Graph if you enable the Article Schema for your page.
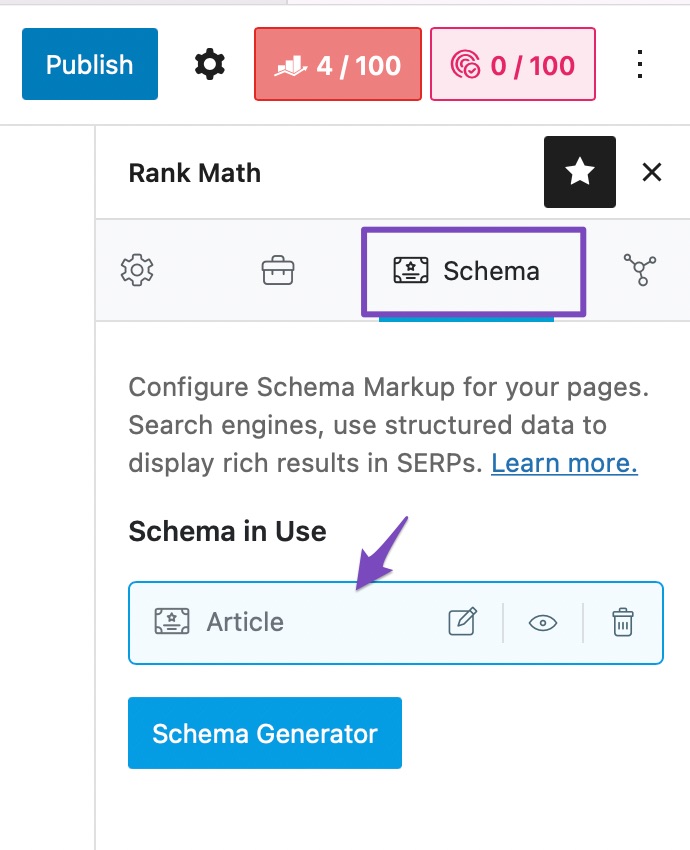
2.20 Article: Modified Time
The article:modified_time tag is used to specify the time when your article was last modified. The article:modified_time tag, like the article:published_time tag will only be added to your Open Graph after you’ve used the Article Schema type on your page.
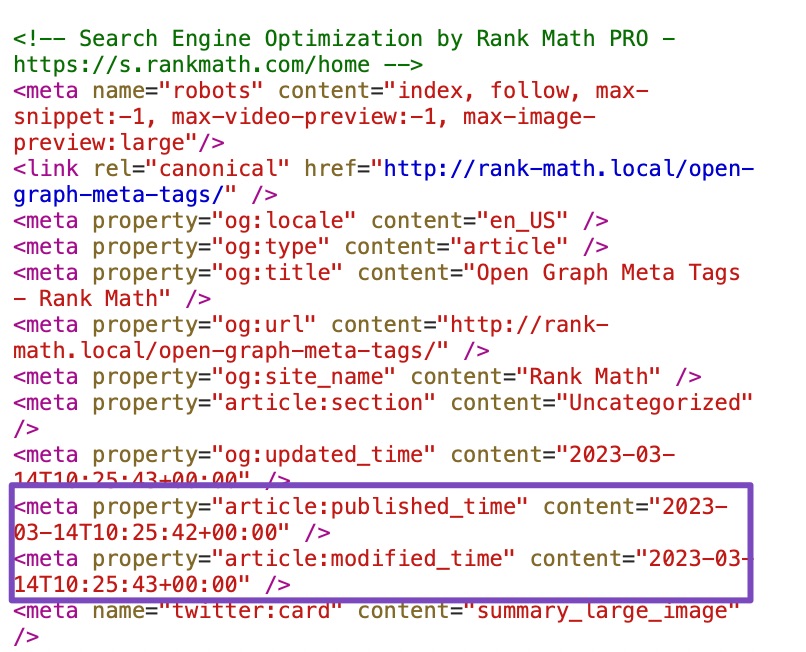
2.21 OG: Updated Time
The og:updated_time is the same as that of article:modified_time and displays when the page was last updated.
3 Twitter Tags
Twitter has its own set of Open Graph tags that are similar to the ones used by Facebook. These tags give you more control over how your website is represented on Twitter and can help to ensure that people have a positive experience when they share your website.
In order to configure your Twitter tags, you’ll need to edit your content and navigate Social Settings by clicking on the Social Tab as shown below:
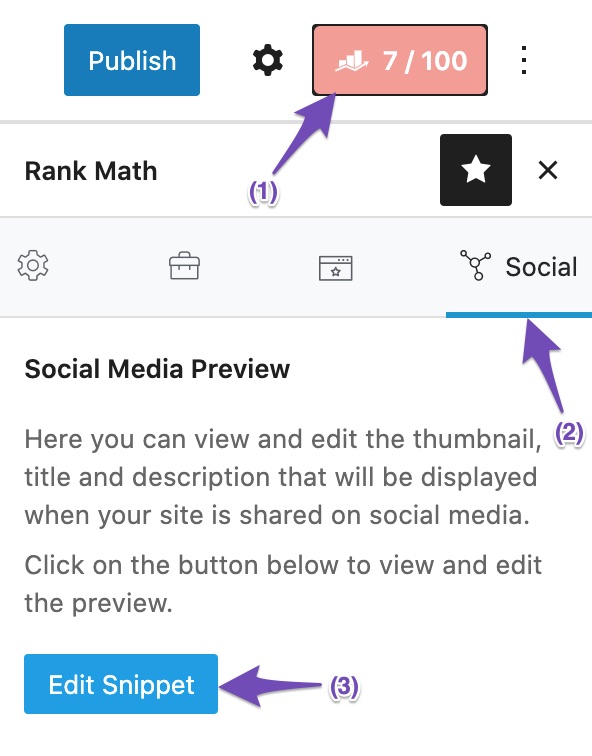
Next, you’ll see the Facebook and Twitter tab in the Preview Snippet Editor.
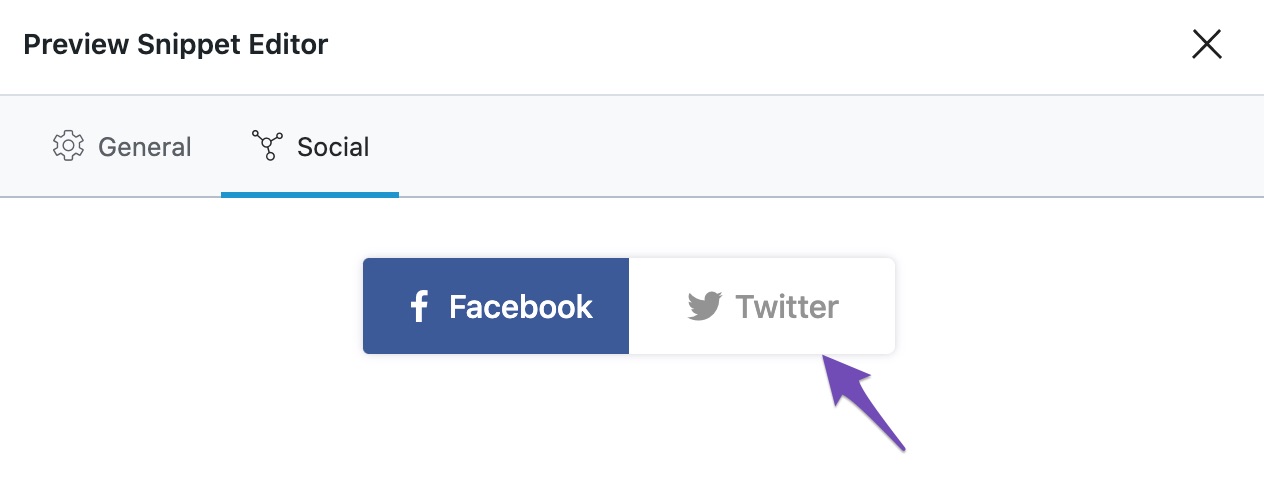
You can switch to the Twitter tab, and then disable the Use Data from Facebook tab to configure the same options for Twitter that you configured for Facebook. For example, you can set a unique title and description for your tweets and add an image as well.
Once clicked, all the Twitter options should become visible, and your screen should look something like this:
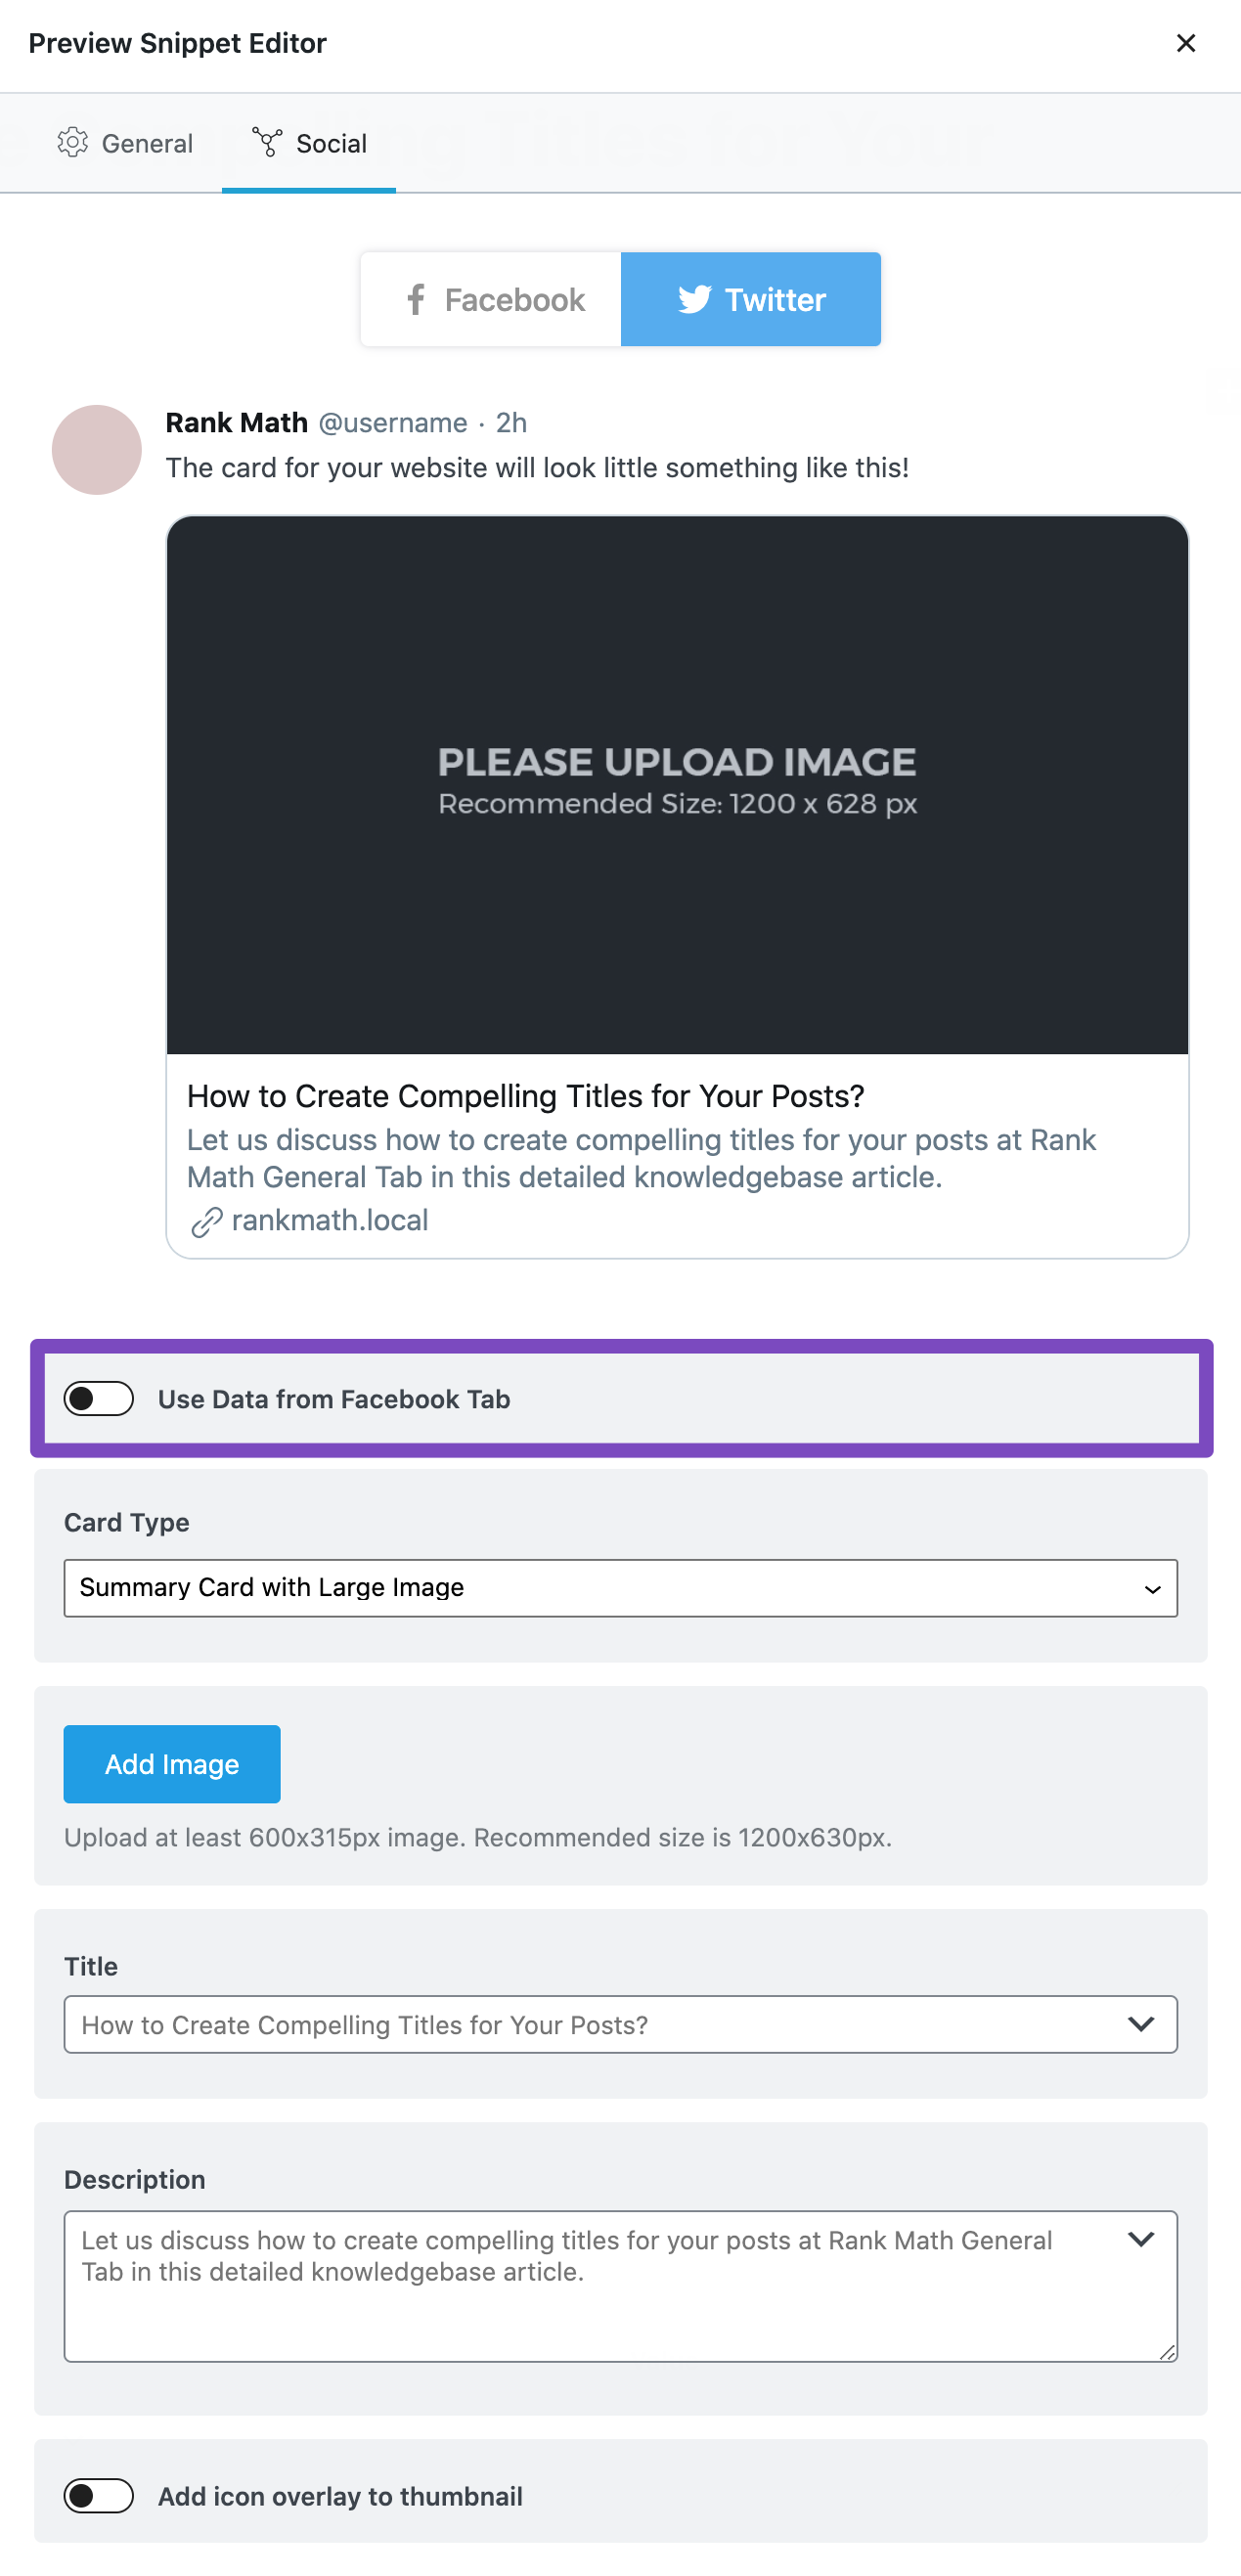
As you can see, you can set the Title, Description, and Image for your tweets. You can also set the additional tags for your sites, such as the author’s Twitter username, Twitter app ID, and many more.
You can learn more about how you can configure each of these options by clicking on Configuring Twitter Sharing Options.
Now let’s move to the important twitter tags.
3.1 Twitter: Title
The twitter:title tag is used to specify the title of your website. This tag is similar to the og:title tag and should be used in the same way.
3.2 Twitter: Description
A description of the content, usually between 150 and 200 characters. While many social sites use the OG description, some (including Twitter) may use their own algorithm to generate a description from the page content. If you want more control over what appears, it’s best to use a metatag.
3.3 Twitter: Image
An image URL that should represent your object within the graph. Do not use a generic image such as your website logo, individual product photos, etc. Images should be at least 1200x630px for best display on high-resolution devices.
3.4 Twitter: Site
The twitter:site tag is used to specify the Twitter username of the website. To configure this, navigate to Rank Math SEO → Titles & Meta → Social Meta and enter the Twitter Username.

3.5 Twitter: Creator
The twitter:creator tag is used to specify the Twitter username of the individual who created the content. The author can add their Twitter Username under Users → Profile inside the WordPress Dashboard.
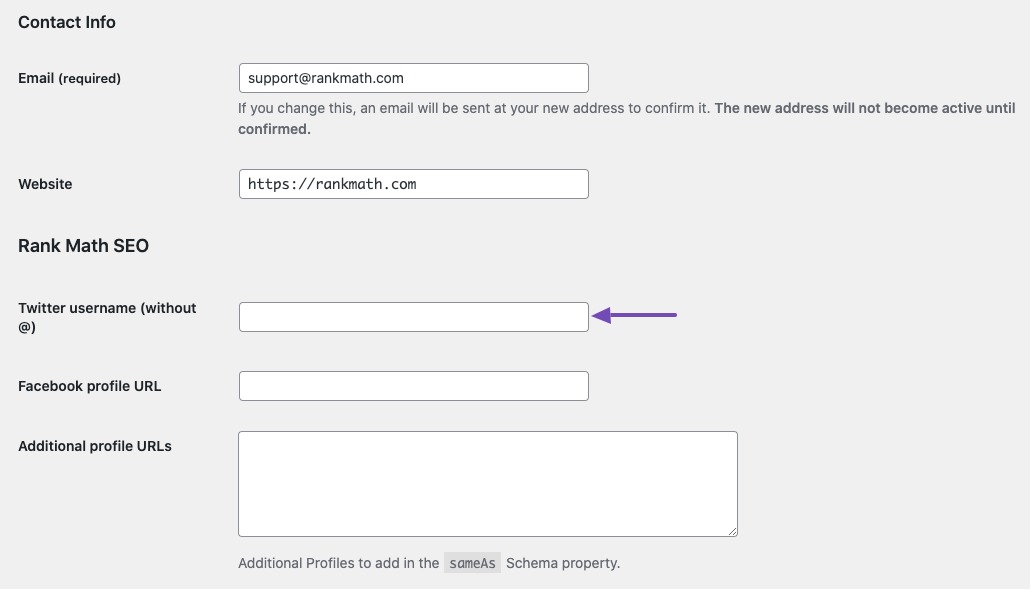
If the author has not configured the Twitter Username, then Rank Math would display the Twitter Username of the site configured under Rank Math SEO → Titles & Meta → Social Meta → Twitter Username.
4 Twitter App Card Tags
Unlike Facebook, Twitter allows many different types of content sharing, each of which is suitable for specific types of content. Twitter calls them cards, and here are all the card types supported in Rank Math.
- Summary Card with Large Image
- Summary Card
- App Card
- Player Card
The Twitter App Card tags are a subset of the Open Graph tags that are specific to Twitter. With Rank Math, you can easily add these Twitter App Card tags to your website. Simply go to the Social tab in the Rank Math plugin and click on the Twitter tab.

There, you’ll see all the Twitter App Card tags that you can add to your website. Simply fill in the information and click on the Save Changes button.
Here’s an image that shows all the options in the App Card.
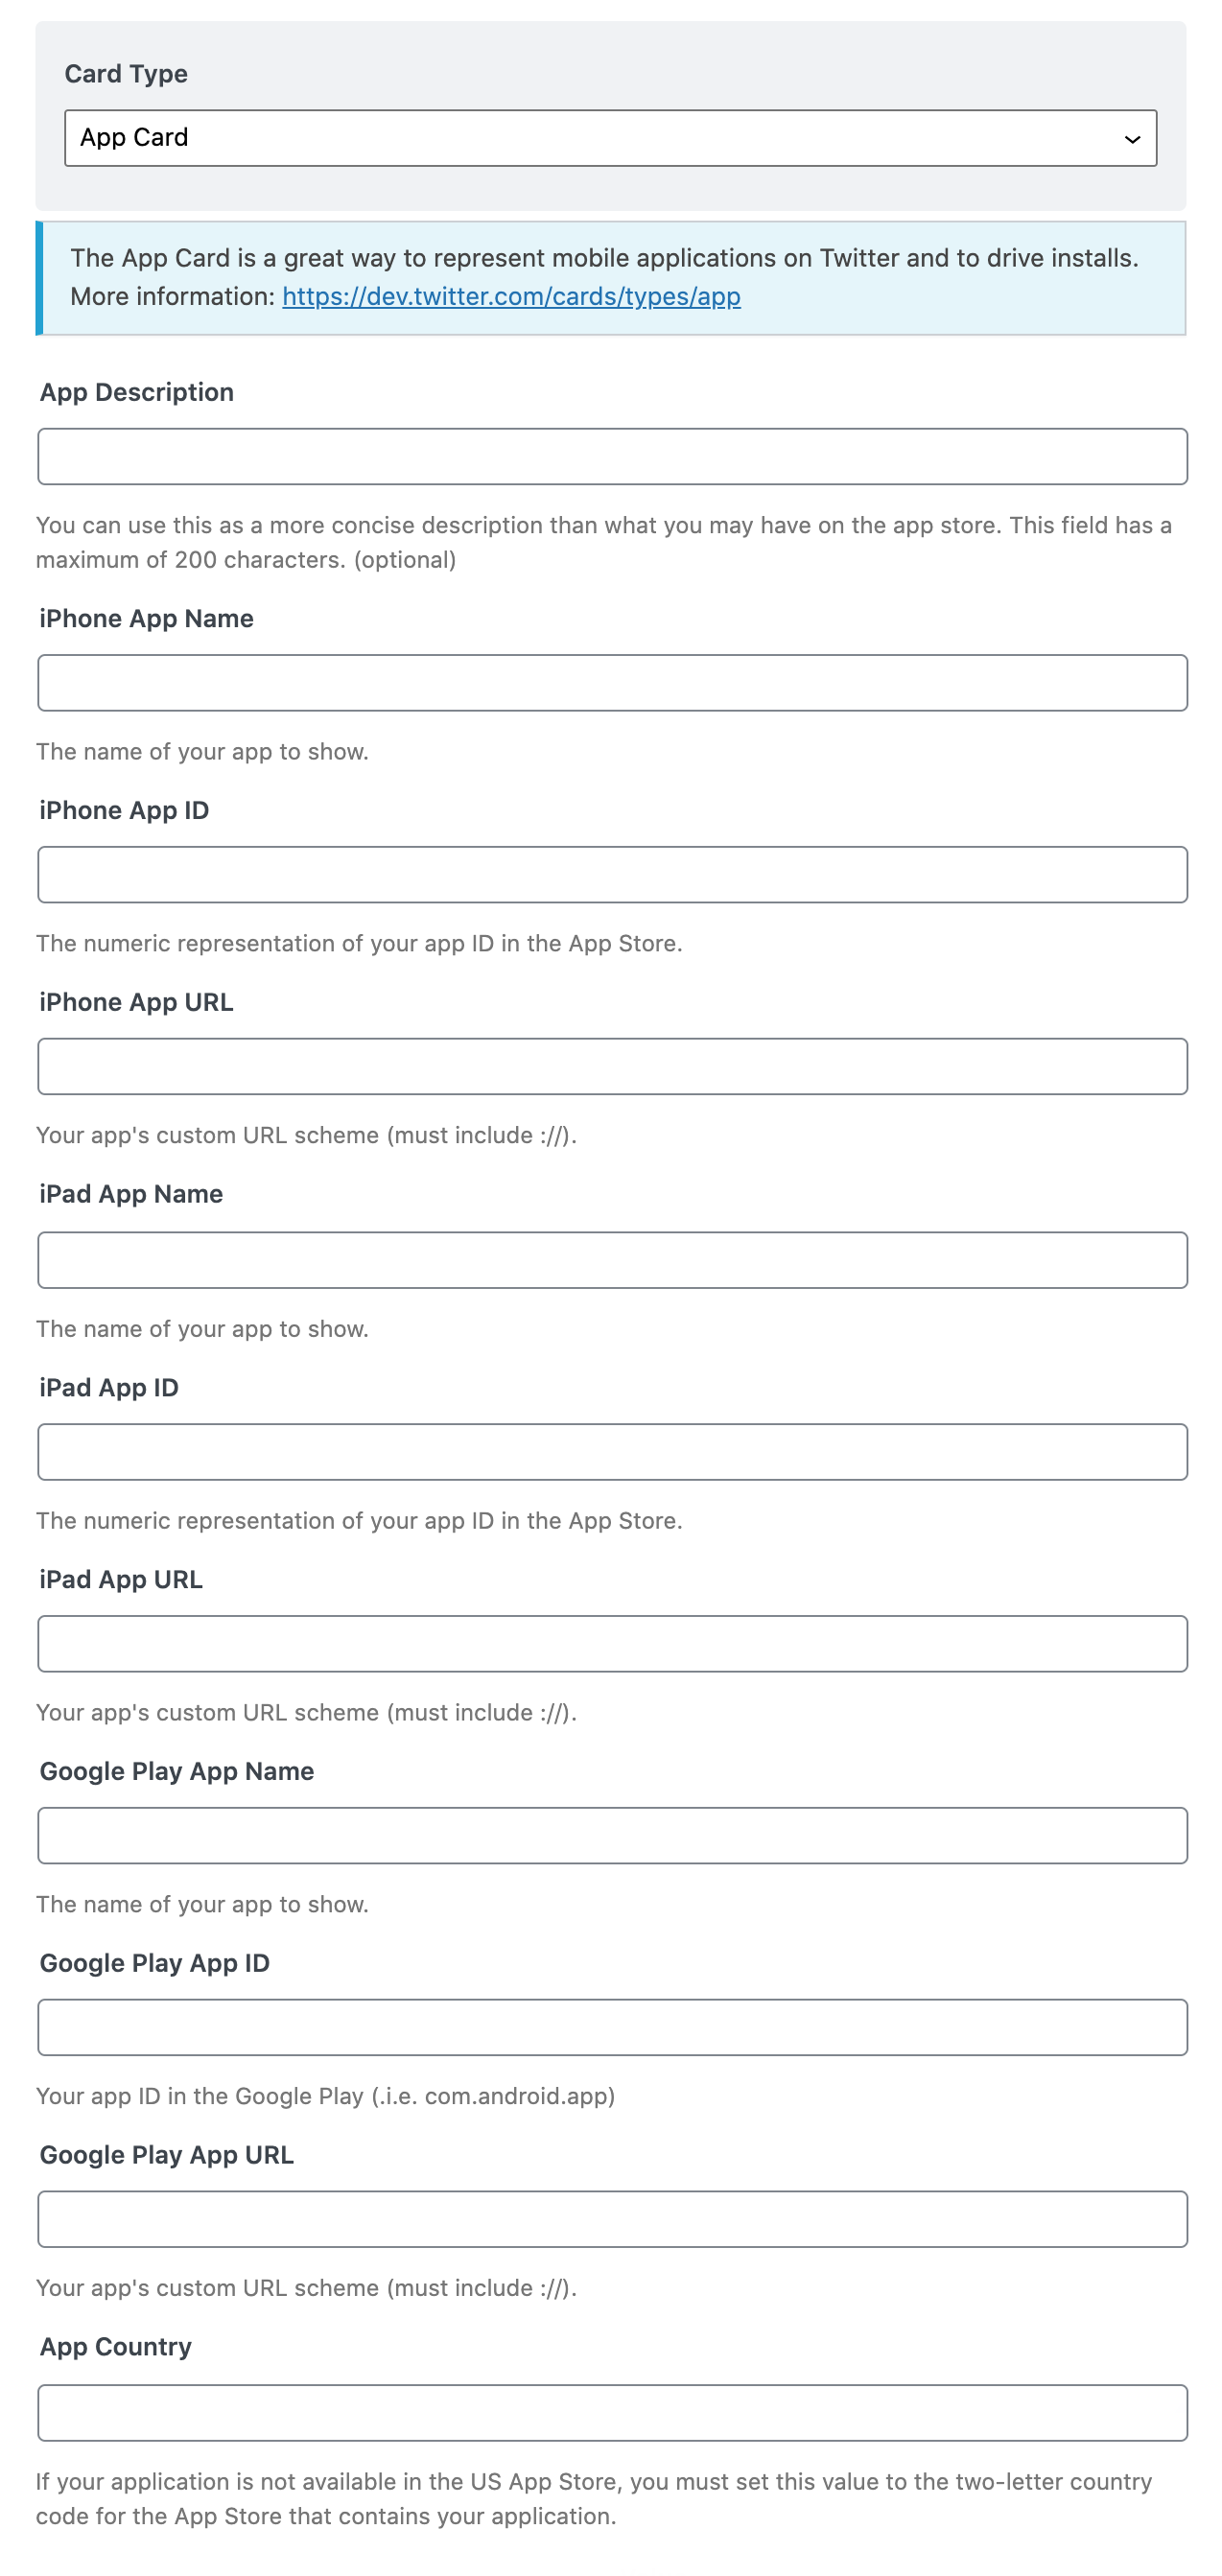
Setting up the App Card is fairly simple and quick, as all you have to do is put in a lot of data. However, there are significant benefits. Your app will be visible to a whole new set of people every time you retweet it, allowing them to install the app with a single click.
Here are the different tags for the App card:
4.1 Twitter:Description
The twitter:description tag is used to describe your website. This description will be shown underneath the website’s name on the Twitter App Card.
4.2 Twitter:App:Country
The twitter:app:country tag is used to specify the country where your app is available. This should be a two-letter ISO 3166-1 country code.
4.3 Twitter:App:Name:iPhone
The twitter:app:name:iphone tag is used to specify the name of your iPhone app.
4.4 Twitter:App:Id:iPhone
The twitter:app:id:iphone tag is used to specify the id of your iPhone app.
4.5 Twitter:App:URL:iPhone
The twitter:app:url:iphone tag is used to specify the URL of your iPhone app.
4.6 Twitter:app:name:iPad
The twitter:app:name:ipad tag is used to specify the name of your iPad app.
4.7 Twitter:App:ID:iPad
The twitter:app:id:ipad tag is used to specify the id of your iPad app.
4.8 Twitter:App:URL:iPad
The twitter:app:url:ipad tag is used to specify the URL of your iPad app.
4.9 Twitter: App: Name: Googleplay
The twitter:app:name:googleplay tag is used to specify the name of your Android app.
4.10 Twitter:App:ID:Googleplay
The twitter:app:id:googleplay tag is used to specify the id of your Android app.
4.11 Twitter:App:URL:Googleplay
The twitter:app:url:googleplay tag is used to specify the URL of your Android app.
If you’d like to learn more about the App Card, you can refer to Twitter’s official documentation.
5 Twitter Player Card Tags
The Twitter Player Card tags allow you to embed rich media content in your tweets, such as audio and video files.
The main benefit of using the Player card is that when people see a Player card in their timeline, they are more likely to click and watch the embedded content. This is because the player card is visually more appealing than a regular tweet with a link.
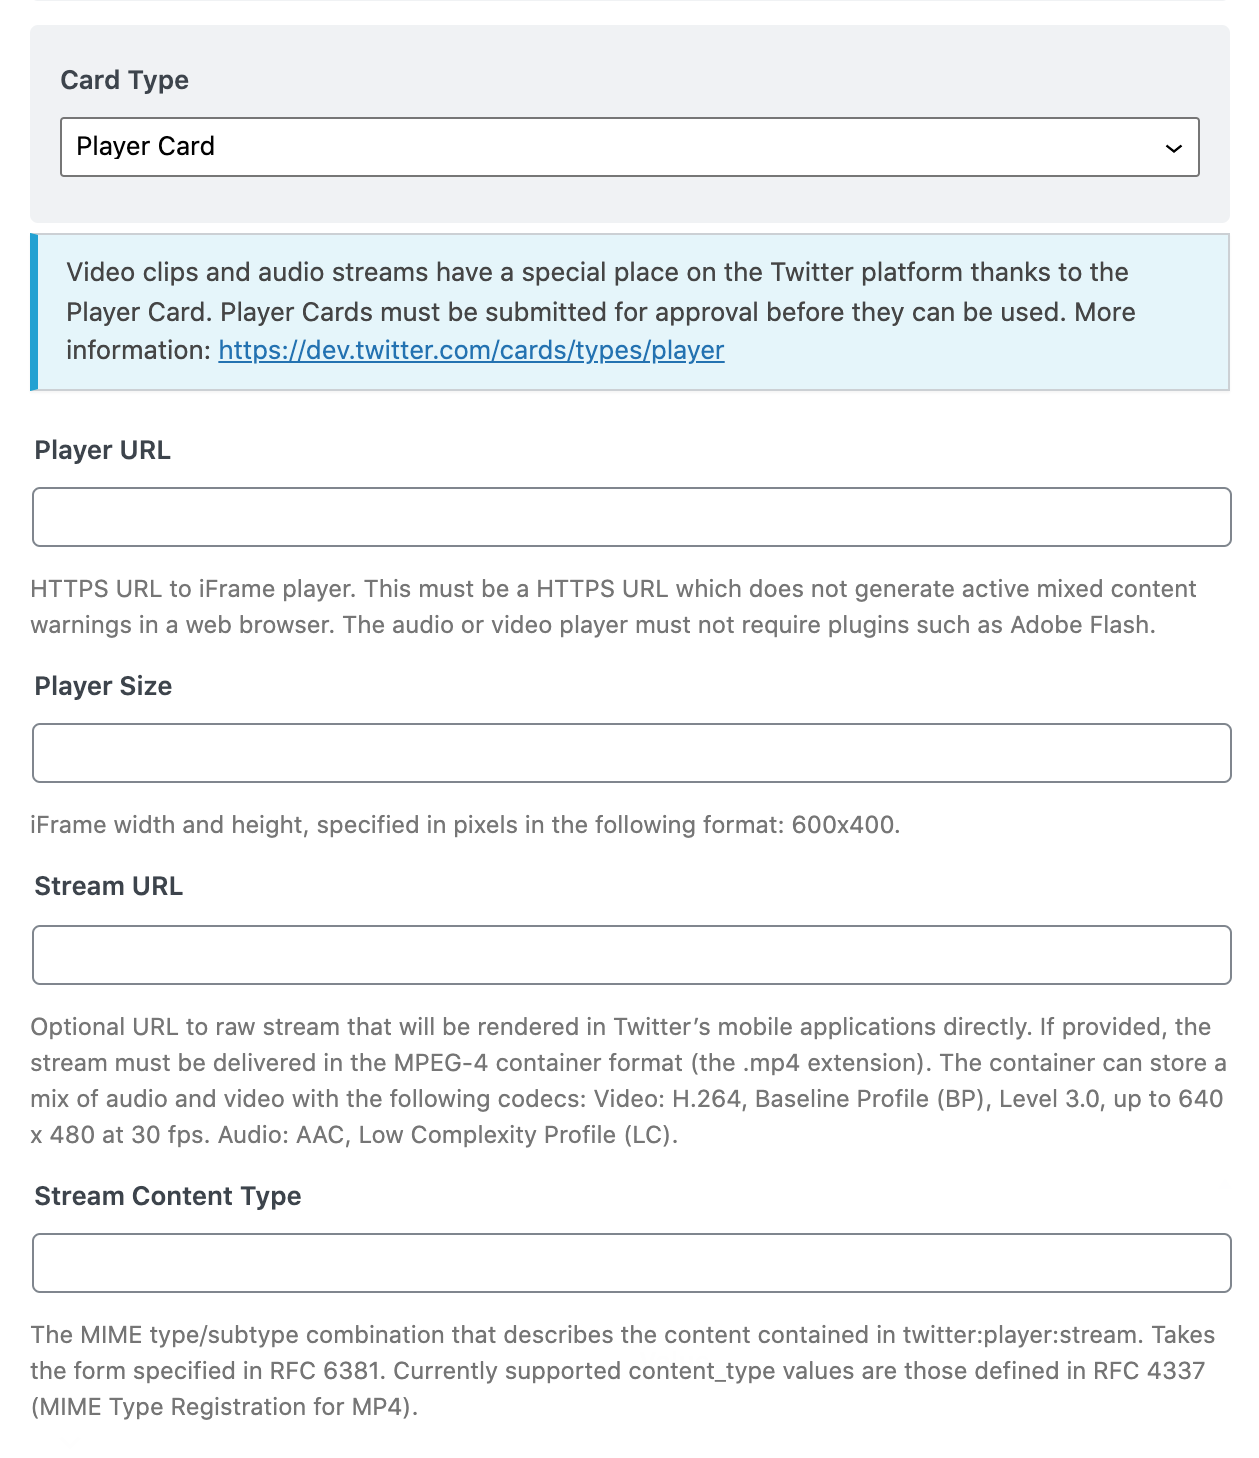
The most important Twitter Player Card tags are:
5.1 Twitter:Player
The twitter:player tag is used to specify the URL of the player that will be used to play the audio or video file.
5.2 Twitter:Player:Width
The twitter:player:width tag is used to specify the width of the player in pixels.
5.3 Twitter:Player:Height
The twitter:player:height tag specifies the height, in pixels, of the media player.
5.4 Twitter:Player:Stream
The twitter:player:stream tag allows you to provide a direct link to an audio/video file that can be played in Twitter’s native media player. This is especially useful for long-form content, like podcasts or video series.
5.5 Twitter:Player:Stream:Content_Type
The twitter:player:stream:content_type tag is used to specify the content type of the audio or video file. This should be set to “video/mp4” for MP4 files or “audio/MPEG” for MP3 files.
6 Yandex Video Tags PRO
These tags are used to help Yandex understand the content of a video, and to match it with other relevant videos.
Note: These tags are added only in the PRO version of Rank Math. If you want to use them, upgrade now!
6.1 Ya:Ovs:Adult
This tag indicates that your video is not suitable for children under the age of 18 and helps the search engine understand the content is not appropriate for all ages.
6.2 Ya:Ovs:Upload_Date
This tag includes the date at which your video has been uploaded.
6.3 Ya:Ovs:Allow_Embed
This tag indicates where your video can be shown on Yandex search result pages.
7 Product-Based OG Tag
If you’re running an eCommerce store, then you’ll want to make sure that your Open Graph meta tags are correctly configured. Open Graph tags provide information about your products that is used when your pages are shared on social networking sites like Facebook and Twitter.
This information can include the product name, price, description, currency, and more. By configuring these tags correctly, you can ensure that your products are accurately represented when they’re shared on social media.
There are several different open graph meta tags that you can use to make your website or product easier to find. Each tag provides additional information about your site or product, helping to improve its visibility. Rank Math makes it easier for you by picking up these data based on what you’ve configured for WooCommerce Product Schema.
Some of the Open Graph Tags for Product Schema include:
7.1 Product: Retailer_Item_Id PRO
This tag is used to specify the unique identifier for your product. This is useful for when you have multiple products with the same name but different variants, such as different sizes or colors.
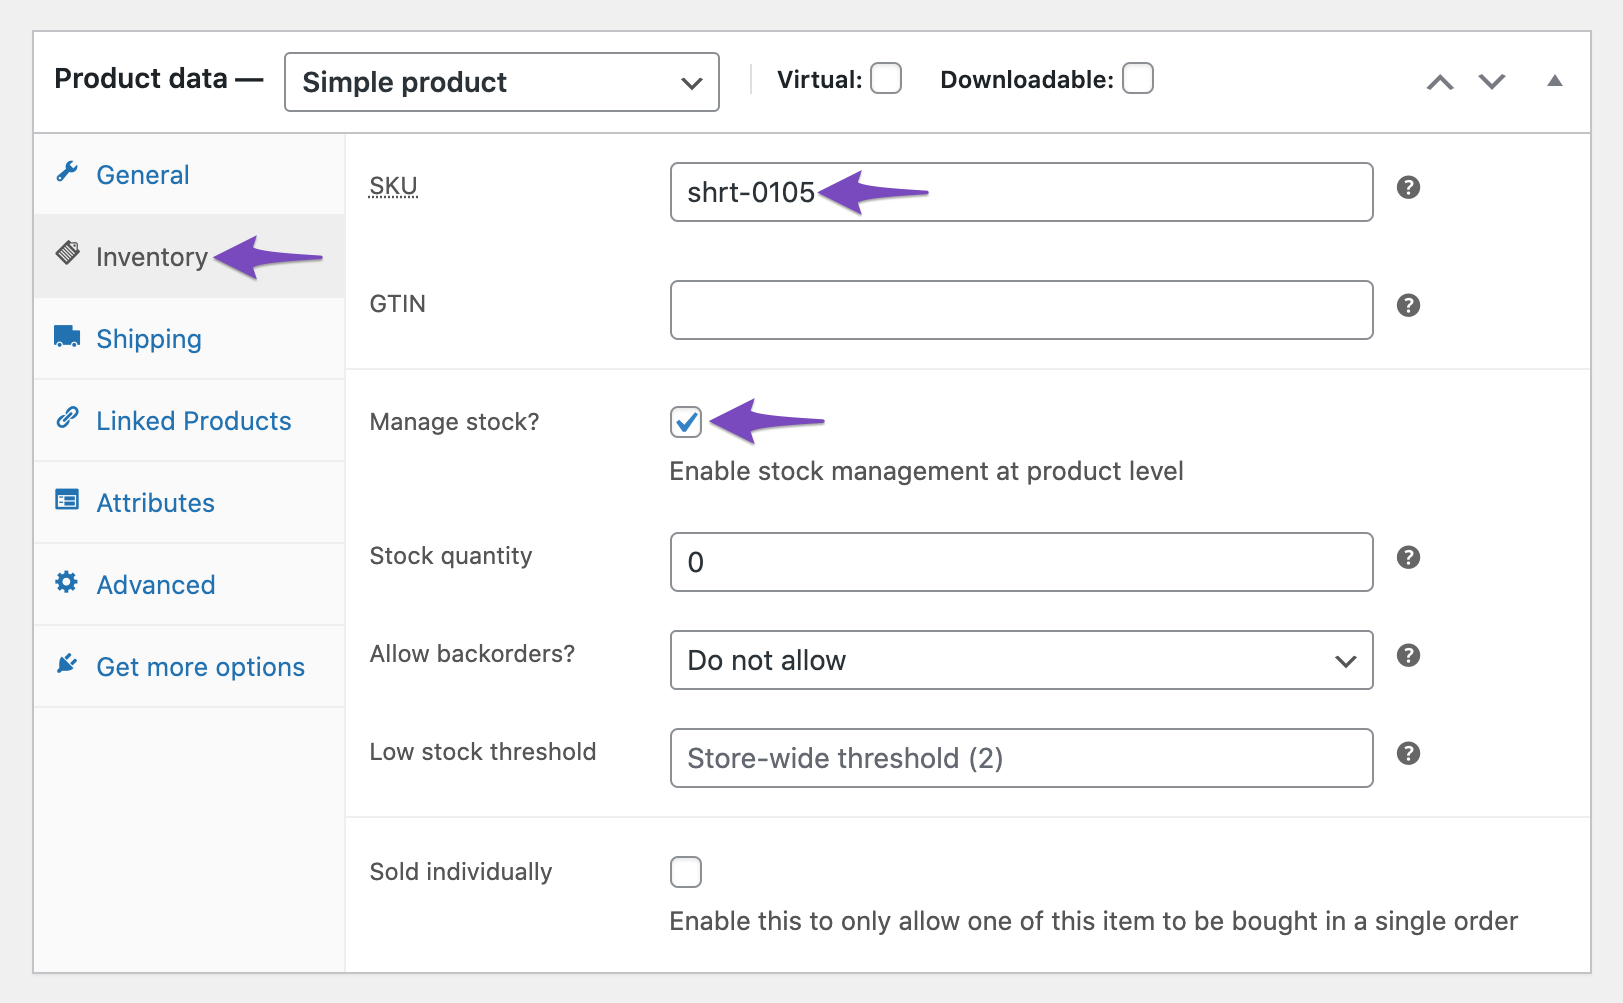
Rank Math uses the SKU that you’ve configured for the product when you have the Manage Stock option selected.
7.2 Product: Brand
The product:brand meta tag includes the brand name of the product you’re selling. Rank Math includes this brand name based on what you’ve configured under Rank Math SEO → General Settings → WooCommerce → Select Brand.

7.3 Product: Price: Amount
This particular meta tag product:price:amount displays the price at which the product is available for sale. This price is the same as what is configured for the Offer Price in the Product Schema.
7.4 Product: Price: Currency
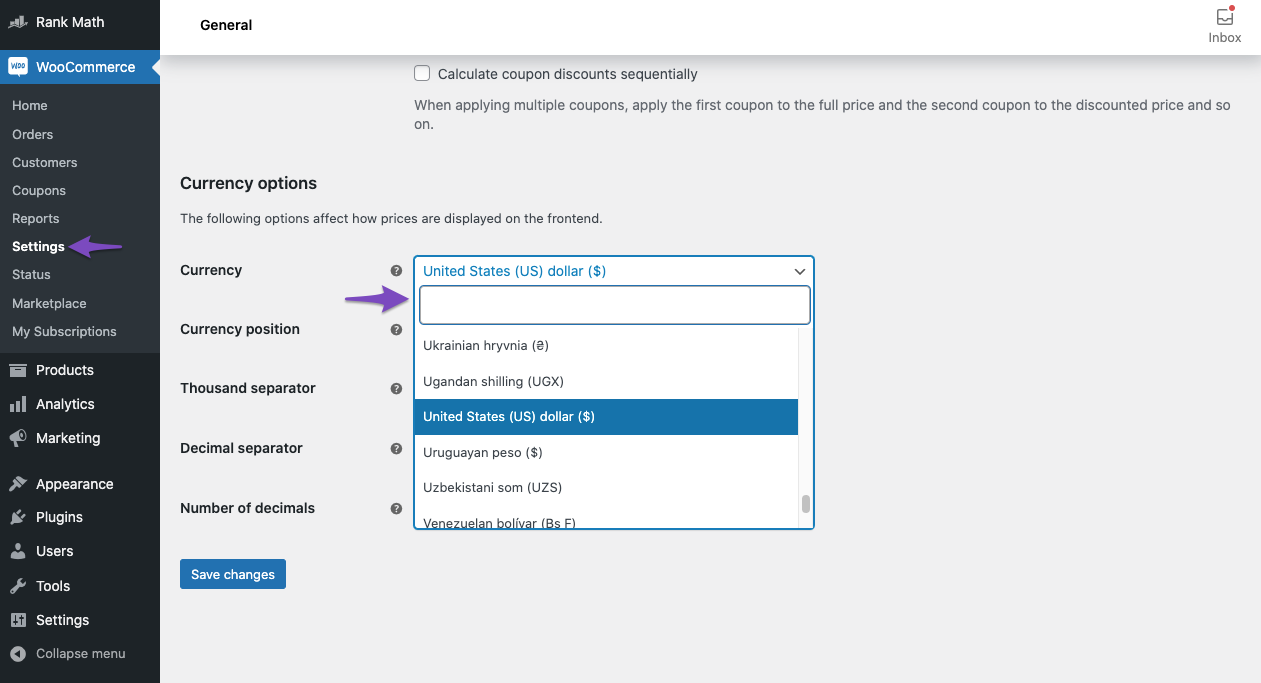
The meta tag product:price:currency shows the currency in which you are selling the product. By default, it will be set in $ (USD). If you want to change it navigate to WooCommerce → Settings → General, scroll down and change it under Currency options.
7.5 Product: Availability
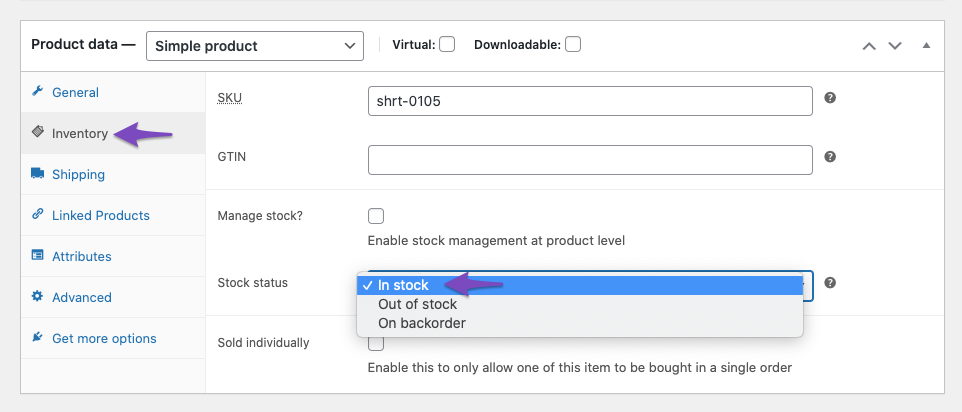
The product:availability meta tag displays the stock status that you have configured previously in the Inventory tab of Product data. The available stock statuses include In stock, Out of stock, and On backorder.
8 Setting Up Default Open Graph Image Using Rank Math
The order of hierarchy of the image selected for your Open Graph/Social Preview image is as follows.
- The OpenGraph image
- The featured image
- The first image in the post
- The default OpenGraph thumbnail
To set a custom Open Graph/Social Preview image, open Rank Math in the WordPress Block Editor sidebar and upload one through the Social tab, as shown below:
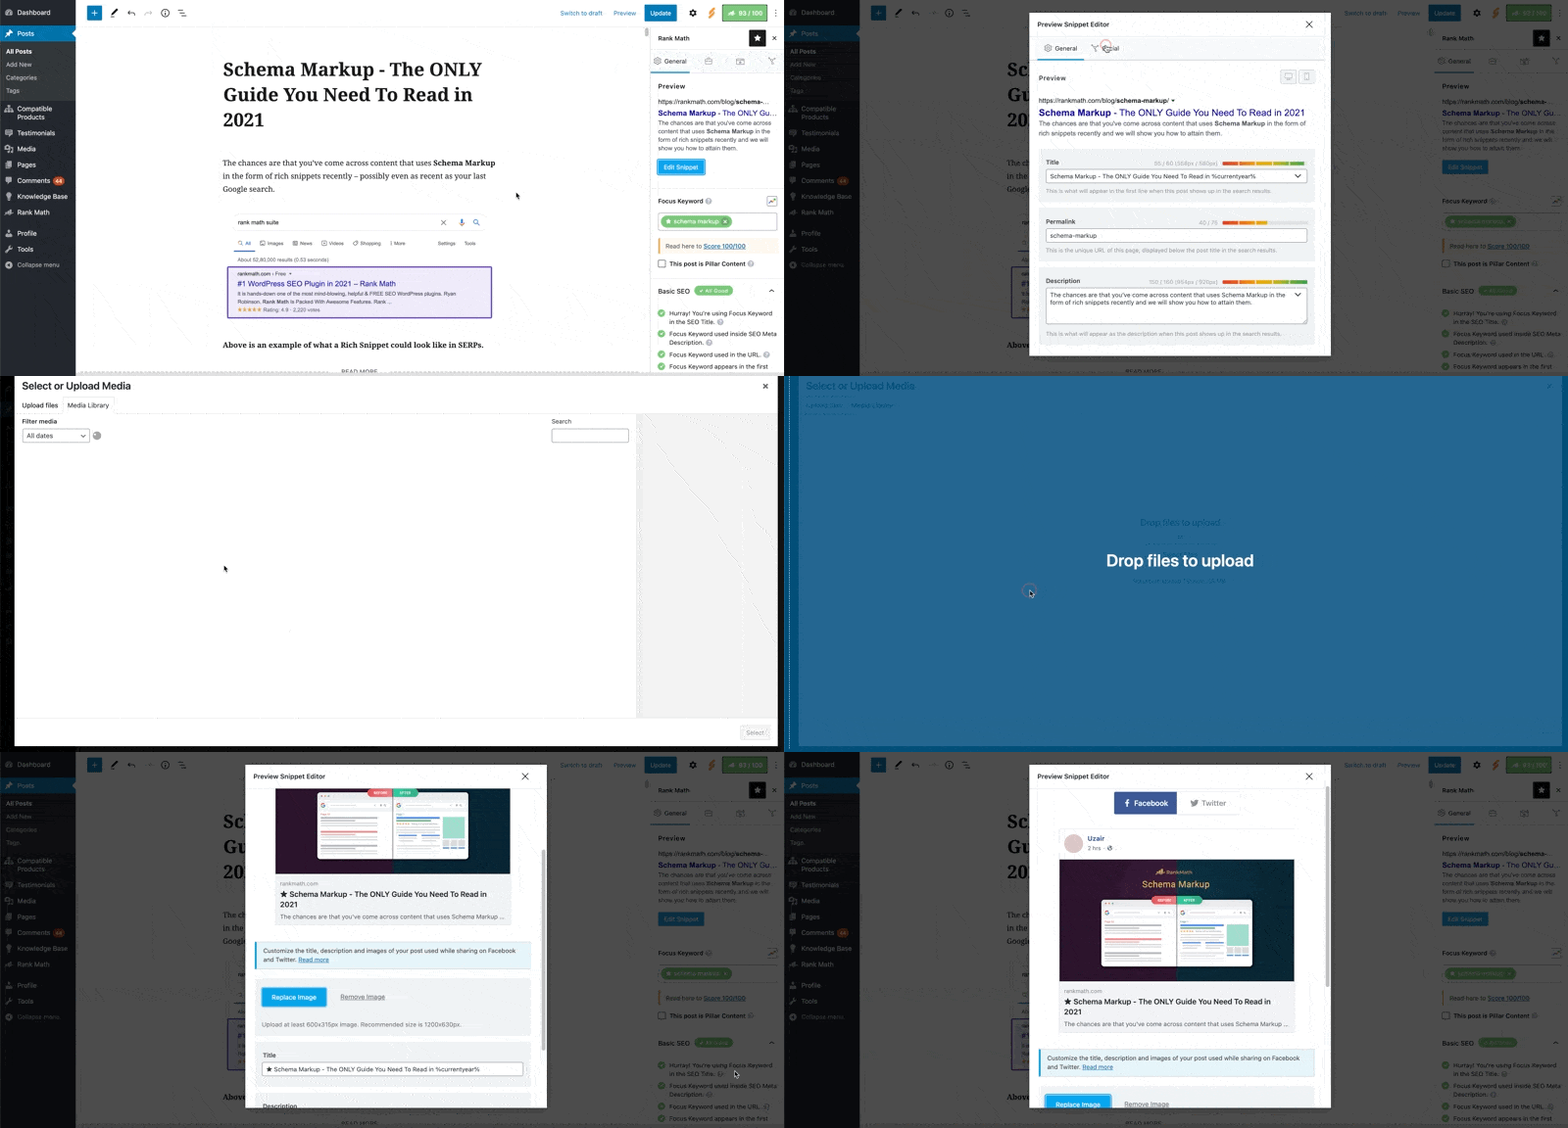
With that said, you can set a featured image by heading to the individual post/page settings and uploading a featured image, as shown below:
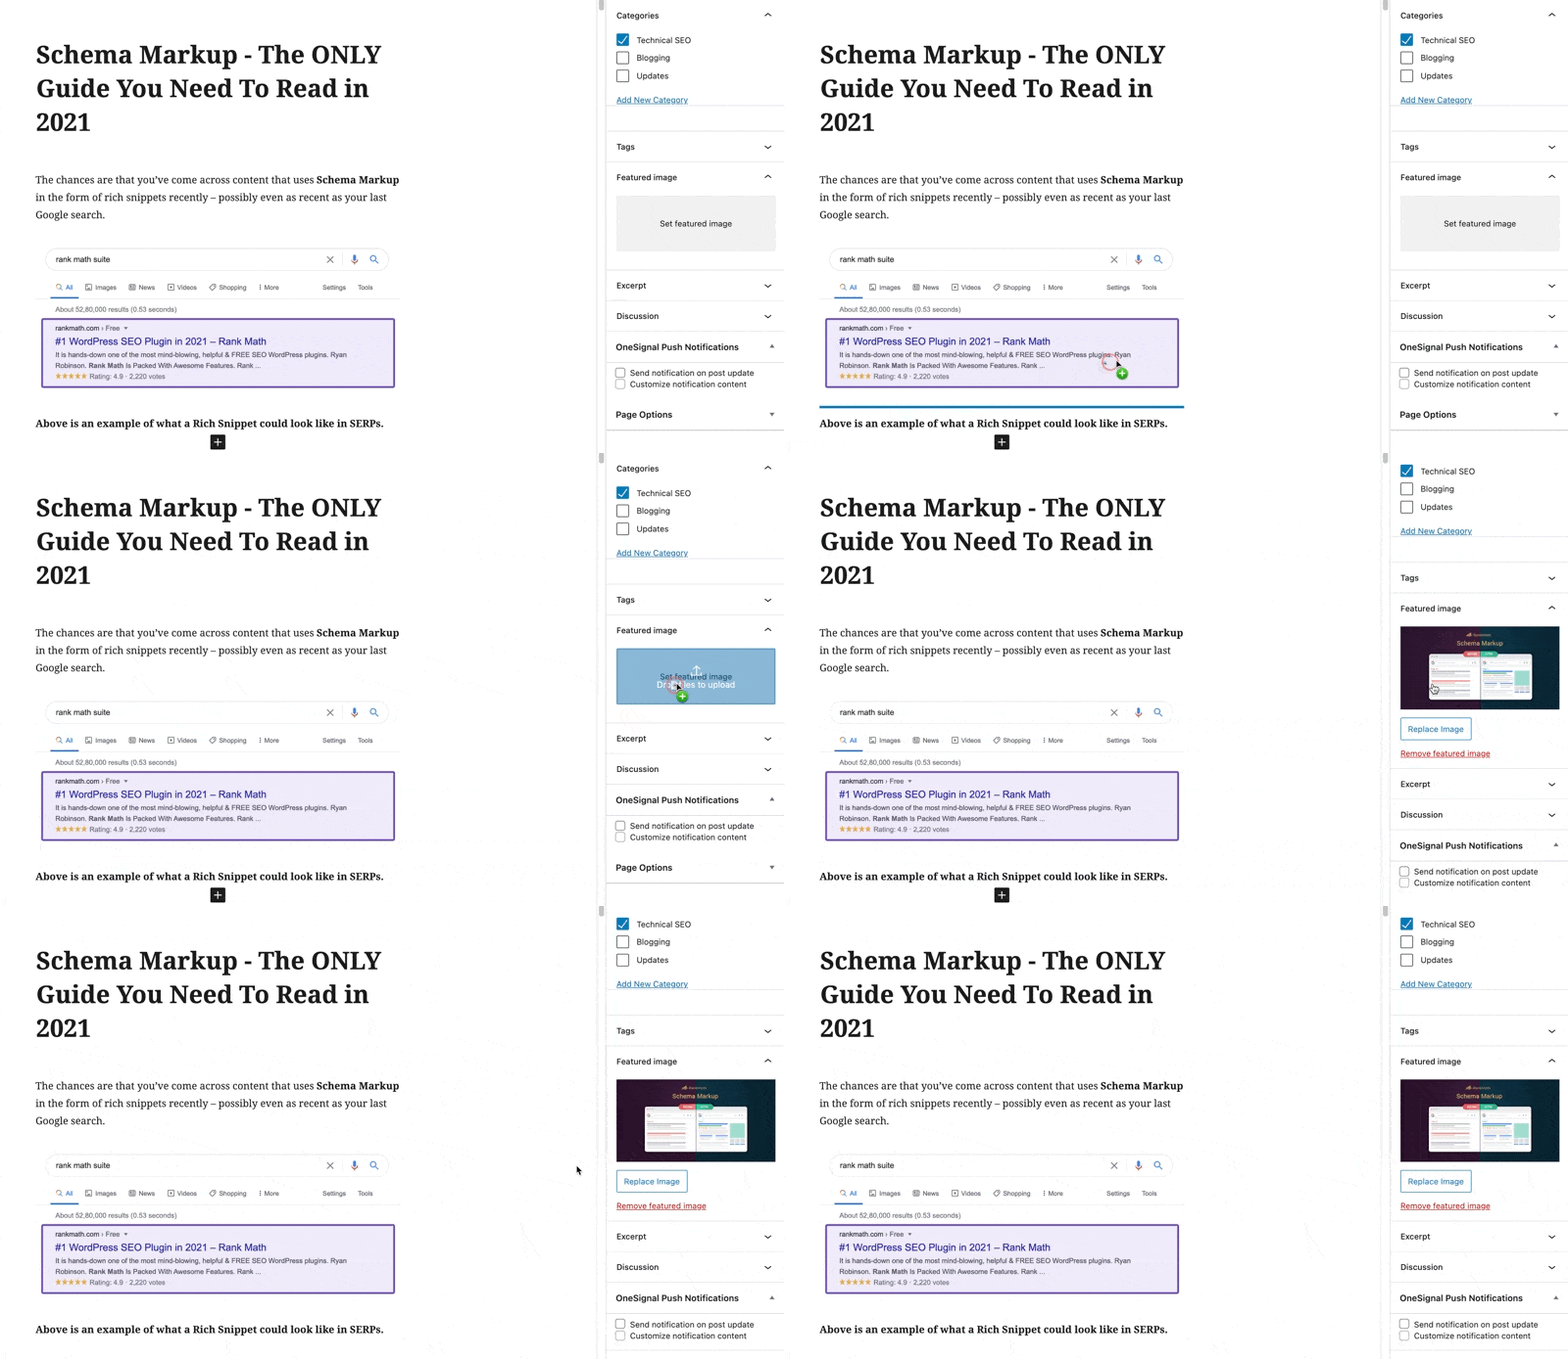
The default OpenGraph thumbnail is your final fallback. You can set it by navigating to Rank Math SEO → Titles & Meta → Global Meta → OpenGraph Thumbnail. Once done, upload the image that you want to use as your default Open Graph image and click on the Save Changes button.
Important Note: Please ensure that the OpenGraph thumbnail that you’ve set is of the recommended dimensions (1200px X 630px), and of the supported image types (jpeg, png, and gif) as per Opengraph Standards.

If you wish to override the first image in the post with the default OpenGraph thumbnail, then you can use the below filter to do that.
//Override the first image in the post and make the default OpenGraph thumbnail the Open Graph/Social Preview image.

add_filter('rank_math/opengraph/pre_set_content_image', function() {
	return true;
});
9 Set Open Graph Image for Homepage Using Rank Math
While the previous method lets you set a default Open Graph Thumbnail for all pages on your website, Rank Math includes a dedicated option to set the Open Graph Thumbnail for your homepage.
Start by checking what is your homepage set to display under Settings → Reading → Your homepage displays.

If your homepage is set to display Your latest posts, then you can change the homepage Open Graph thumbnail under Rank Math SEO → Titles & Meta → Homepage → Homepage Thumbnail for Facebook.

In case an individual page is set as a homepage, then you can edit the page in WordPress Editor and set the Open Graph thumbnail in Rank Math Metabox of that page, as shown in the previous section.
10 Conclusion
And that’s it! We hope this guide helped you understand how to use open graph meta tags with Rank Math. If you still have absolutely any questions, please feel free to reach our support team directly from here, and we’re always here to help.