Have you ever visited a website like an e-commerce platform, web hosting site, or news portal where additional menu options appear when you hover over or click on a main menu item?
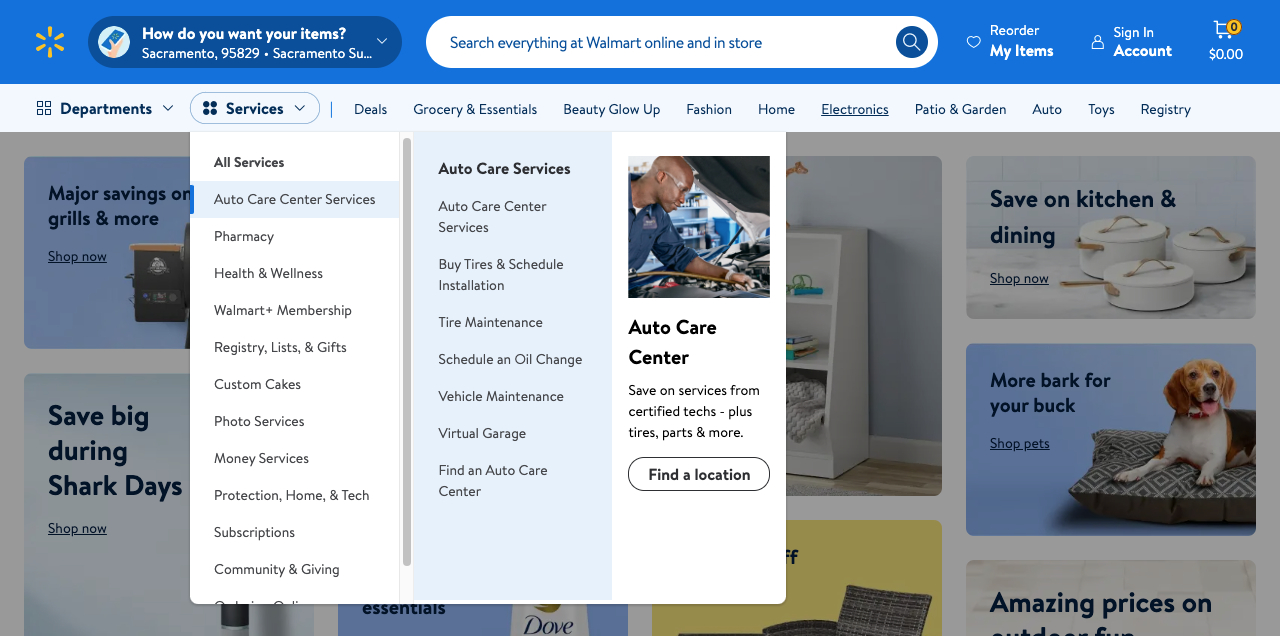
These dropdown menus are usually visually appealing, based on the site’s design, and provide quick access to relevant pages or posts. Sometimes, they even feature icons, animations, or tags alongside the menu items.
In this post, we’ll discuss adding a dropdown menu to your WordPress site. While dropdown menus commonly appear in the main top menu, you can also display them elsewhere on your page.
So, without further ado, let’s get started.
Table Of Contents
1 What is a Dropdown Menu in WordPress?
Your website most likely already has a menu containing links or menu items for pages, posts, categories, or custom links that might direct visitors elsewhere. However, a dropdown menu serves a distinct purpose.
A dropdown menu, also known as a sub-menu in WordPress, is a navigation element that reveals additional links or options when hovering over or clicking a parent menu item.
You can utilize dropdown menus to showcase subcategories or extra pages within a specific section of your site.
For instance, if you own an online electronics store with “Gadgets” as a primary menu item, adding a dropdown menu allows you to include subcategory products like smartphones, laptops, tablets, and more. Depending on your theme and layout, you can display dropdown menu items in the website’s header, sidebar, or footer.
2 Why Add Dropdown Menus to Your Website?
Adding dropdown menus to your website offers more than displaying additional links or subcategories. It’s about improving user experience.
Think about how convenient it is for your visitors to navigate through different sections without the hassle of searching or waiting for pages to be indexed by search engines.
Imagine cramming all your website pages or product categories into the main menu. It’s not efficient and can slow down your website.
Instead, choose dropdown menus for each category to keep things organized and user-friendly.
For instance, if you operate a news website, consider how a dropdown menu can help users easily find the latest or most popular content. This feature encourages visitors to explore, spend more time on your site, and return for updates.
3 Methods to Create Dropdown Menus in WordPress
There are various ways to create a dropdown menu in WordPress. The most common approach utilizes the built-in WordPress menu system, but you can also use the Customizer, the full-site editor, or a plugin.
3.1 Creating a Dropdown Menu Using the Built-in WordPress Menu System
While creating a dropdown menu might seem tricky if you’re only familiar with simple menus, you can absolutely leverage WordPress’ default menu system.
First, you’ll need categories, subcategories, posts, pages, or custom links to populate your dropdown menu. If you haven’t already, create them.
Next, log into your WordPress dashboard and go to Appearance → Menus. Here, you’ll see existing menu items, structures, and settings.
Click on the create a new menu link if you don’t have one yet.
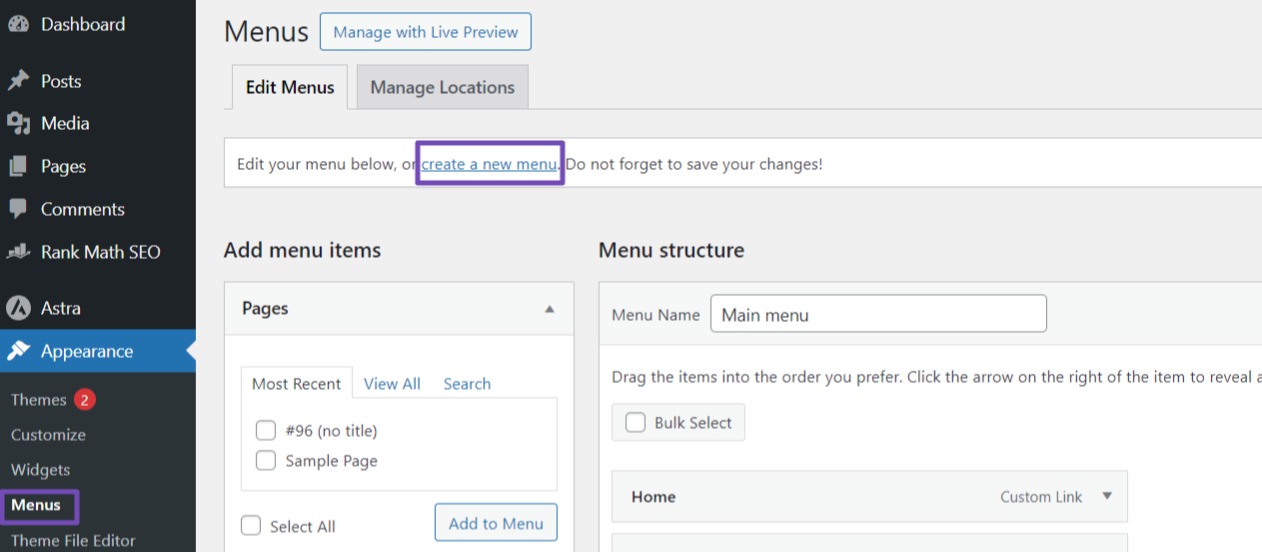
Note: If Appearance → Editor is visible, your theme has Full Site Editing (FSE) enabled. Skip ahead to the FSE method below. Then, name your menu, select its location, and click the Create Menu button.
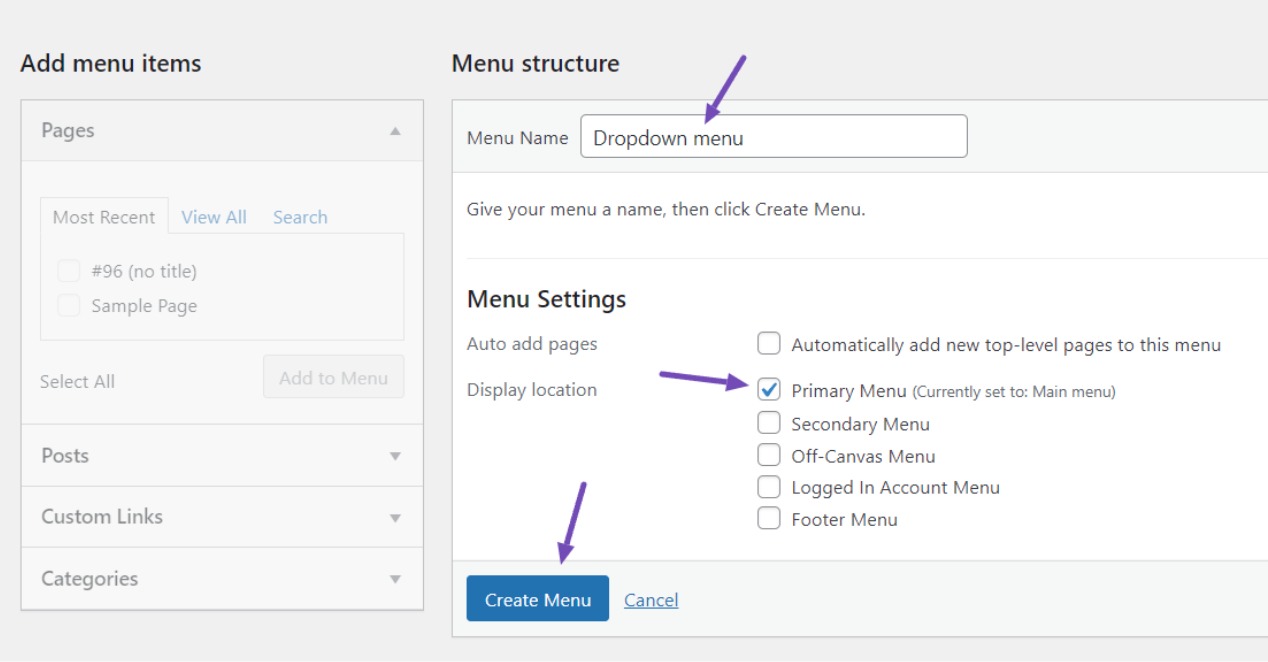
Once created, you’ll reach the menu page. Look at the left column’s Add Menu Items section with pages, categories, posts, and custom links.
Toggle their arrows and check any parent menu items you want to use, then click the Add to Menu button.

Those will now appear under Menu structure in the right column. You can also add blog posts, categories, or custom parent menu links here.
Adding Sub-Items to a Menu
With the parent menu created, it’s time to add the dropdown menu items.
Use the same method in the left column to select pages, posts, or categories you want as sub-items.
By default, they’ll appear under existing structure items in the right column. To create the dropdown, simply drag and drop sub-items underneath their corresponding parents.
Here’s how:

You can repeat this process for every dropdown sub-item you want to show.
Once done, click the Save Menu button to make your dropdown menu live.
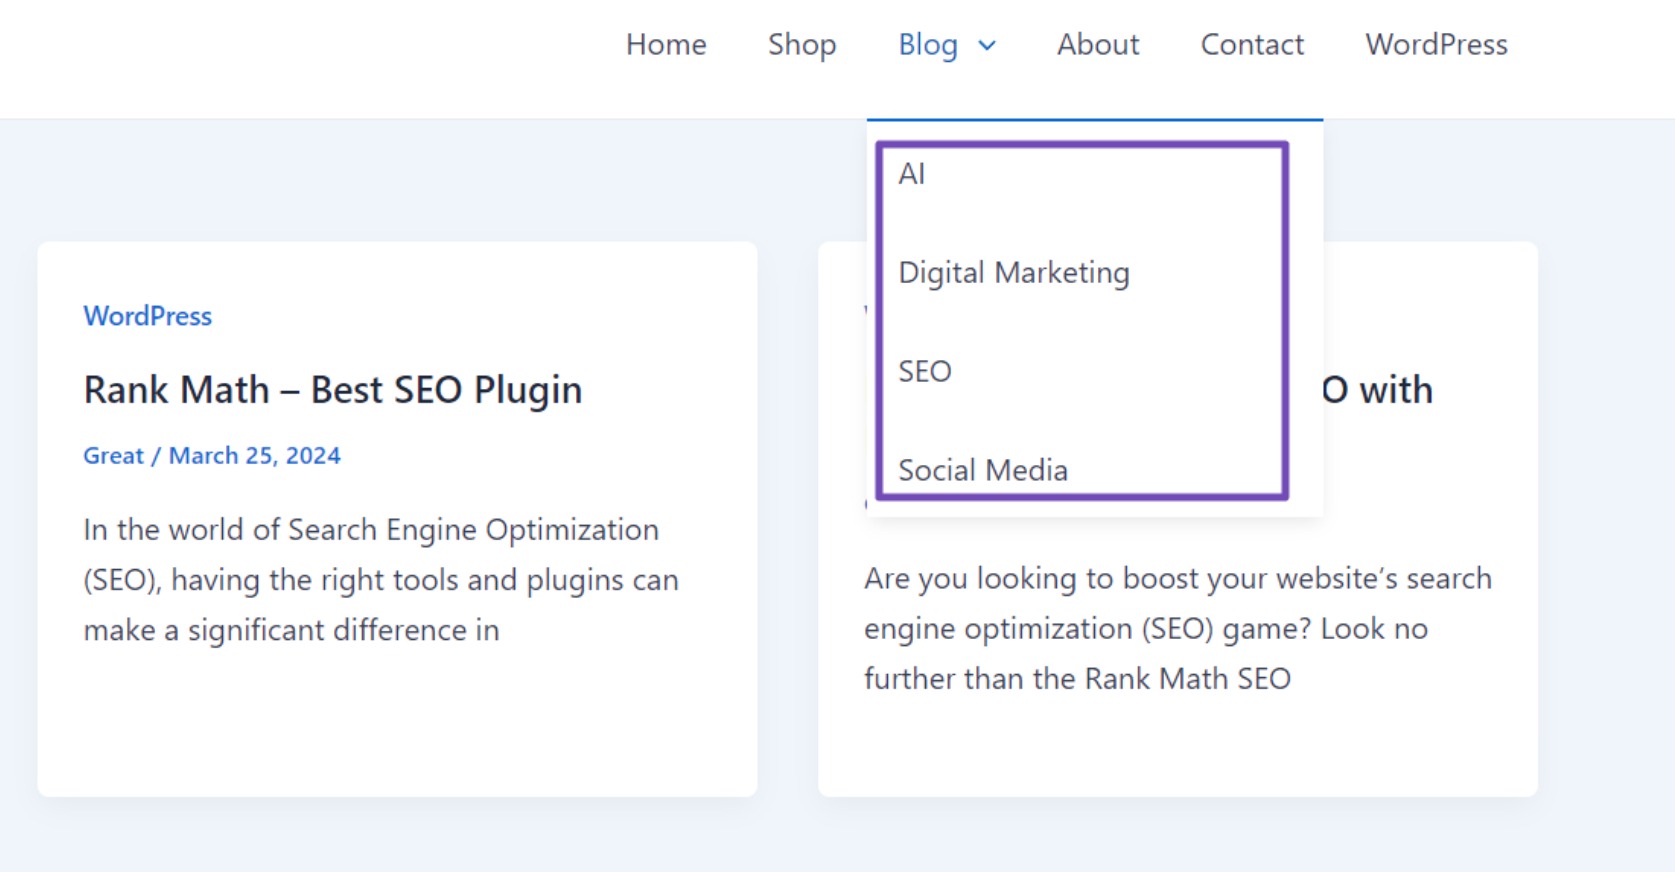
3.2 Creating a Dropdown Menu Using the WordPress Customizer
This method is similar to the built-in menu system, but it has the added benefit of a live preview, which allows you to see how the menu items you’ve added or removed will look on your website.
Log into your WordPress dashboard and go to Appearance → Customize. This will take you to the customization screen. Look for the Menus option and click on it.
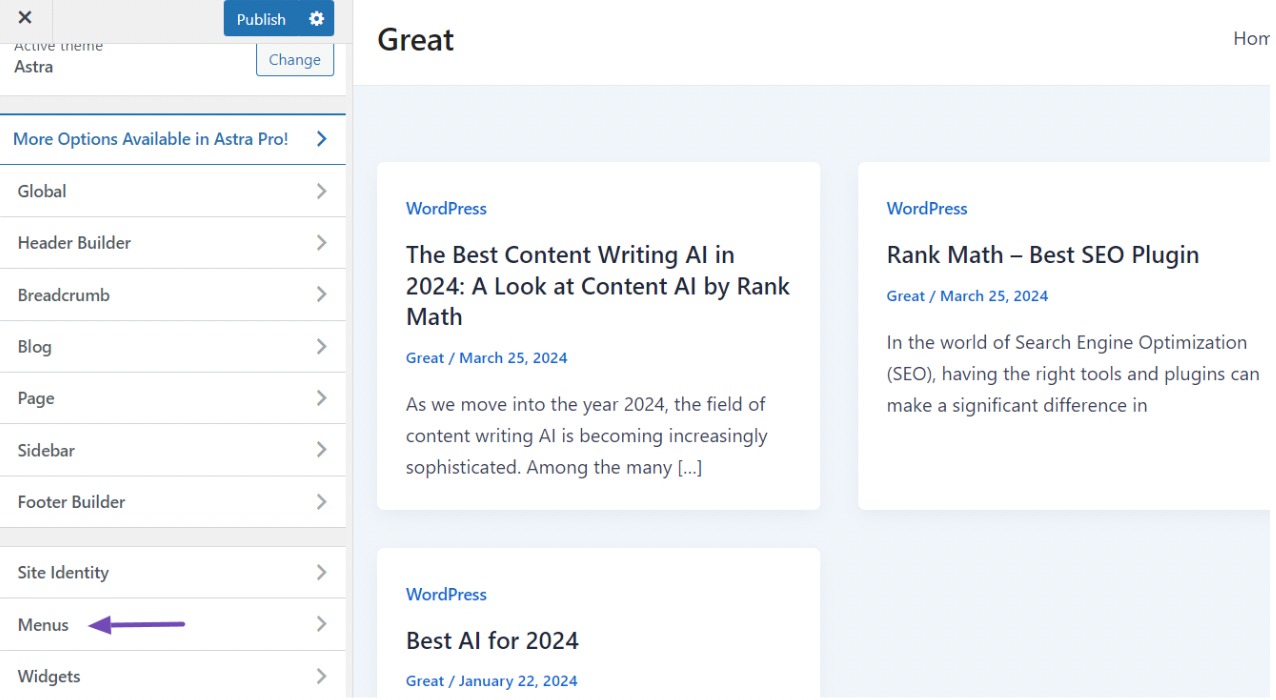
You’ll see any menus you’ve already created. If you haven’t made one yet, click the Create New Menu button.
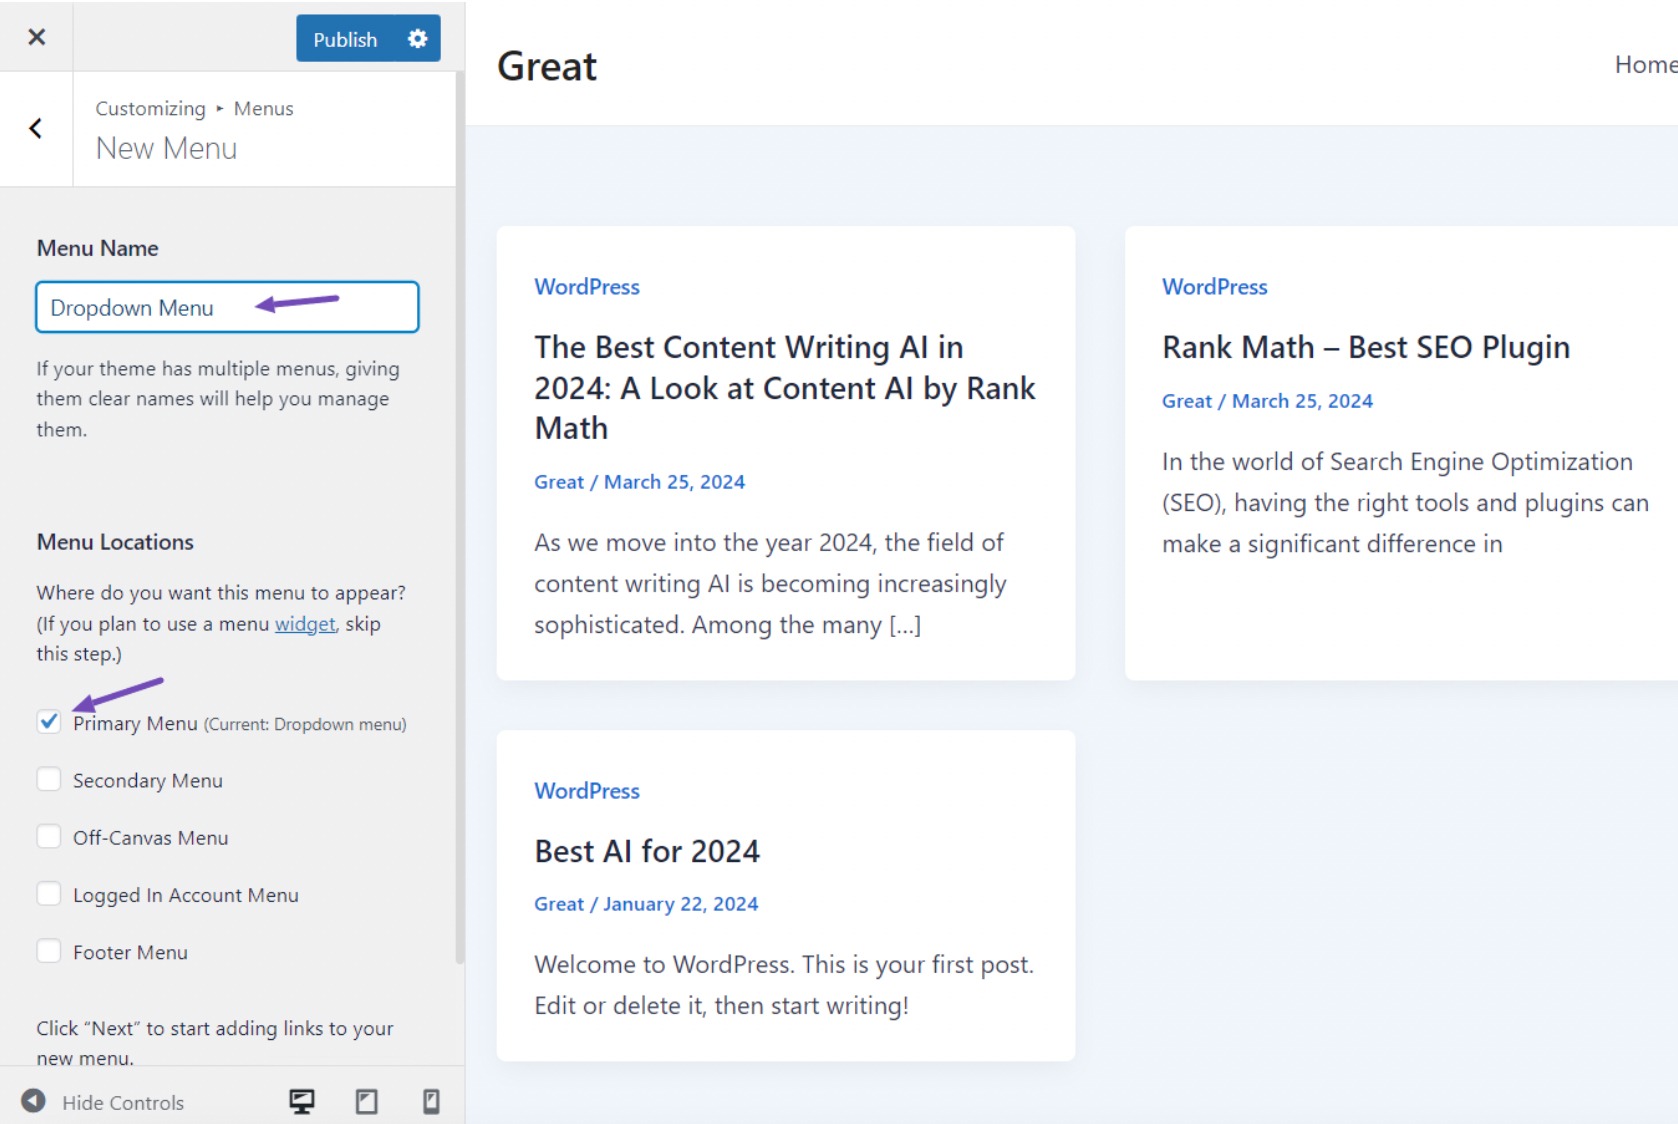
Next, enter a name and select the menu’s location. For your main site menu, choose Primary Menu as the location. Then scroll down and click the Next button.
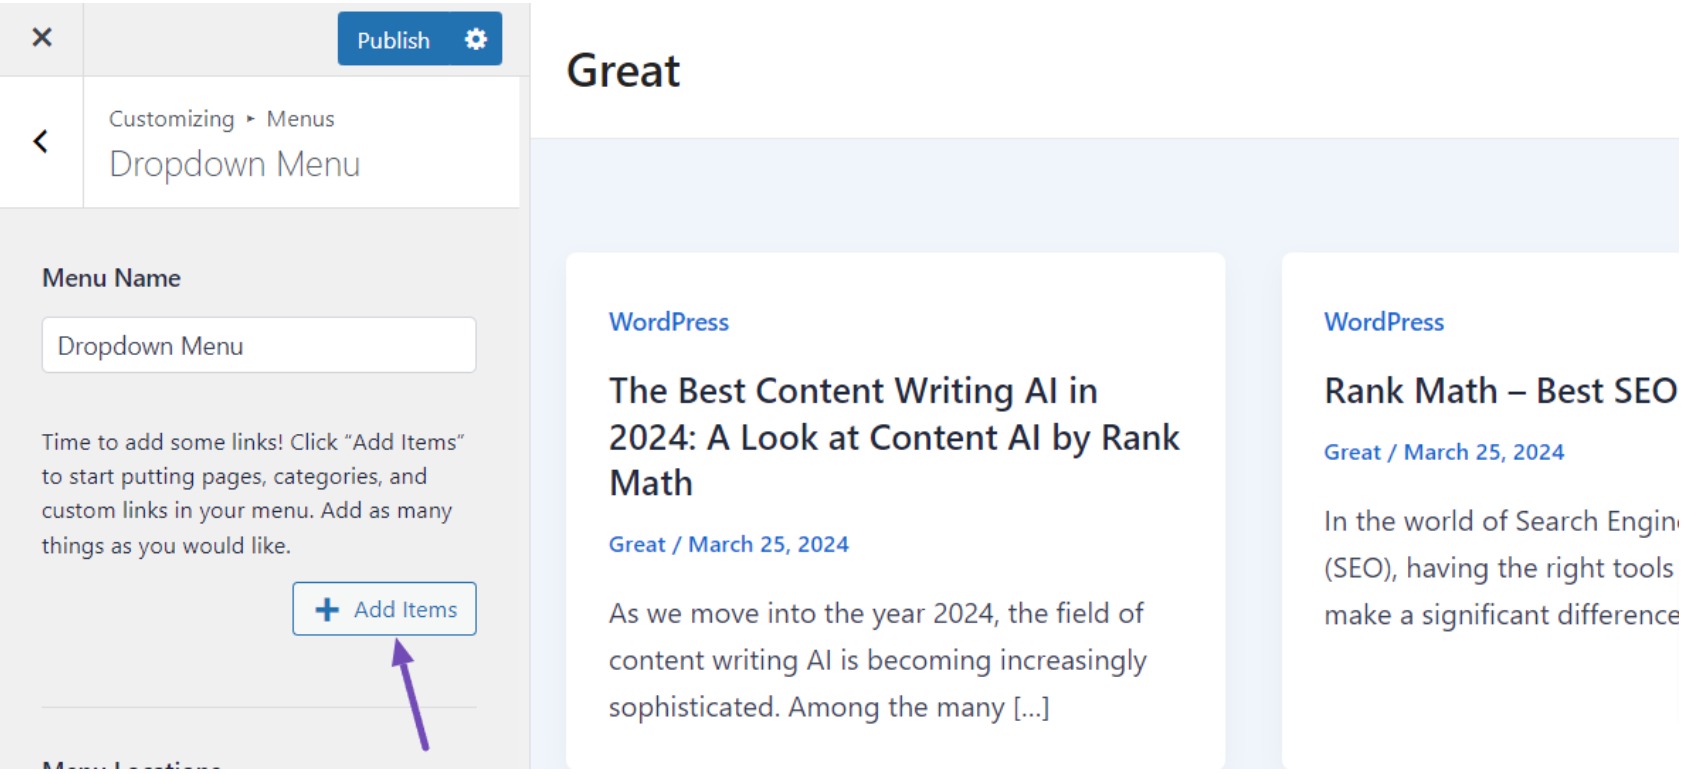
You’ll be redirected to add menu items. Click the + Add Items button to slide out the menu items section on the right.
Then, toggle down the arrows and click the + icon next to any items you want to add, including posts, custom links, categories, and tags.
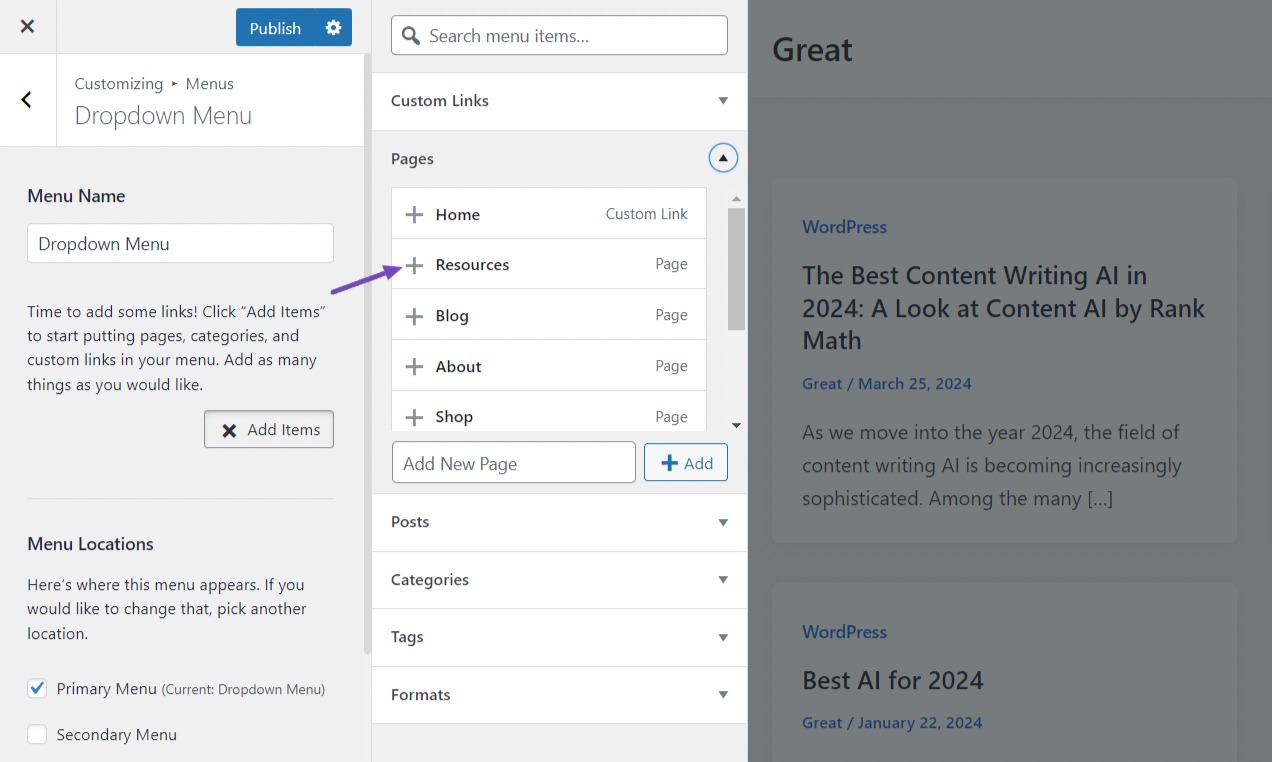
Once you’ve added menu items, rearrange them into parent/dropdown structures by dragging and dropping sub-items underneath their corresponding parent items.

When satisfied with your adjustments, click the Publish button above to save your changes.
3.3 Creating a Dropdown Menu Using the WordPress Full-Site Editor
This method applies when using a block theme like the default Twenty Twenty-Four WordPress theme.
In that case, you’ll see Appearance → Editor when logged into your dashboard. Click on it.
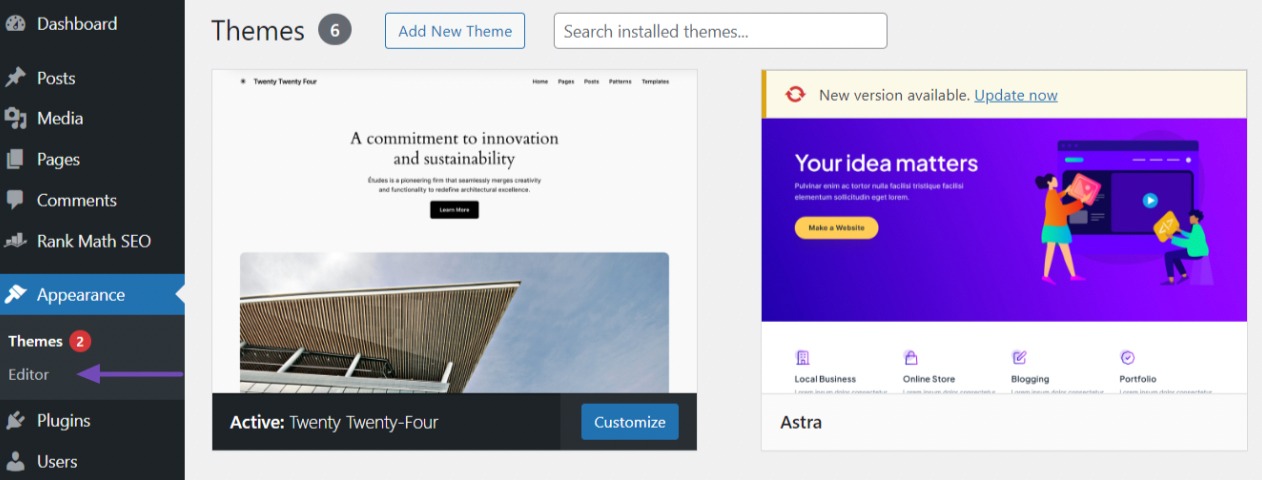
By default, the full-site editor will show your theme’s home template.
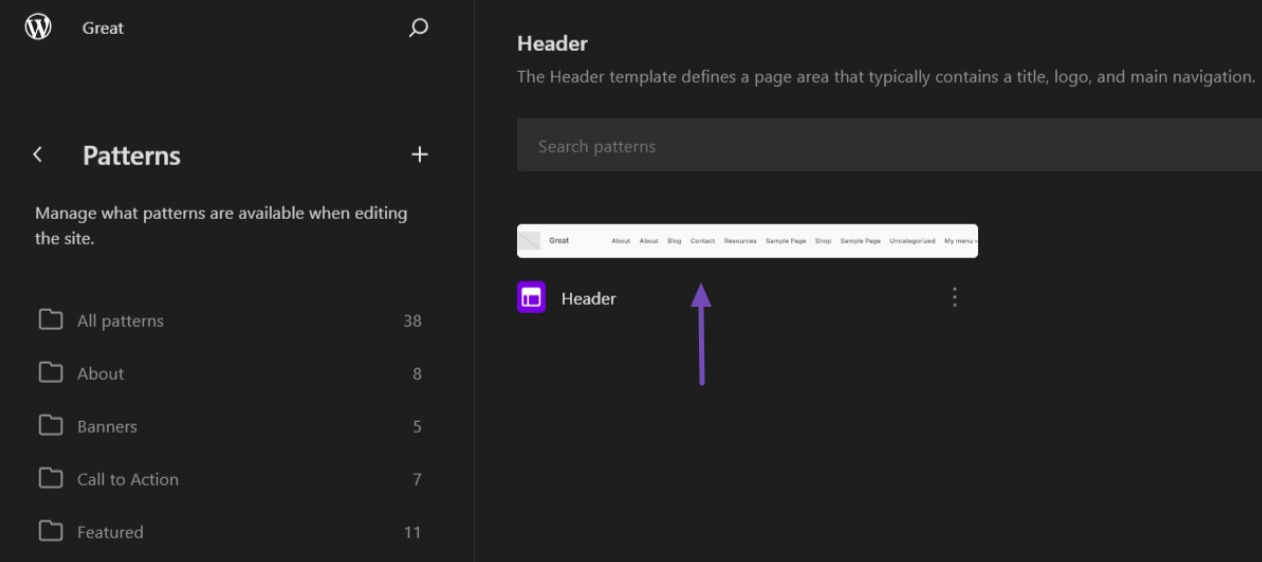
To add a dropdown menu elsewhere, click the Patterns section.
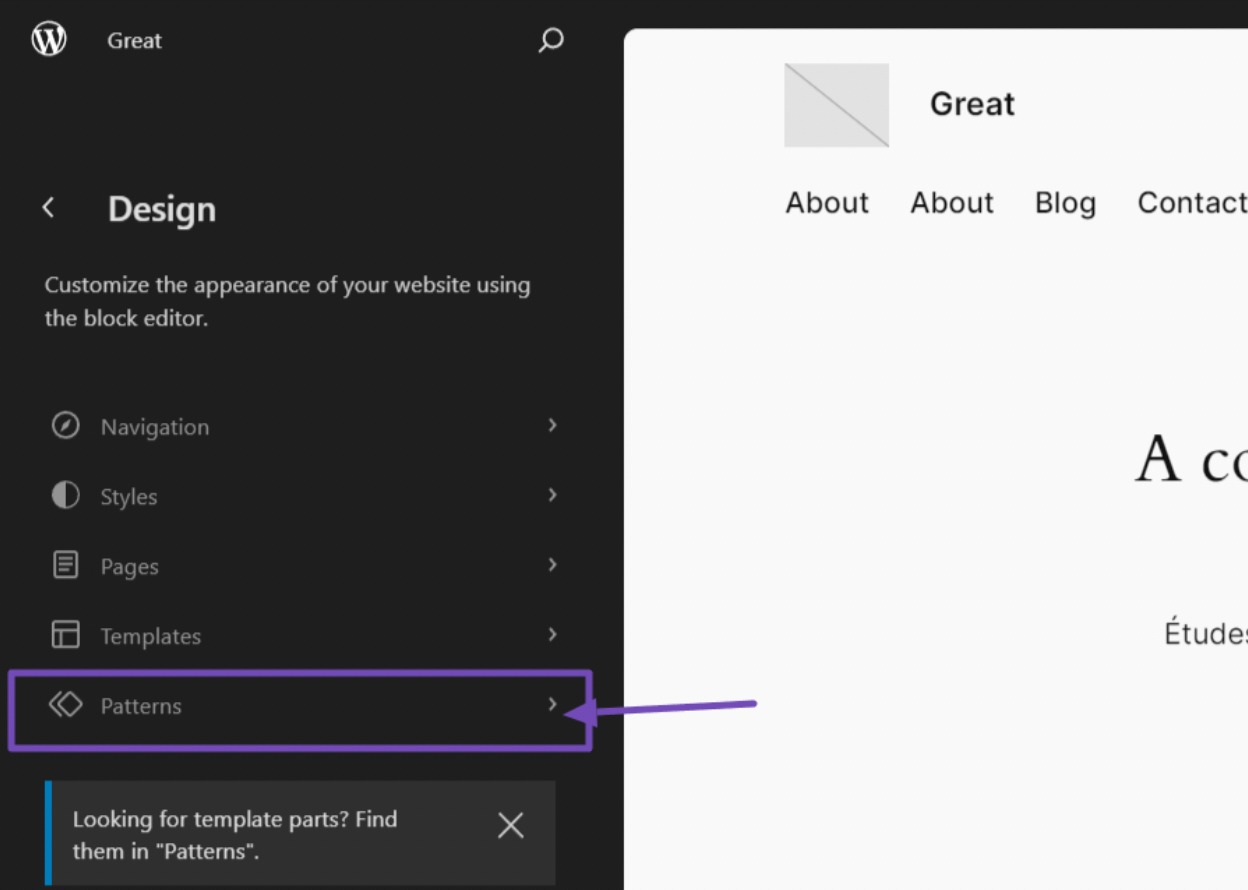
The editor will list all templates/template parts of your theme.
Simply click on the area where you want the dropdown menu. For a main navigation menu, you’ll typically select the Header template part.
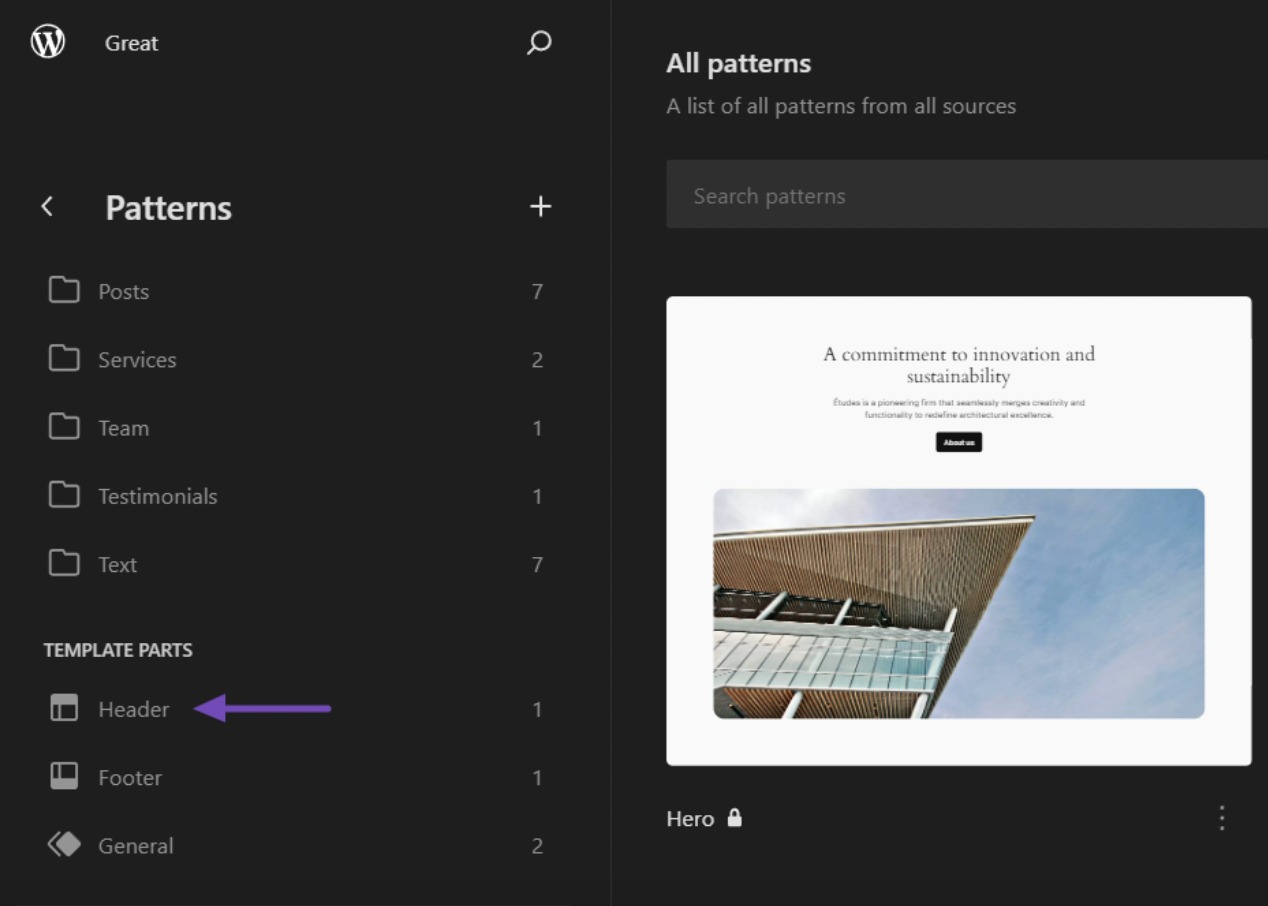
WordPress will now show the template or template part. To preview this template, click on it.
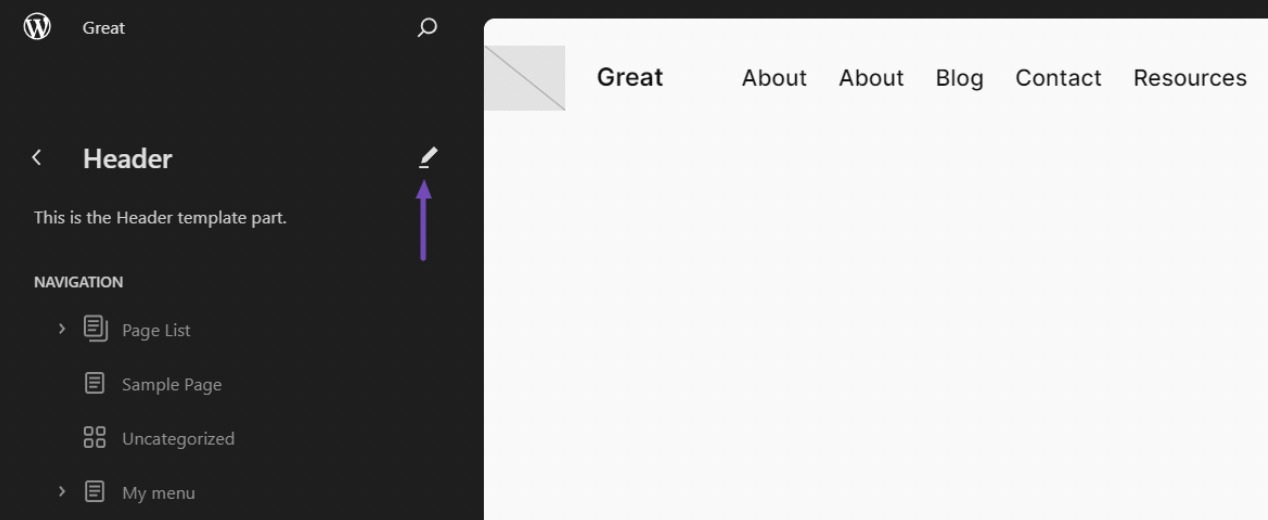
After previewing the template, you can click on the pencil icon to edit it.
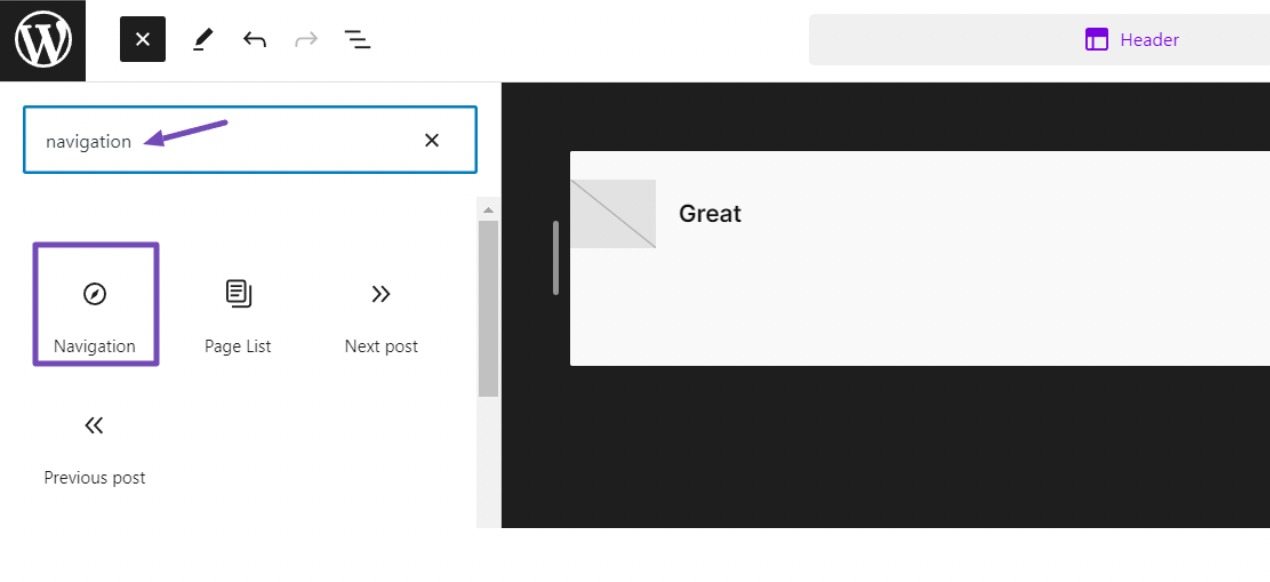
Now, click the blue ‘+’ icon in the top left and search for Navigation. Drag and drop the navigation block onto your design.
To add items to the navigation menu, click the ‘+‘ icon and choose from the available blocks, such as page links, custom links, home links, and category links.
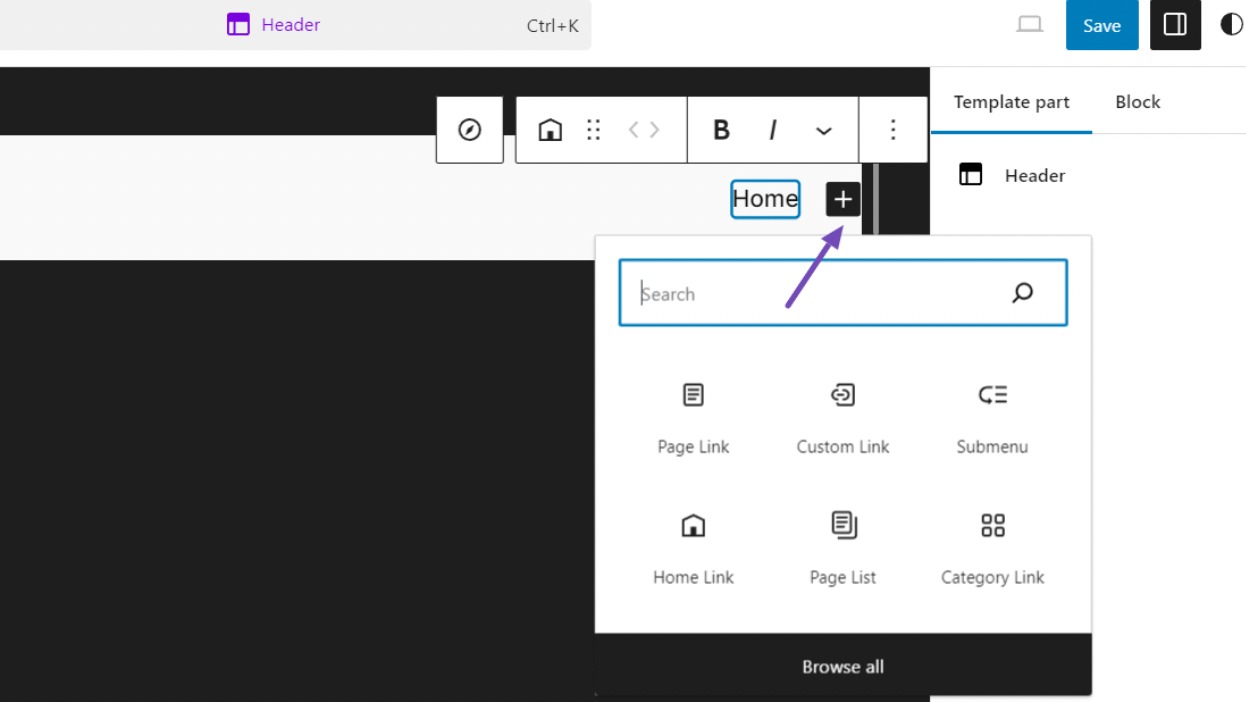
Now, click on the ‘Submenu’ block. You’ll need to provide the menu item name and link.

For easier editing, locate the right-side settings panel and click Block while on the Submenu block. There, you can set the label, URL, and more.
Clicking the Styles tab allows you to customize font color, background, and dimensions.

Go back and click the menu items block. In the Block settings, you’ll see a hierarchy interface.

On that hierarchy with our parent ‘Blog’ menu, click the three dots next to it and select the Add submenu link option.
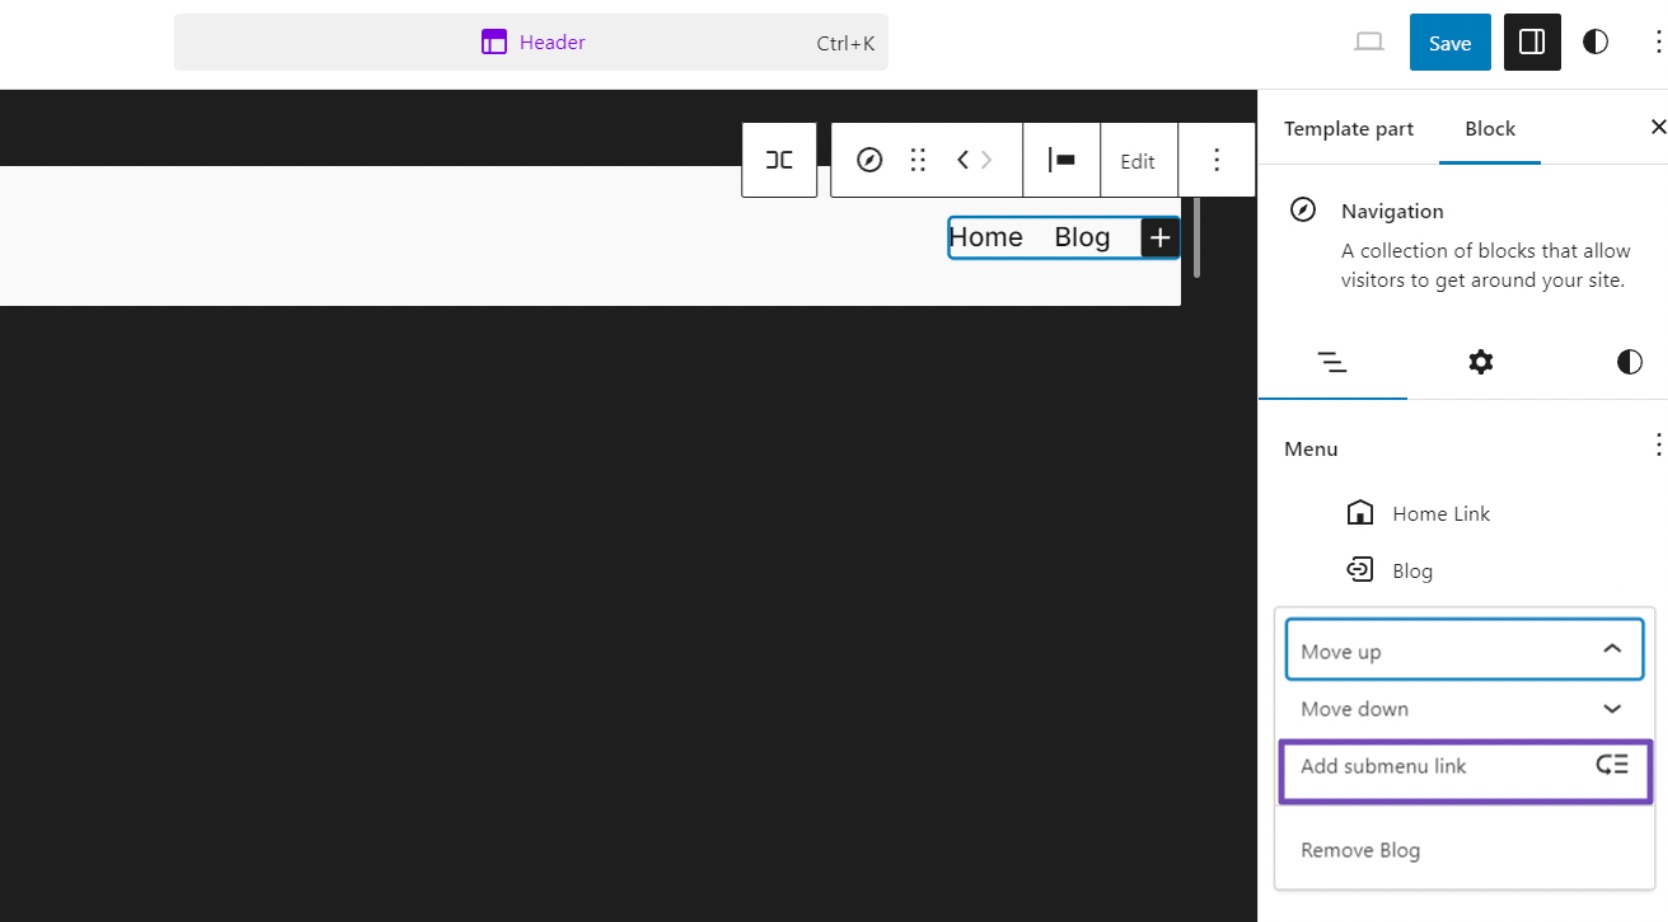
From there, you can either add the URL of the submenu or search for the page, post, or tag you want to use as the dropdown menu item.

Repeat this process to add all desired dropdown menu items for each parent menu item. Once complete, rearrange the patterns by dragging and dropping the items to their desired locations.
The Full-Site Editor provides additional styling options in those right-side settings panels too.
So you can further customize things like text size, colors, backgrounds, justifications, and more both for the overall menu and individual parent/submenu items.

After making all the customizations, remember to save your changes by clicking the Save button.
3.4 Creating a Dropdown Menu Using a Plugin
Let’s discuss creating an advanced dropdown menu called a mega menu using WordPress’s Max Mega Menu plugin.
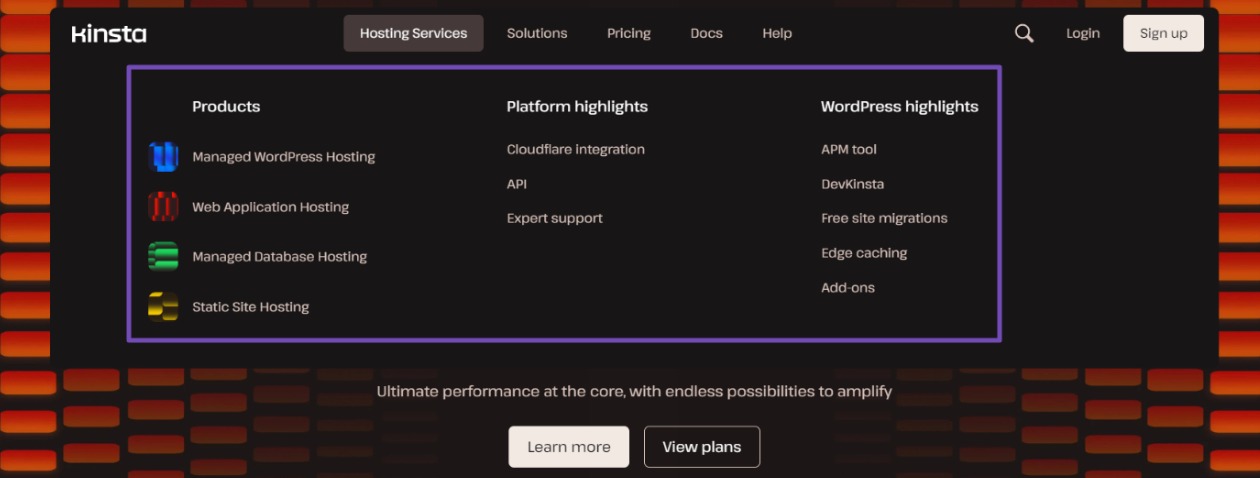
A mega menu is a prominent, multi-column dropdown with additional sections and content.
It usually looks like this:
First, ensure you have the Max Mega Menu plugin installed and activated. Also, ensure that you have published the pages and create a navigation menu and its location.
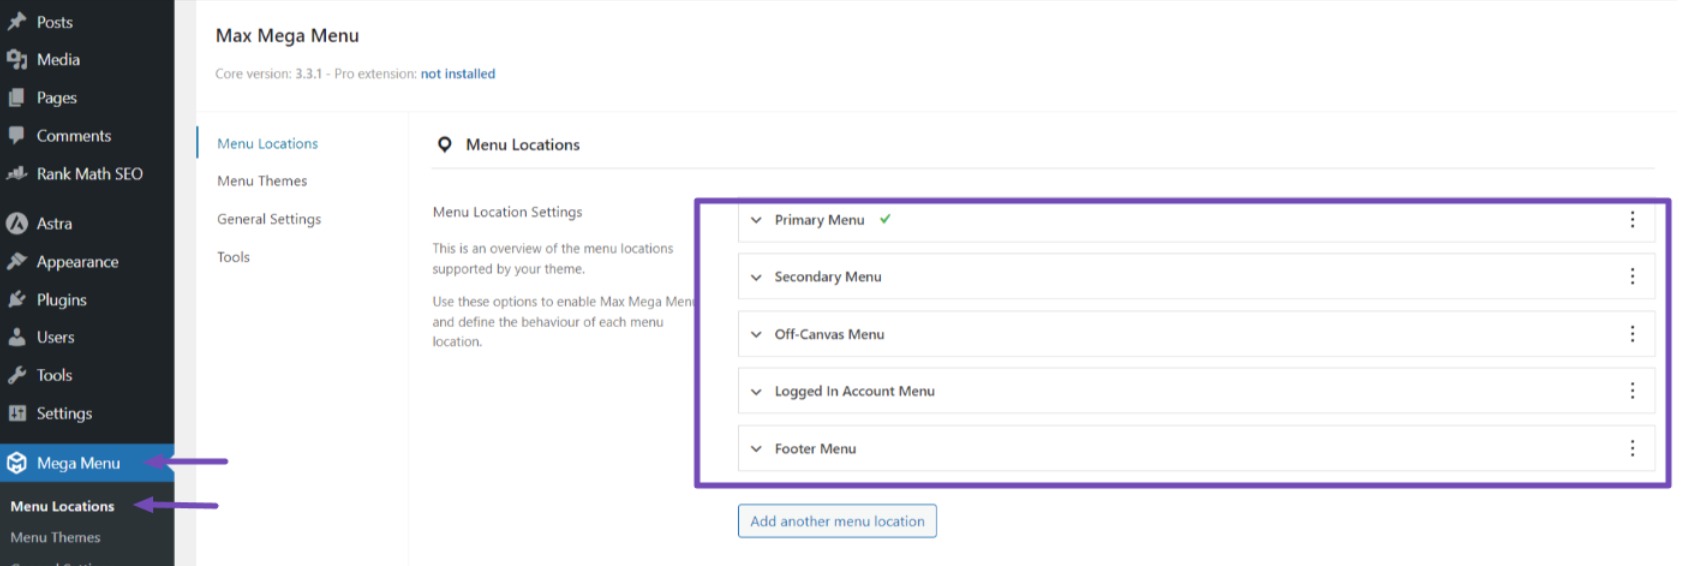
To configure the behavior and appearance of your menu locations, go to Mega Menu → Menu Locations. Toggle the arrows next to each location and make adjustments as needed.
While the plugin provides a default menu theme, you can also create a custom theme to personalize the appearance of your mega menu.
Access the Menu Themes tab, click the three-dot icon next to Default, and select Add new theme.
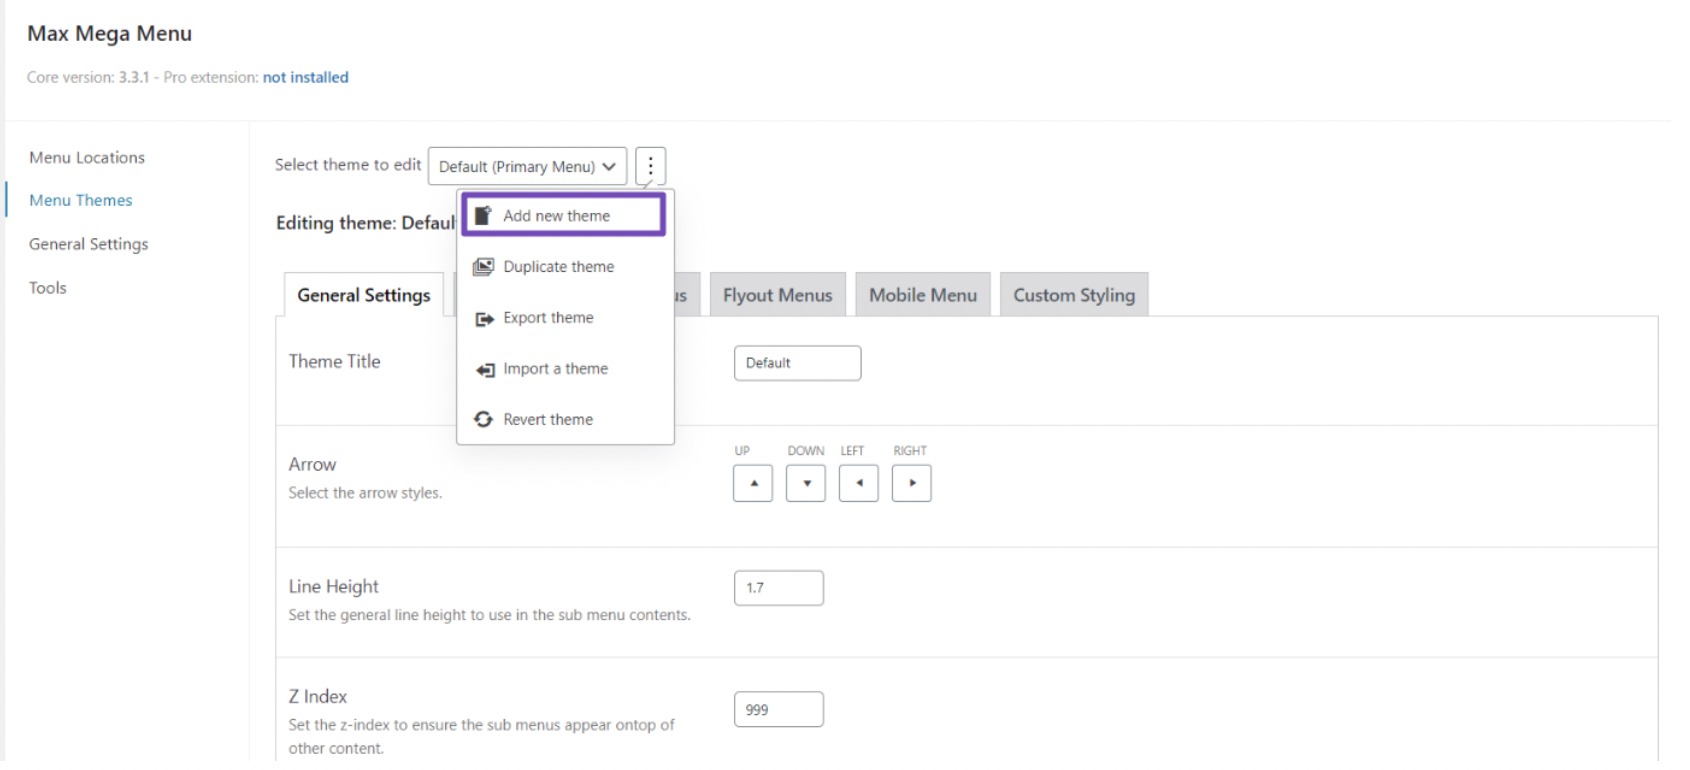
In the General Settings tab of your new theme, you can modify the title, arrow style, line height for sub-menu items and apply shadows to your mega menu layouts.
To customize the appearance of the top-level menu, go to the Menu Bar tab. Here, you can adjust the menu’s height, background color, padding, borders and align the menu items.
In the Mega Menus section, you can change the font, background color, spacing, and borders for second-level and third-level items.
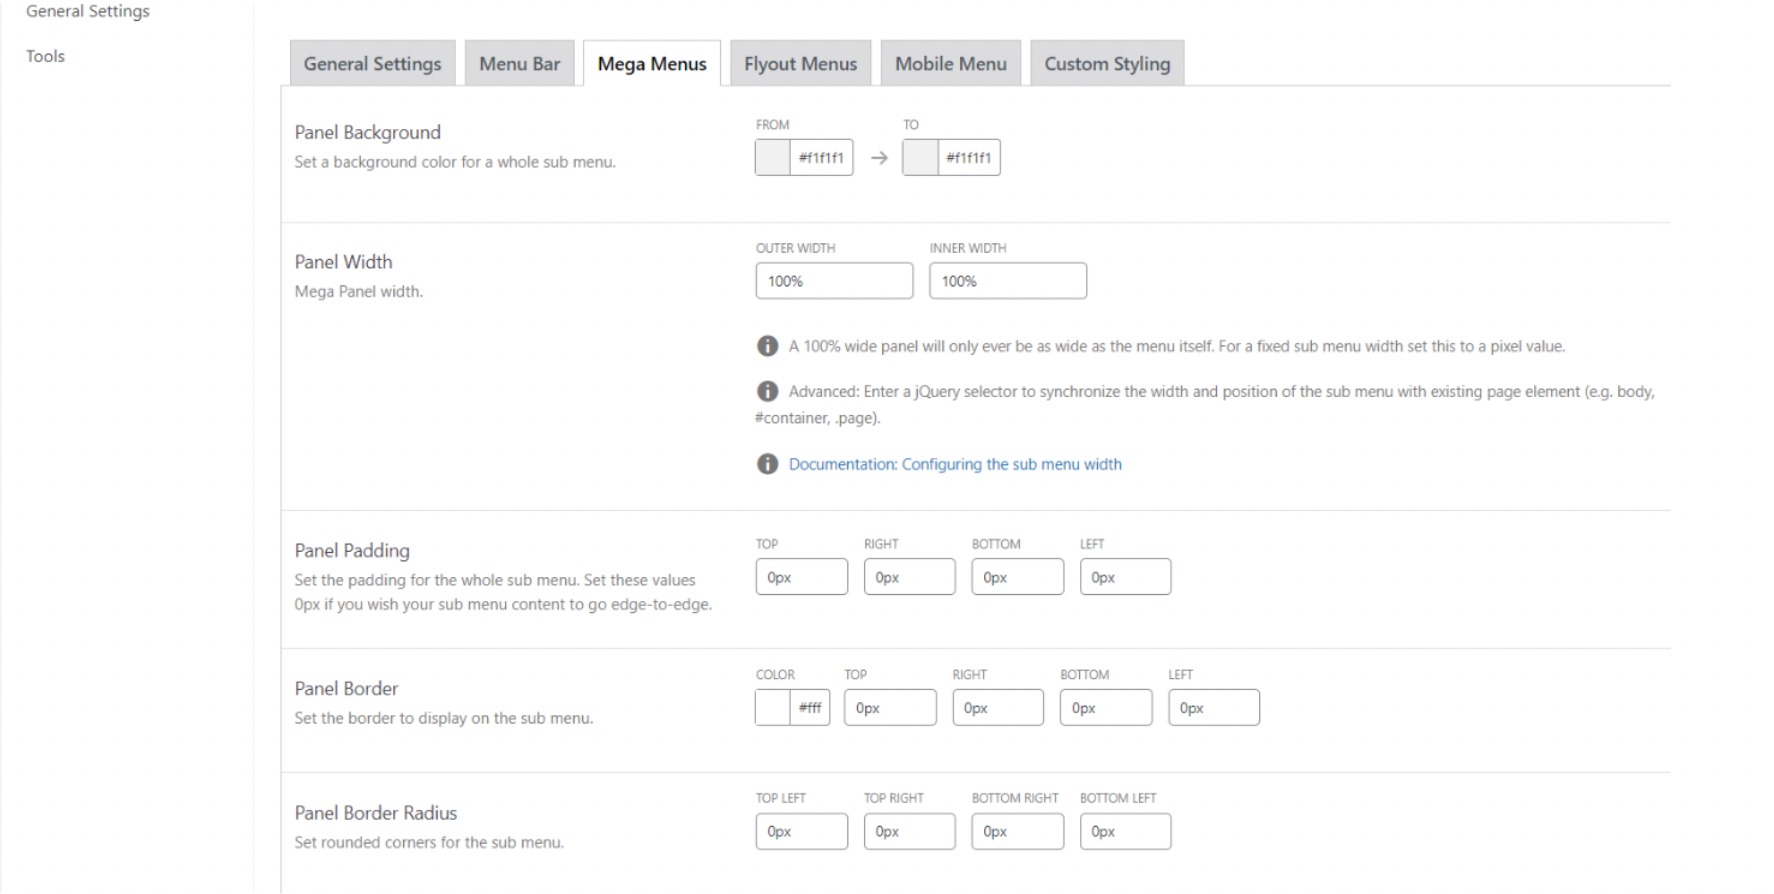
Consider using a distinct color scheme for sub-menus while maintaining consistent typography with the parent menu.
Remember to save your changes after customizing the appearance.
Adding Content to Your WordPress Mega Menu
One standout feature in Max Mega Menu is the drag-and-drop interface for adding content like WooCommerce products, images, and search filters to mega menus to create an engaging experience for your visitors.
To begin, navigate to Appearance → Menus in your WordPress dashboard. If creating a new menu, enable Max Mega Menu Settings and click the Save button.

Then, add the desired pages, posts, categories, and product categories to the menu and drag and drop sub-categories under the main categories.
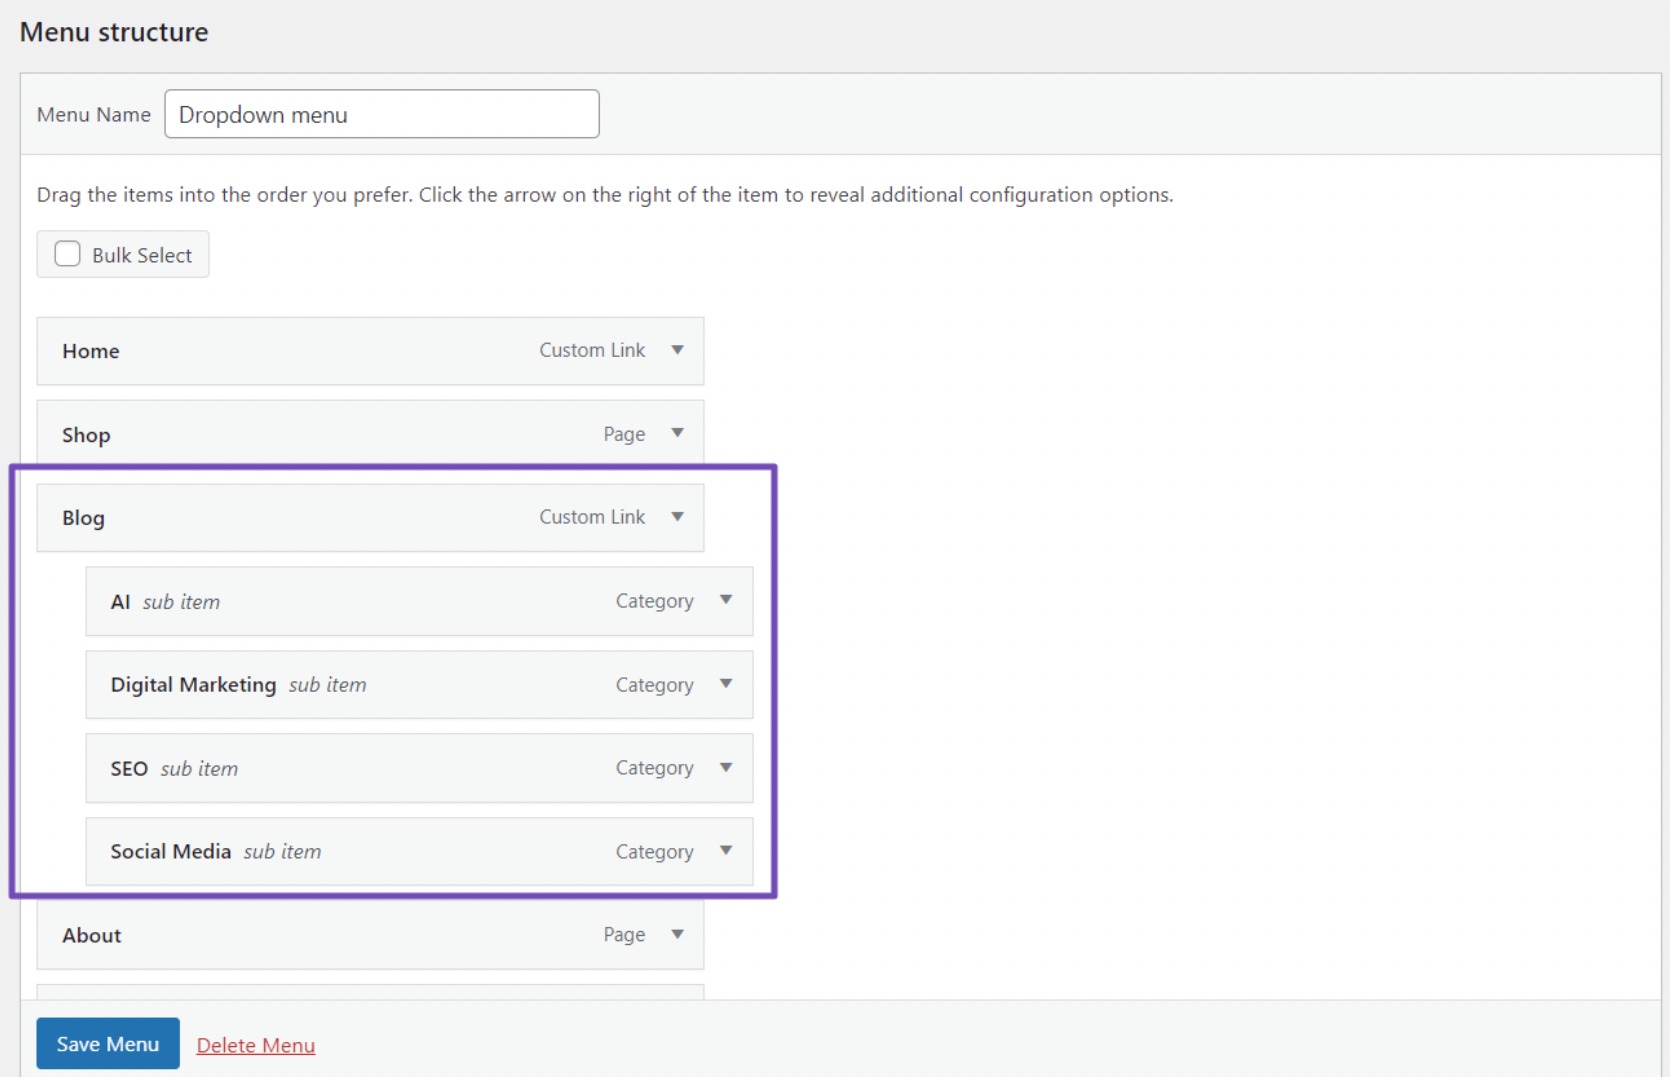
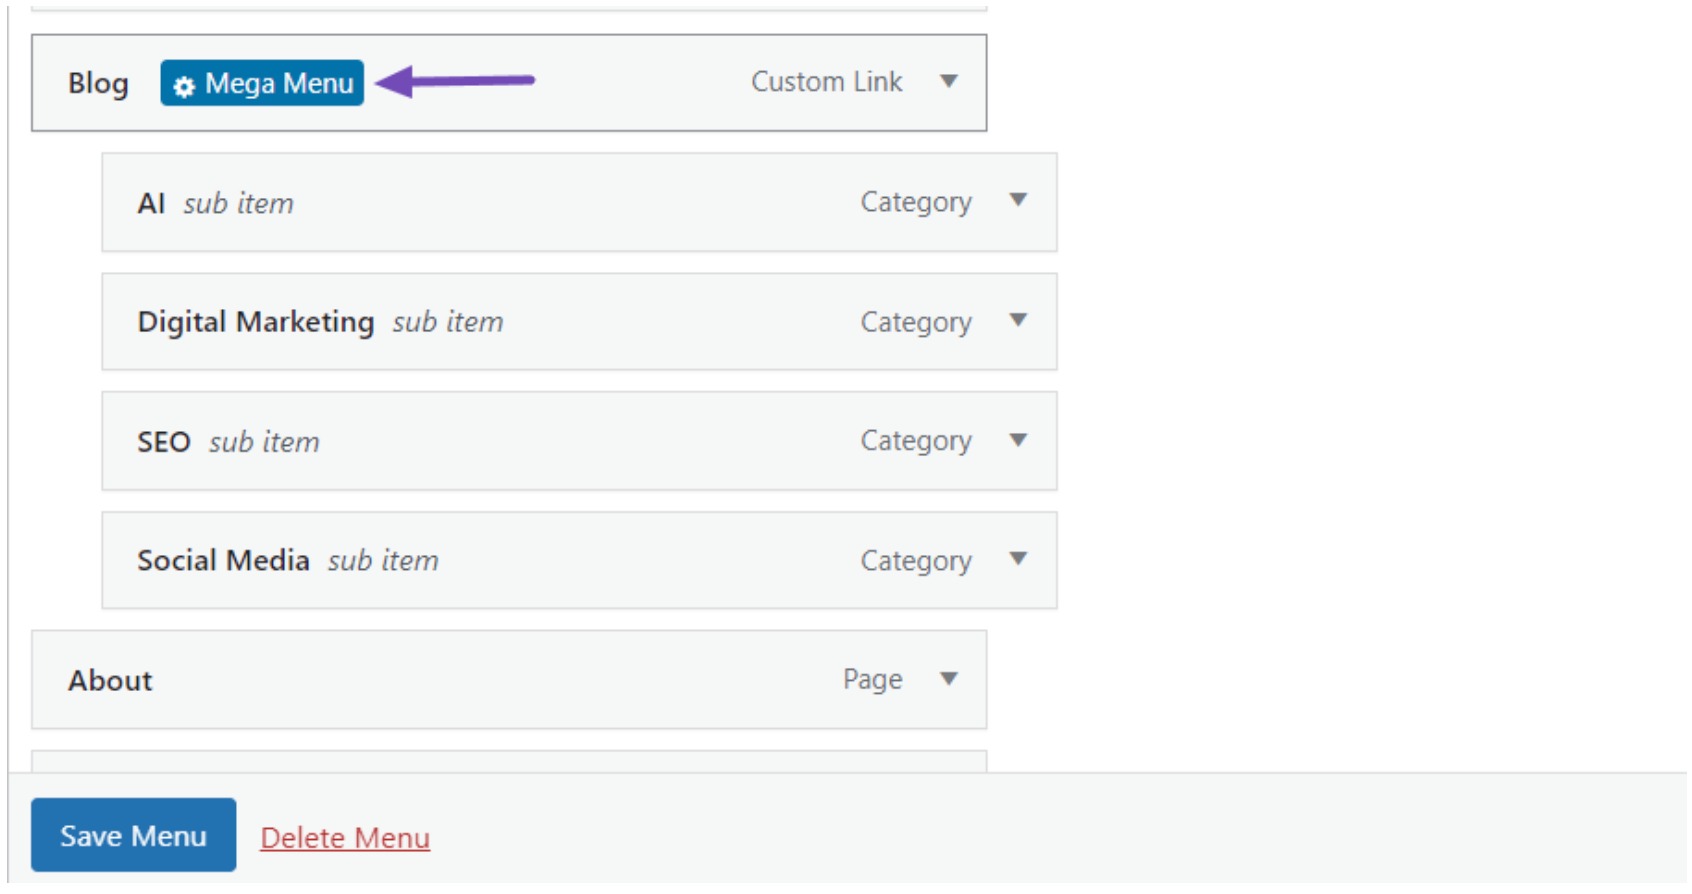
By default, the Max Mega Menu uses a flyout or dropdown menu style. To create a mega menu, hover over one of your pages and click the Mega Menu button.
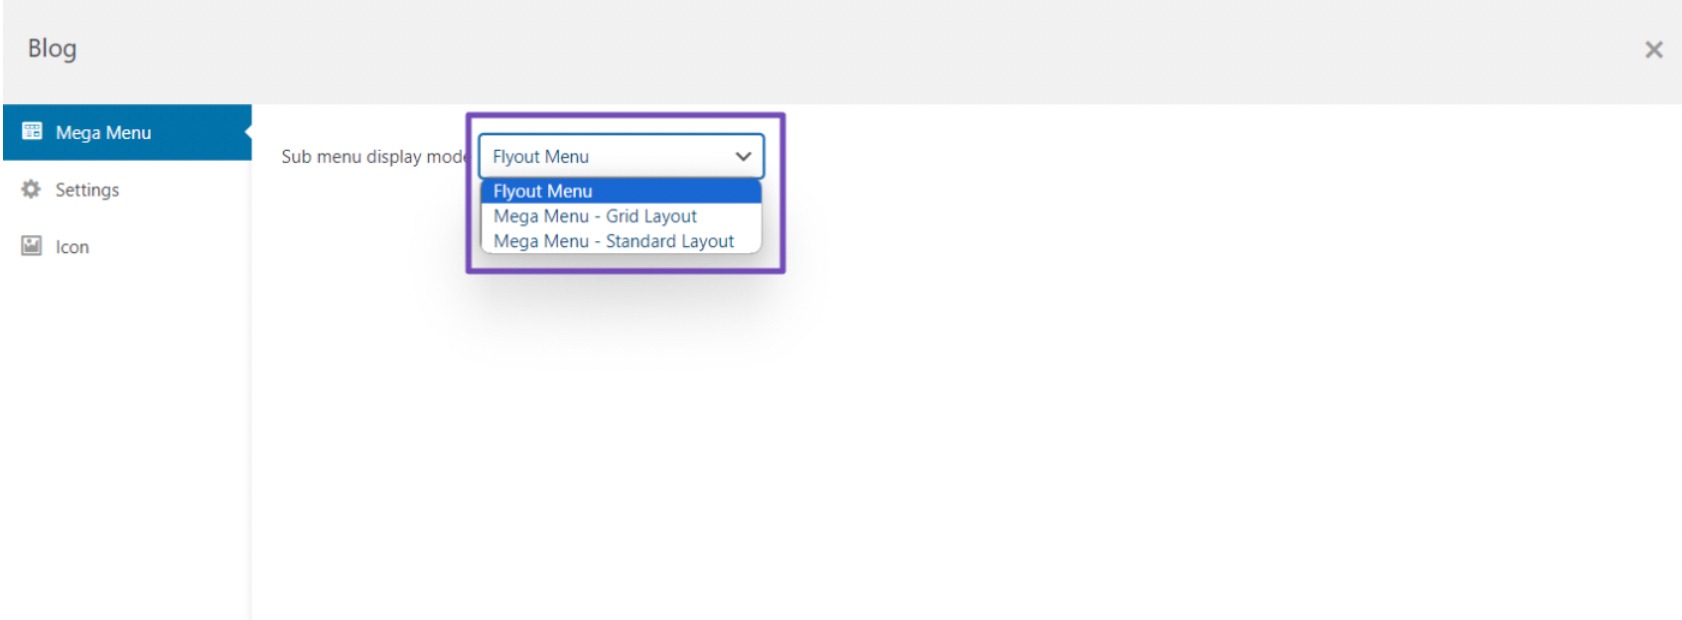
You can choose either a grid layout or a standard layout for the sub-menu display.
The grid layout allows you to create multi-column, multi-row menus, while the standard layout offers customizable column options.
You can add widgets like a search bar, image gallery, calendar, audio content, video, and product filters to enhance the visual appeal.
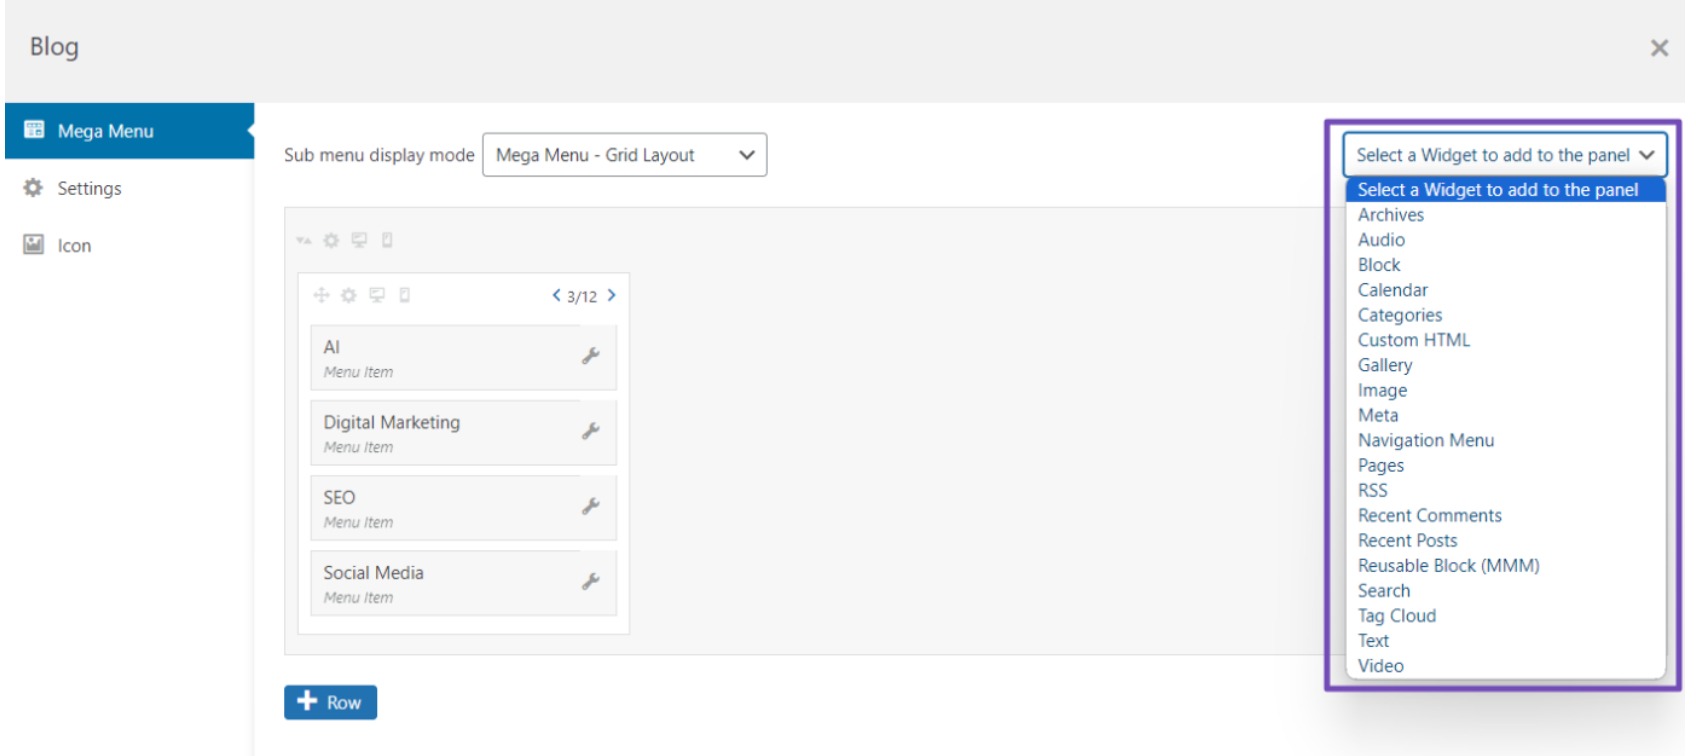
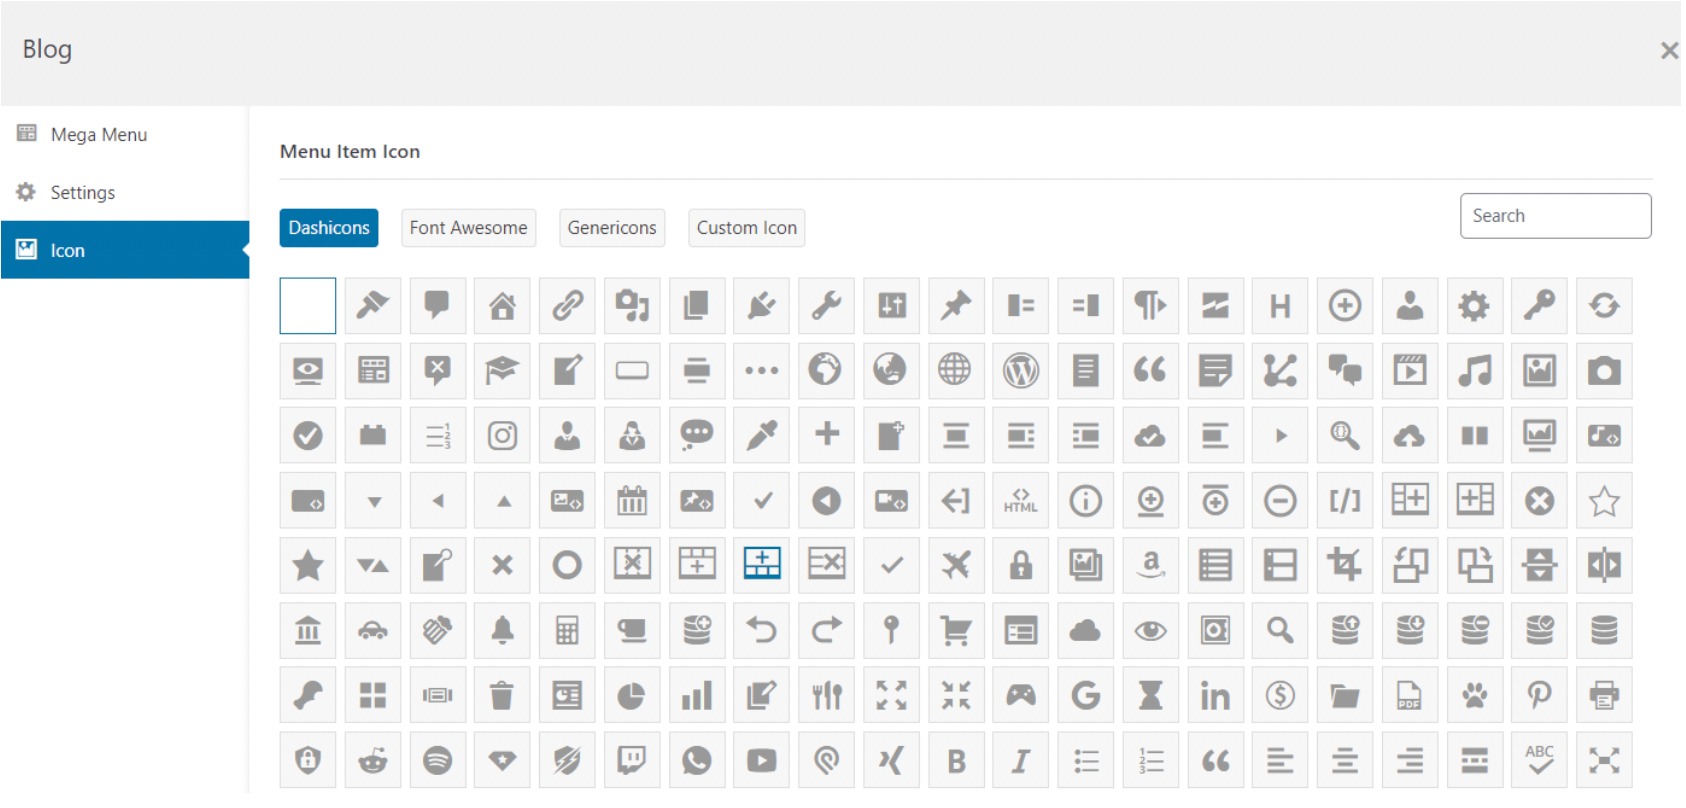
If your menu is complex, consider assigning icons from various platforms to each item by navigating to the Icon tab.
Once you’ve configured all the settings, click the Save Menu button to enable the mega menu on your site.

Remember to take your time and start from the plugin settings to build a unique and appealing mega menu for your site visitors.
4 Frequently Asked Questions
Can I add dropdown menus to any WordPress theme?
Yes, most WordPress themes support dropdown menus. However, it is essential to choose a theme explicitly mentioning dropdown menu support in its features or documentation.
How can I create mega menus in WordPress?
To create mega menus, you can use plugins like Max Mega Menu. Install and activate the plugin, then customize your menu to enable the mega menu feature.
What are some best practices for creating dropdown menus?
Best practices include keeping the menu structure simple and intuitive, using descriptive labels for menu items, ensuring accessibility for all users, and regularly testing menu functionality across different devices and screen sizes.
Is it possible to create multi-level dropdown menus?
WordPress allows you to create multi-level dropdown menus by setting parent and child menu items. This hierarchical structure lets you organize your menu items into multiple levels for improved navigation.
Do I need any coding skills to add dropdown menus to WordPress?
No, you don’t need coding skills. WordPress provides a user-friendly interface for adding and customizing menus, making it accessible to beginners.
How do I ensure my dropdown menu is mobile-friendly?
Most modern WordPress themes are responsive, automatically adjusting to different screen sizes, including mobile devices. When creating your dropdown menu, ensure it displays correctly on mobile devices by testing it across various screen sizes.
What if my dropdown menu doesn’t appear as expected?
If your dropdown menu doesn’t appear correctly, double-check the menu settings. Ensure you’ve correctly assigned items as parent and child items and that your theme supports dropdown menus. If issues persist, consult your theme documentation or contact the theme’s support team for assistance.
Can I add animations and effects to dropdown menus?
Yes, you can add animations and effects to dropdown menus by checking your theme options or customization settings. Some themes offer built-in features for adding animations, while others may require additional plugins or custom CSS.
Can I add an image or icon to a dropdown menu item?
Yes, you can add images or icons to dropdown menu items using custom CSS or plugins that support this feature. Some themes may also provide built-in options for adding images or icons to menu items.
How can I optimize dropdown menus for SEO?
To optimize dropdown menus for SEO, ensure that menu items use descriptive and relevant keywords. Keep the menu structure logical and easy for users and search engines to navigate.
5 Conclusion
Dropdown menus are a powerful and user-friendly addition to any WordPress website.
Adding a dropdown menu to your WordPress post can significantly enhance user experience and improve your website’s navigation.
With WordPress’s flexibility and customization options, you can create your dropdown menu to suit your audience’s specific needs and preferences, ultimately contributing to a more engaging and user-friendly browsing experience.
Also, ensure that your dropdown menus continue to meet the changing needs of your audience.
If you like this post, let us know by Tweeting @rankmathseo.
