Have you ever found yourself in a situation where you needed an exact copy of your WordPress website?
Whether moving to a new host, creating a staging environment, or simply backing up your site, cloning your WordPress site is an important skill that can save you time and headaches.
It is easy to clone a WordPress site with the right tools and guidance.
In this post, we’ll walk you through how to clone a WordPress site step by step, ensuring that you can easily replicate your site, no matter your technical expertise.
Let’s dive in!
Table Of Contents
1 What is WordPress Cloning?
WordPress cloning is the practice of making an exact replica of a WordPress website. It entails duplicating and copying all files, databases, configurations, and content from one WordPress site to another.
By doing this, you can effortlessly create a carbon copy of your site, including its themes, plugins, customizations, and content, without starting from scratch.
When you clone a WordPress site, you’re essentially creating an independent duplicate with the same data and features as the original.
It’s like having a twin website that operates on its own but with all the familiar elements from the original.
2 Why Clone a WordPress Site?
Here are some reasons why you might consider to clone a WordPress site.
- Staging Site Development: You can develop a testing environment where you can freely modify your website without impacting the live site. This enables you to experiment with new features, plugins, or themes before implementing them on your live site.
- Smooth Domain or Hosting Migration: If you’re changing your domain name or moving to a new hosting provider, cloning your site streamlines the migration process, reducing downtime significantly.
- Reliable Backup Solution: Cloning your site provides a reliable backup solution. If your live site encounters any issues, you can swiftly restore it using the cloned site.
- Versatility in Site Versions: Cloning your site allows you to generate multiple versions for various purposes. This includes testing different designs, targeting specific audiences, or conducting A/B tests.
3 Methods of Cloning a WordPress Site
Let us now discuss the methods to clone a WordPress website.
3.1 Clone a WordPress Site Using Softaculous
In this method, you can manually clone your WordPress website using Softaculous. This allows you to perform the cloning process without accessing your WordPress admin.
To initiate this process, start by logging in to your hosting panel or cPanel. Navigate to the WordPress Manager by the Softaculous option to locate your installed sites. In case you don’t find it, you can alternatively choose the Softaculous Apps installer option.
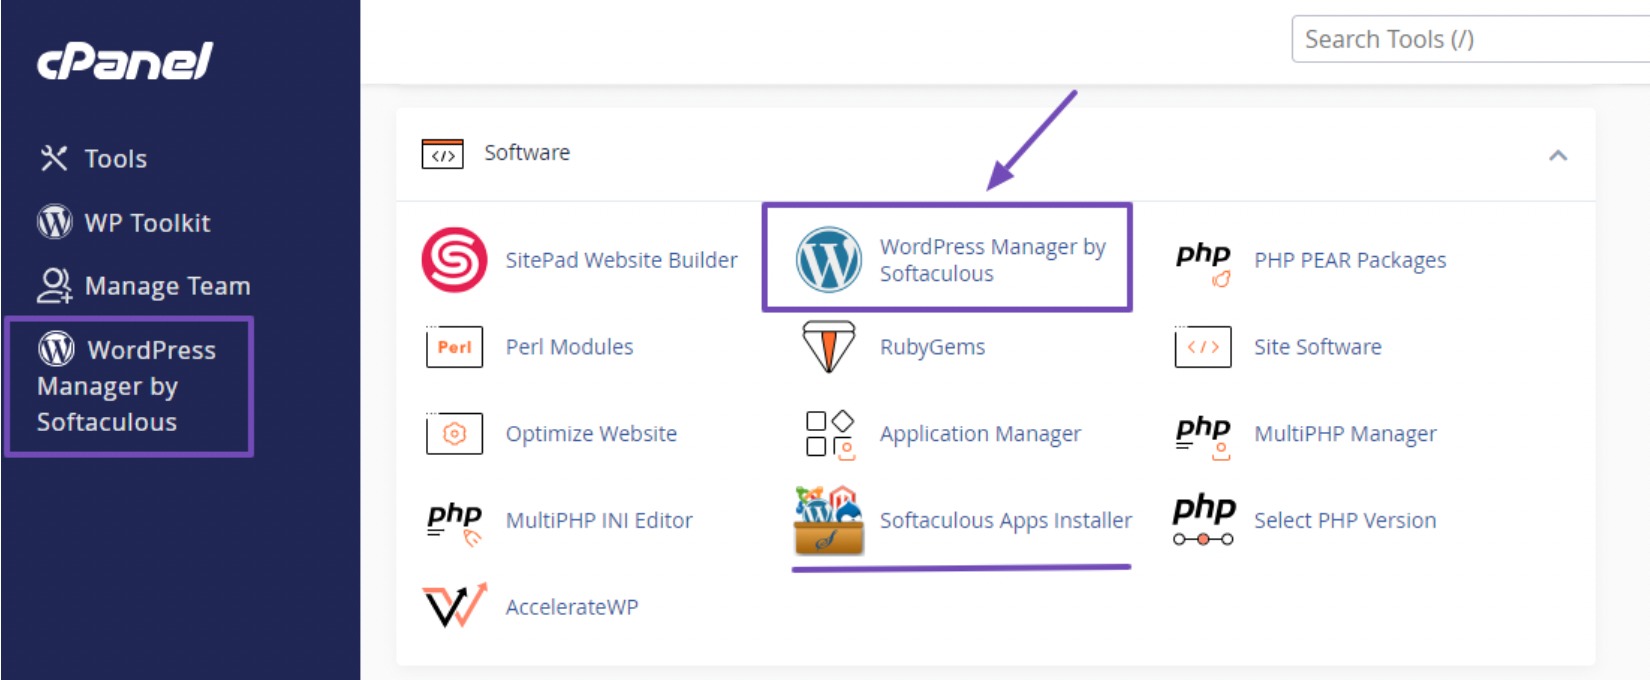
If you use the Softaculous Apps Installer option, select the WordPress Manager icon from the navigation menu, as shown below.

On the WordPress management page, find the specific site you wish to clone. Click on the dropdown menu next to the site, scroll down to access the functional buttons, and then select the Clone button.

This action will redirect you to the Cloning WordPress page. Now, select the URL for the cloned site and provide a name for the site.
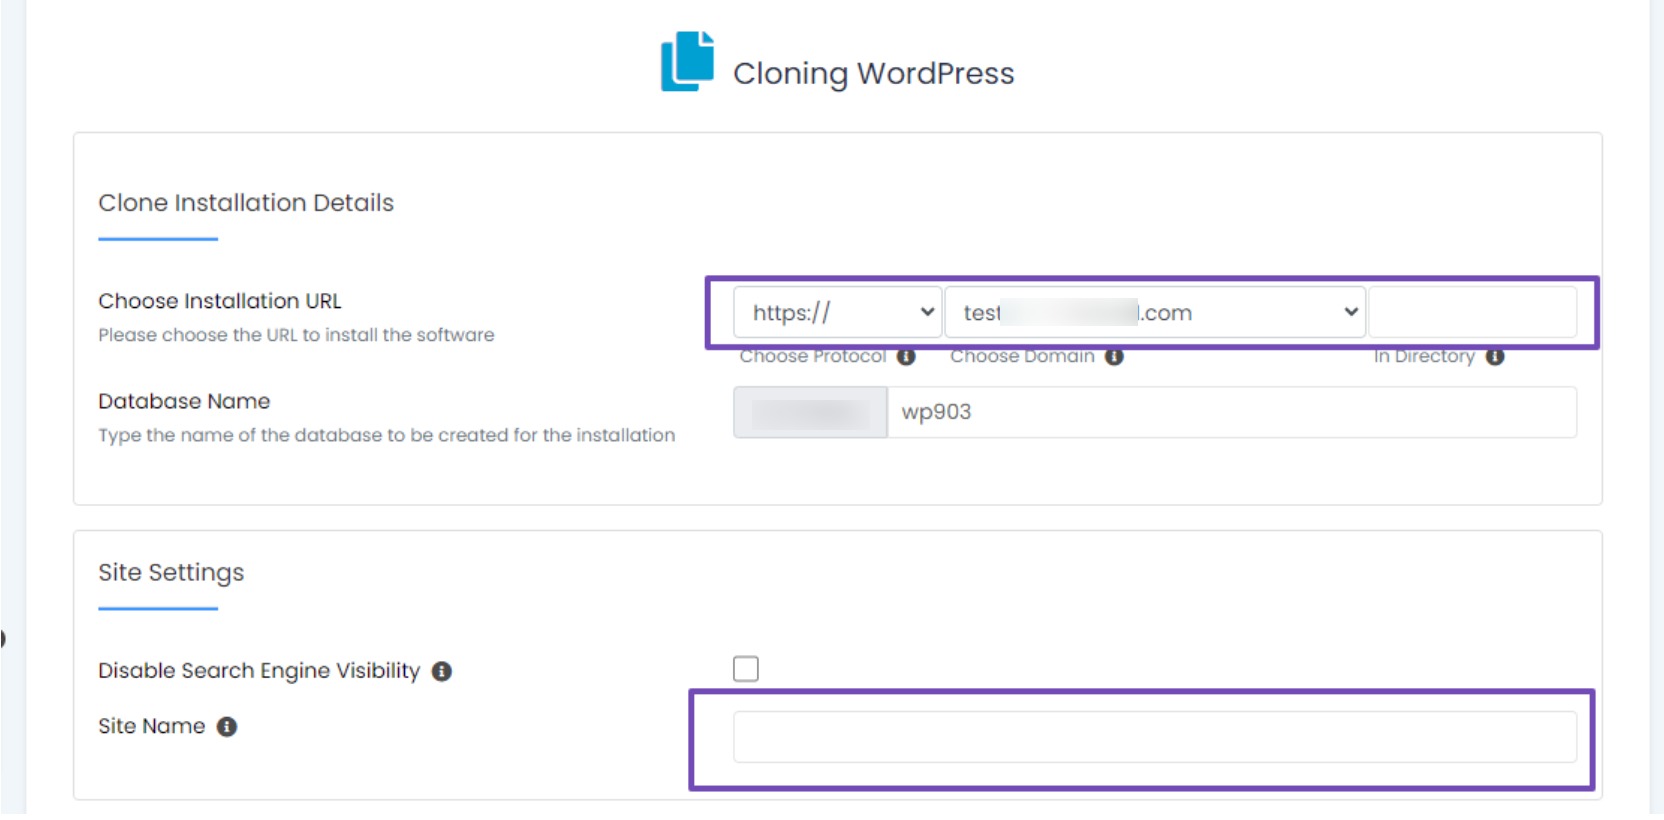
Make sure that you have a subdomain or domain ready before initiating the cloning process for your website. Select the desired subdomain or domain, find the site information, and click the Clone Installation button to complete the process.
The cloning process requires some time. After completion, a congratulatory message will display the cloned website URL and the WordPress dashboard on the page. You can then click on the links of your choice.
Similarly, if you wish to create a staging site by cloning your main site, follow the same process. Choose the Staging button option and proceed accordingly in the queue.

3.2 Clone a WordPress Site With a Plugin
You can clone a WordPress site using a plugin, a method particularly useful for those wanting to replicate their site to a different location or domain.
One such plugin is Duplicator, known for its power and user-friendliness. It consolidates your entire website into a single file, streamlining the relocation process.
Install the Duplicator Plugin
To begin, install and activate the Duplicator plugin on the website you want to clone. Follow our step-by-step guide on installing WordPress plugins for detailed instructions.
Create a Duplicator Package
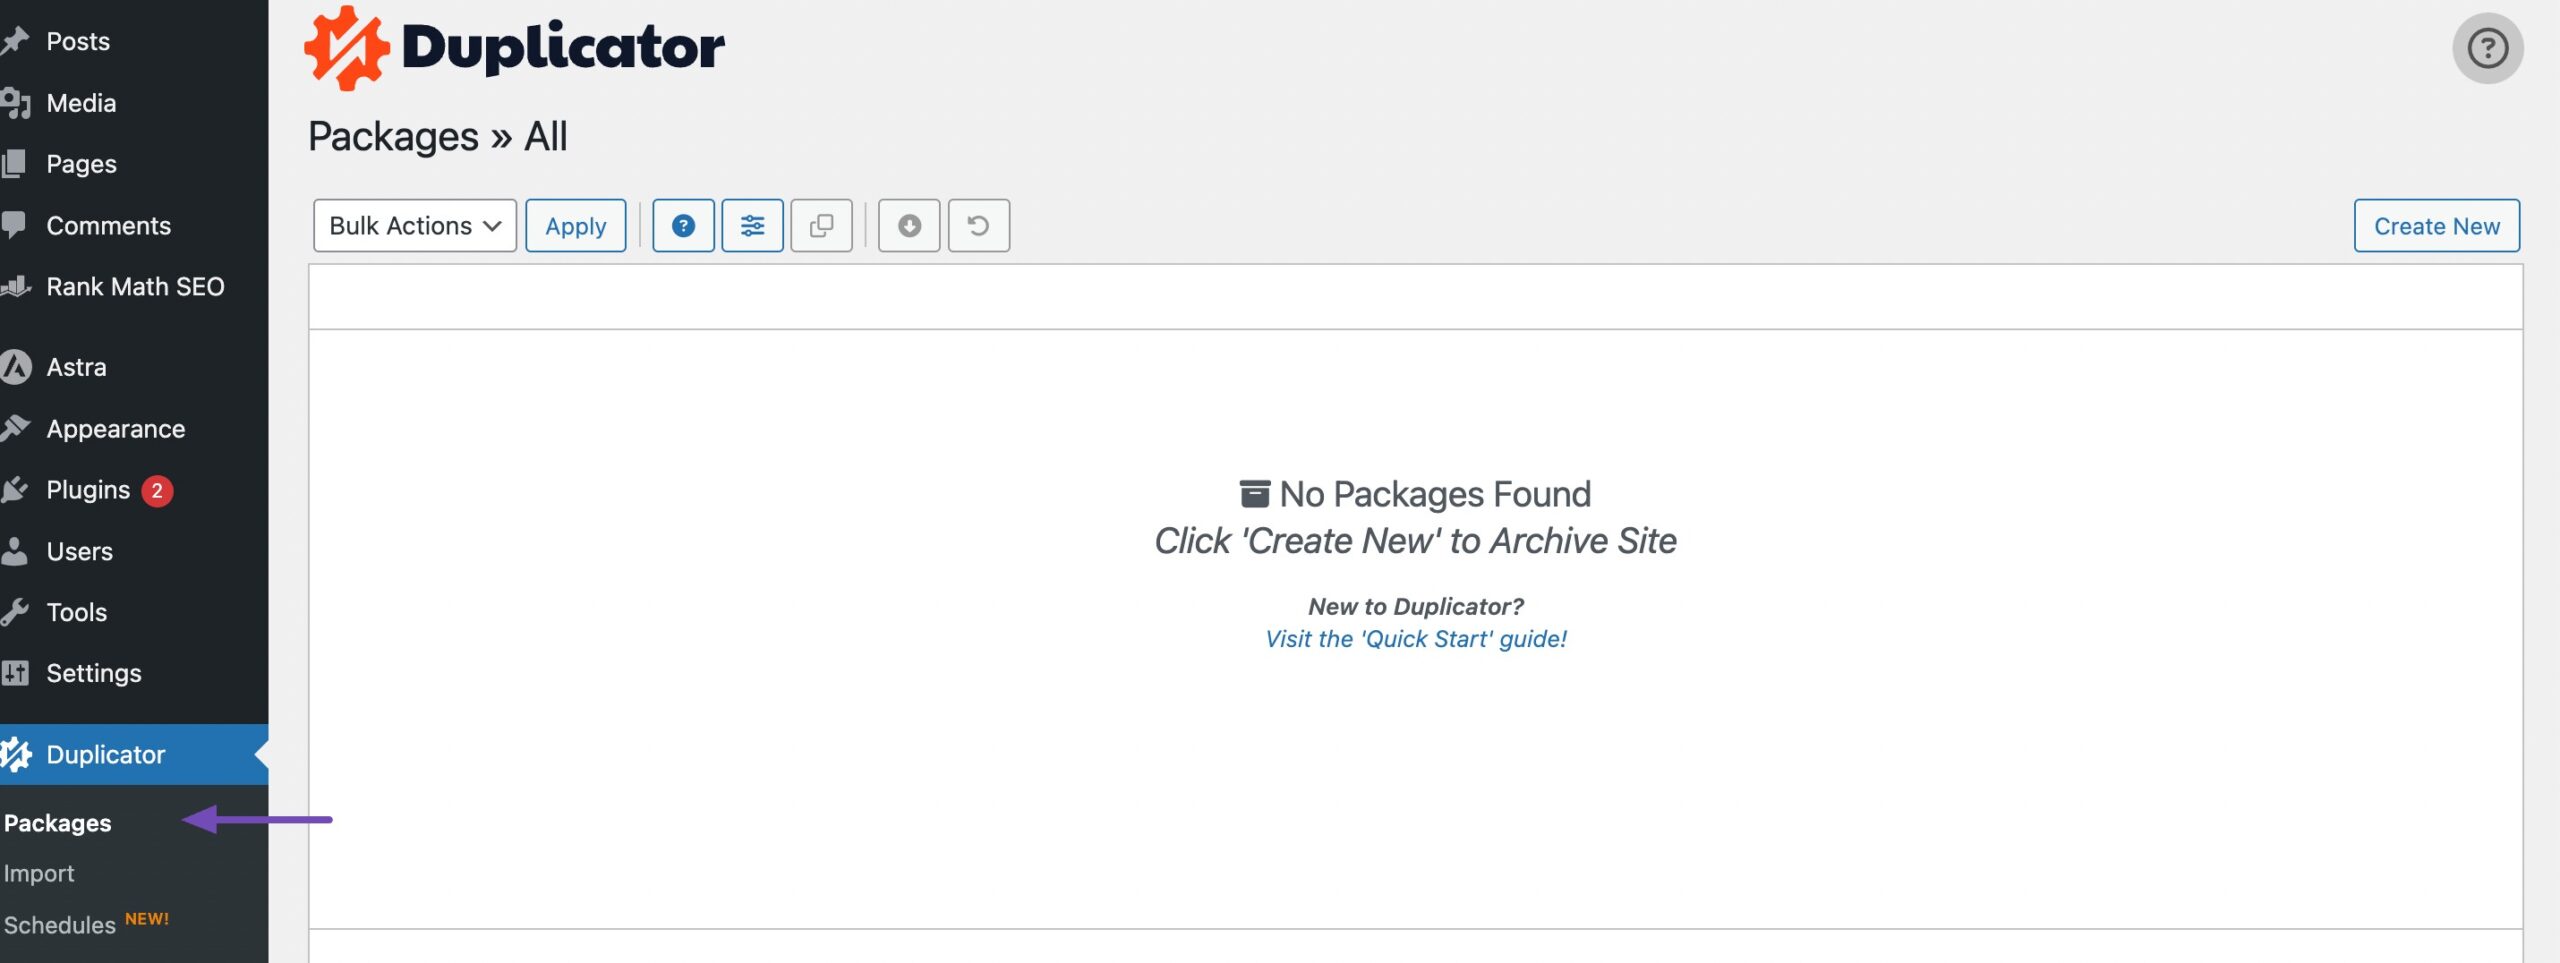
Once the plugin is installed and activated, navigate to Duplicator → Packages and click Create New, as shown below.
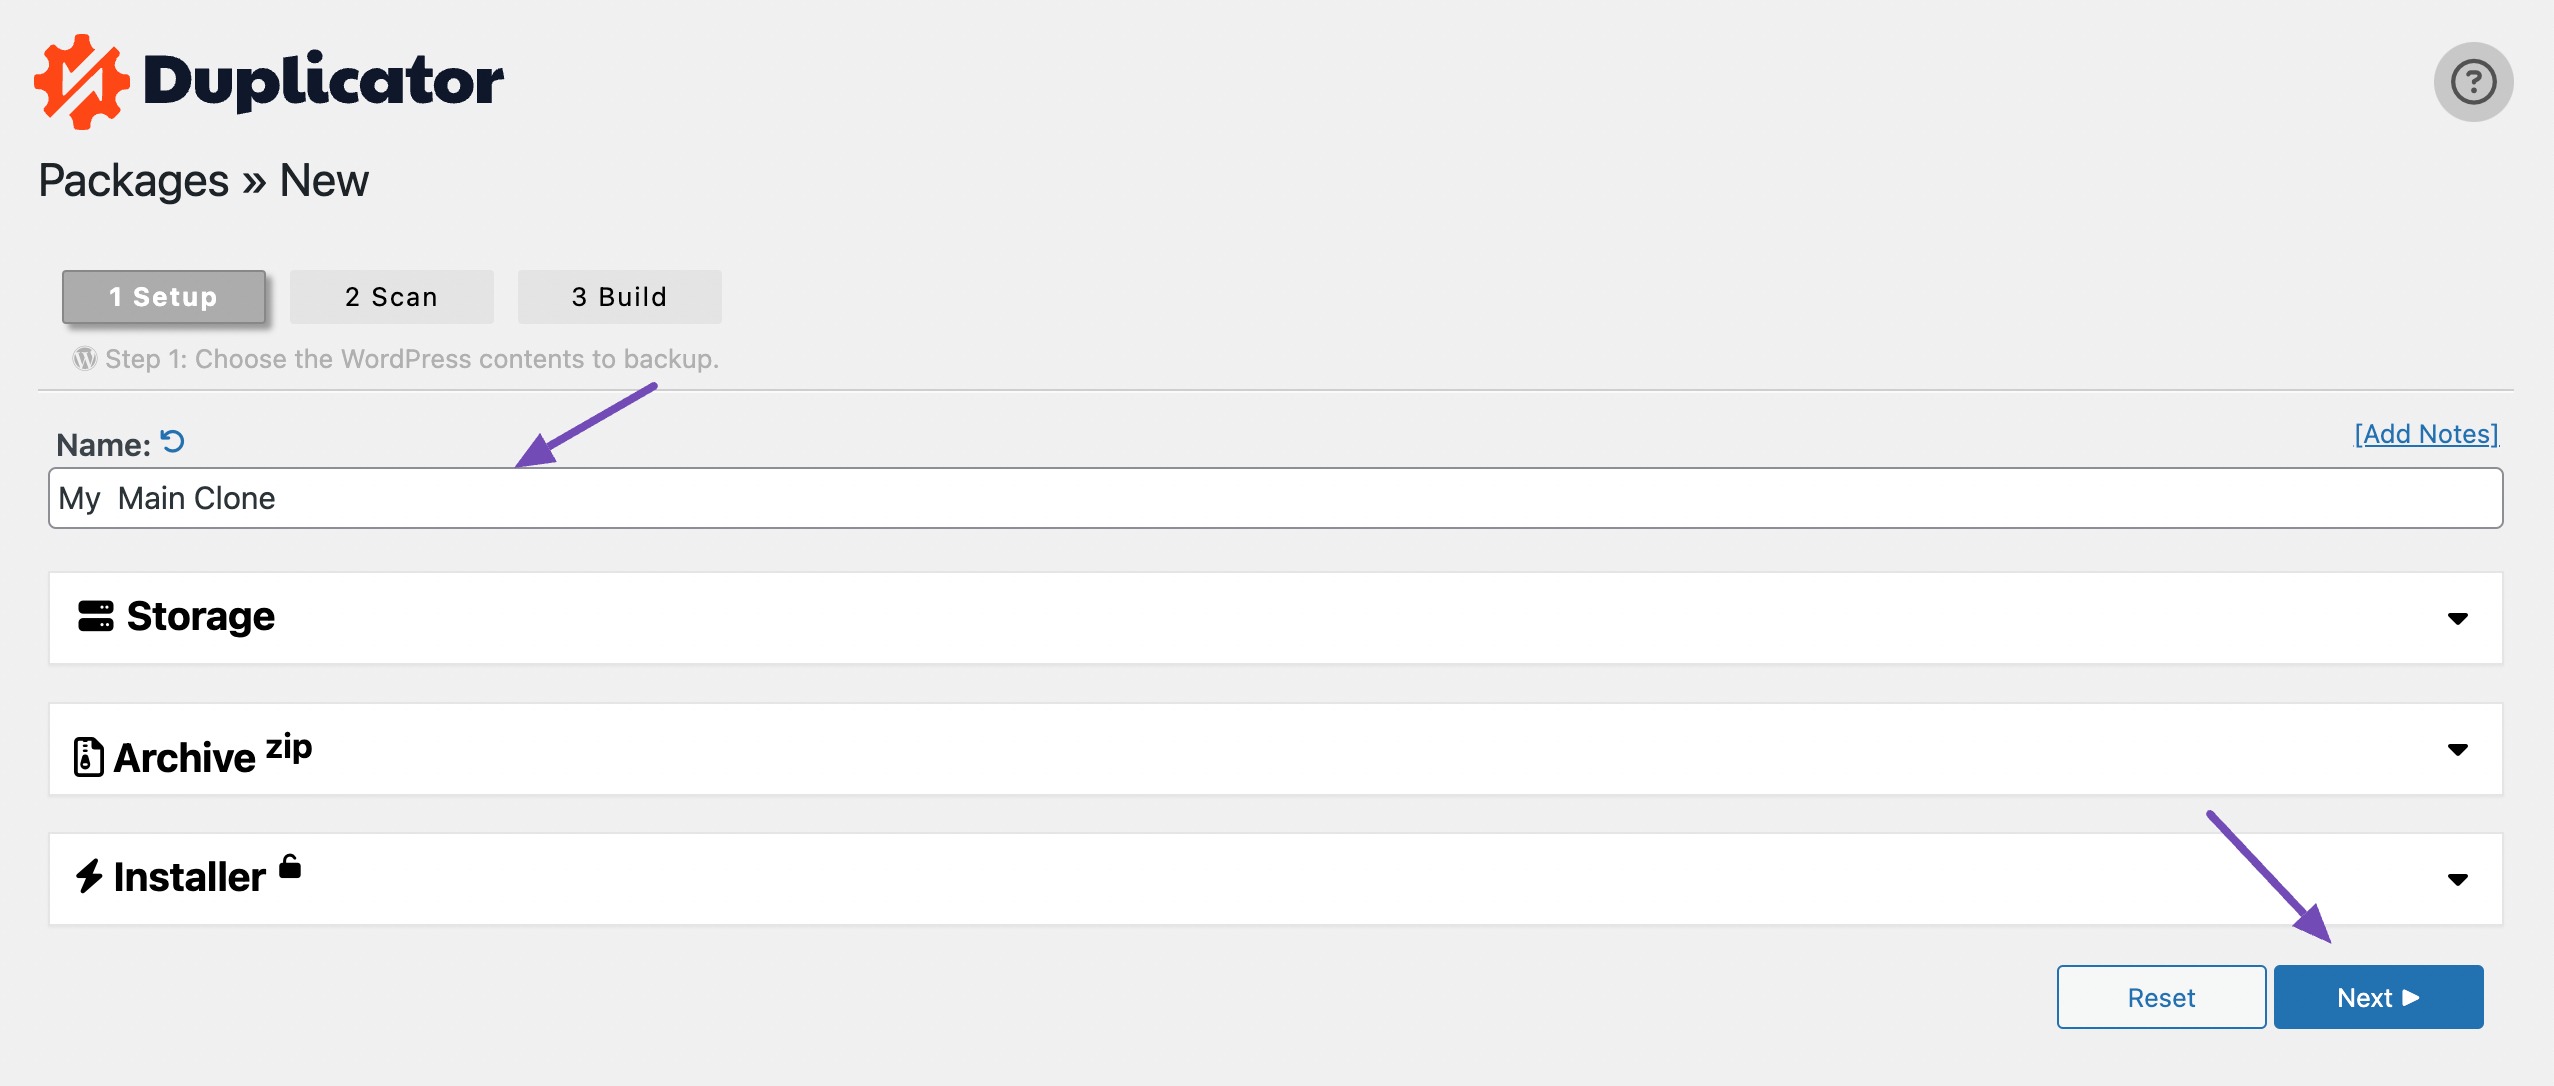
To proceed, assign a name to the clone for easy identification of the file. Once done, click the Next button, and the Duplicator plugin will initiate a scan of your website.
Once the scan is complete, carefully review the results to ensure there are no issues. If you come across any warnings or notices, it is important to address them before proceeding further.
Next, click on the Build button to initiate the creation of your package. This backup will be conveniently packaged into a single downloadable file.
Note that the duration of this process may vary depending on the size of your website.
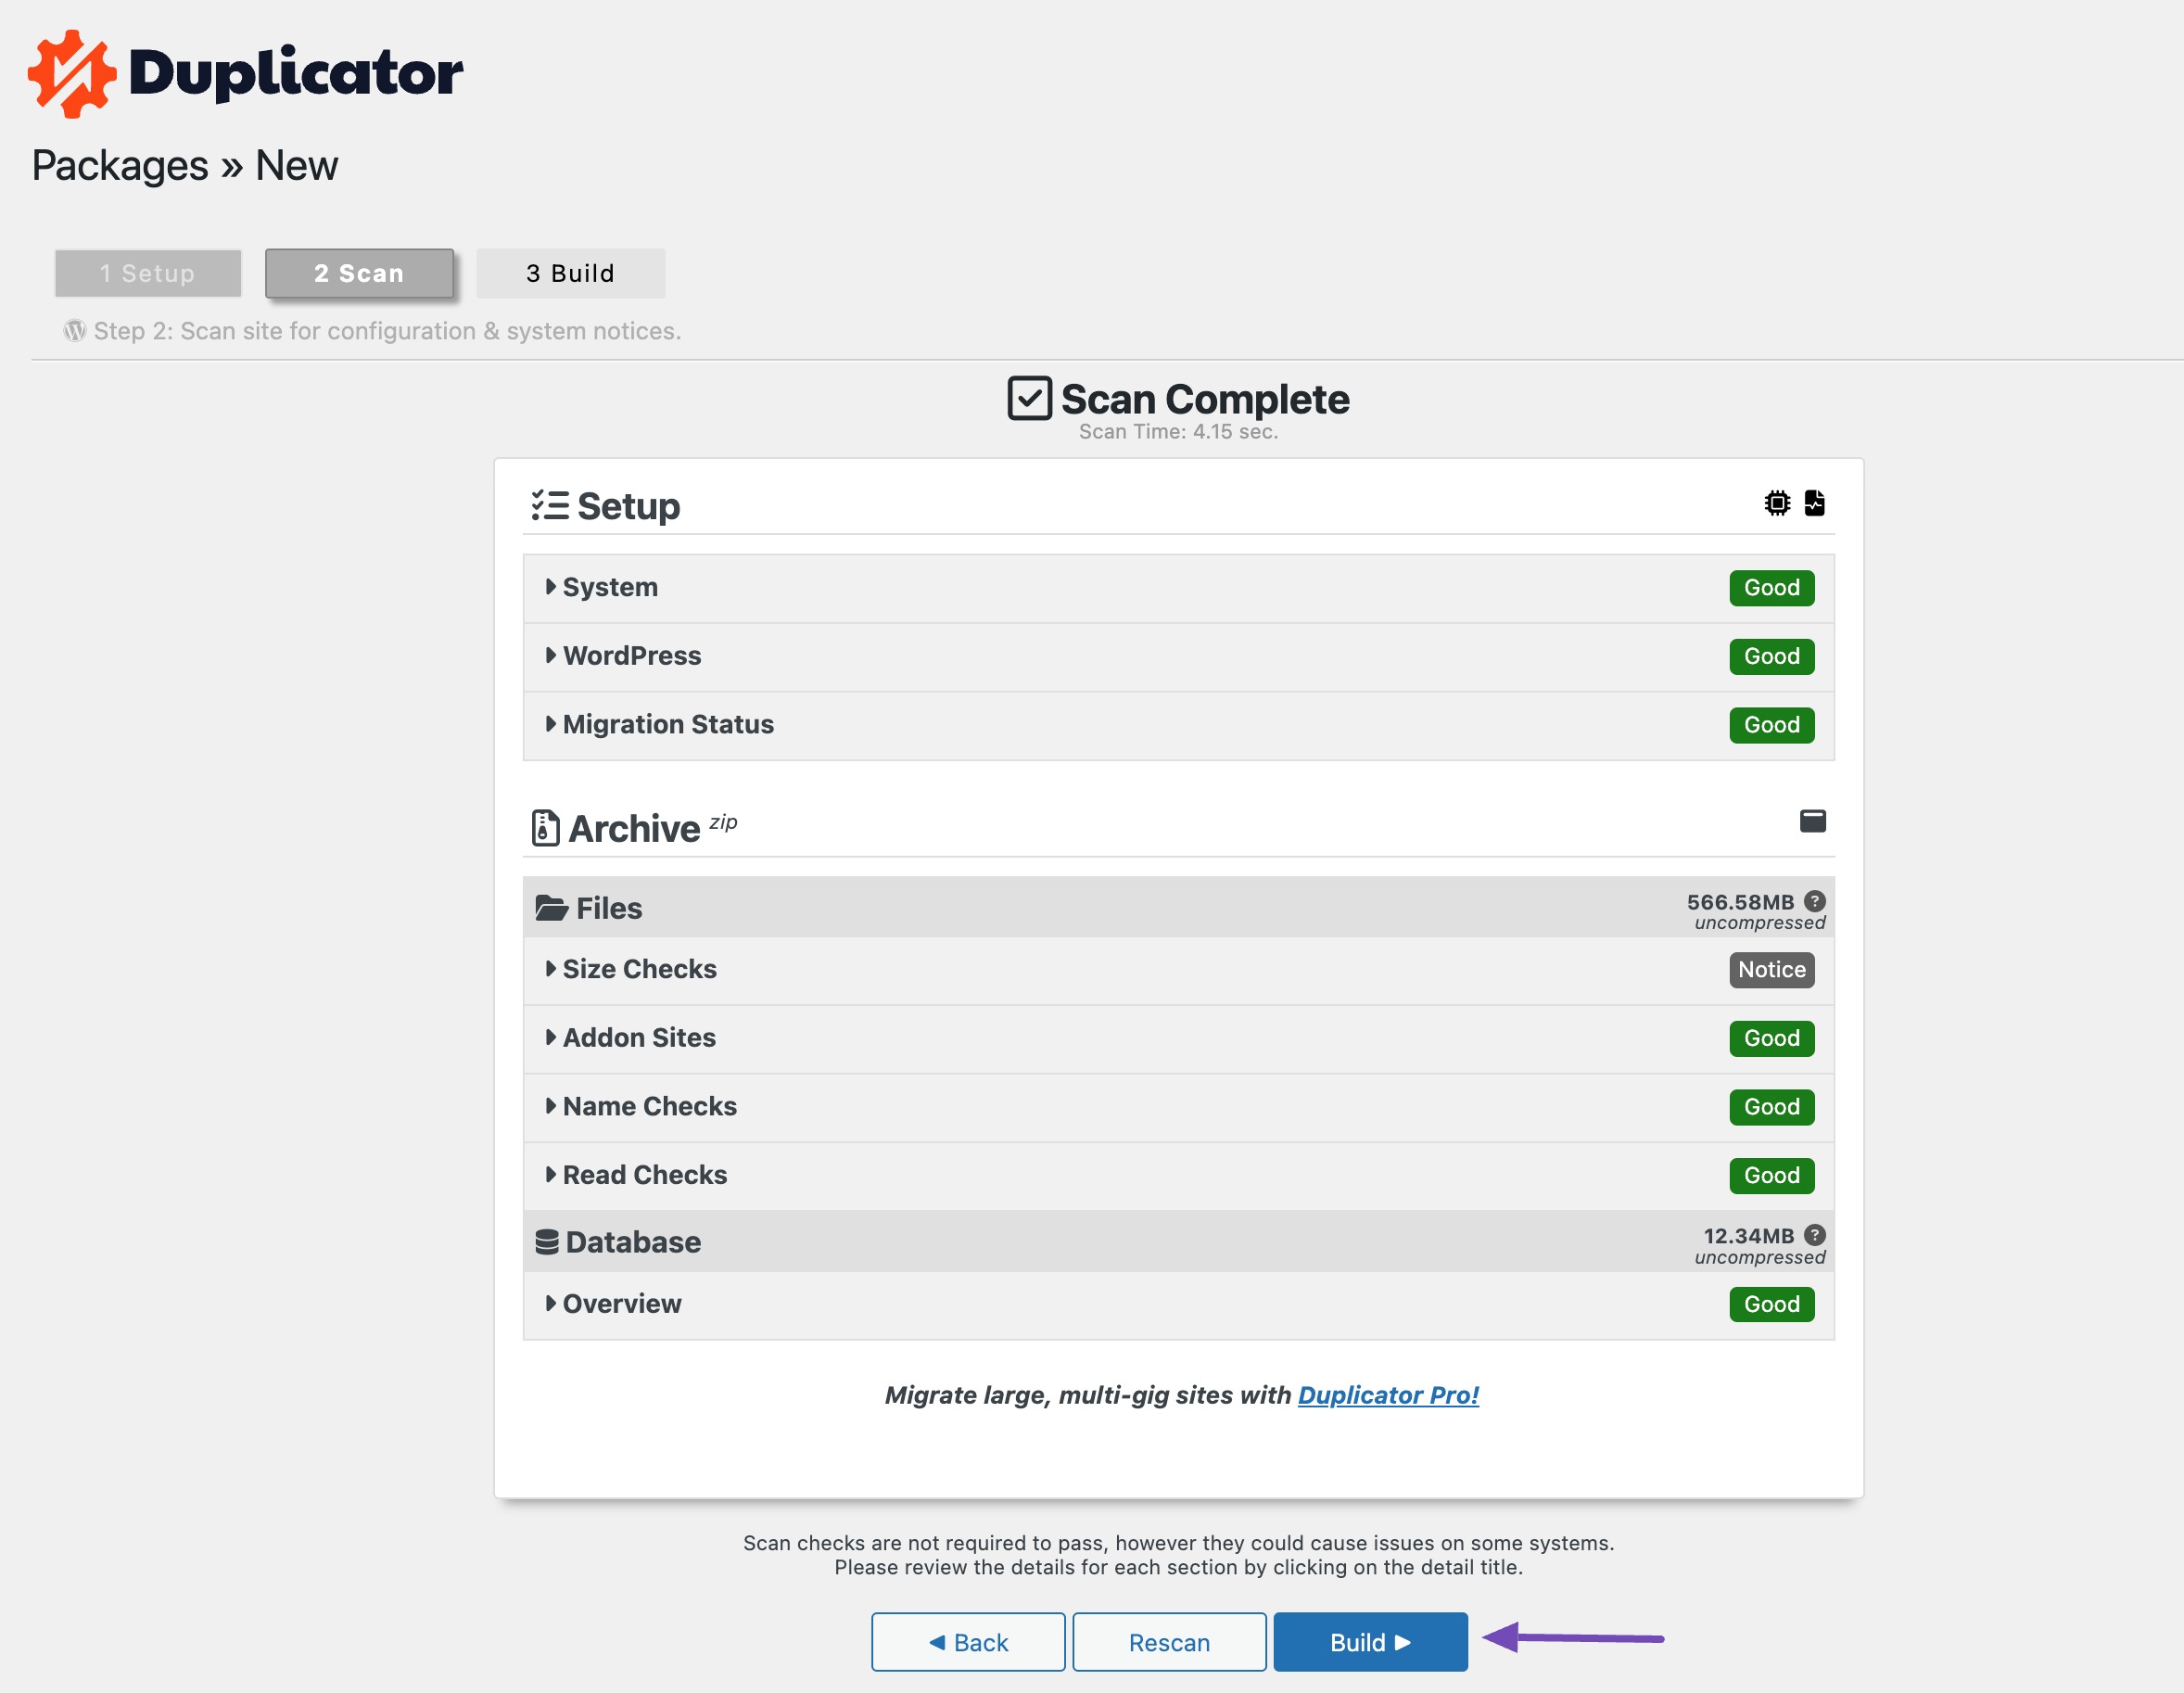
During this time, it’s important to keep the window open and refrain from reloading the page until the process is complete.
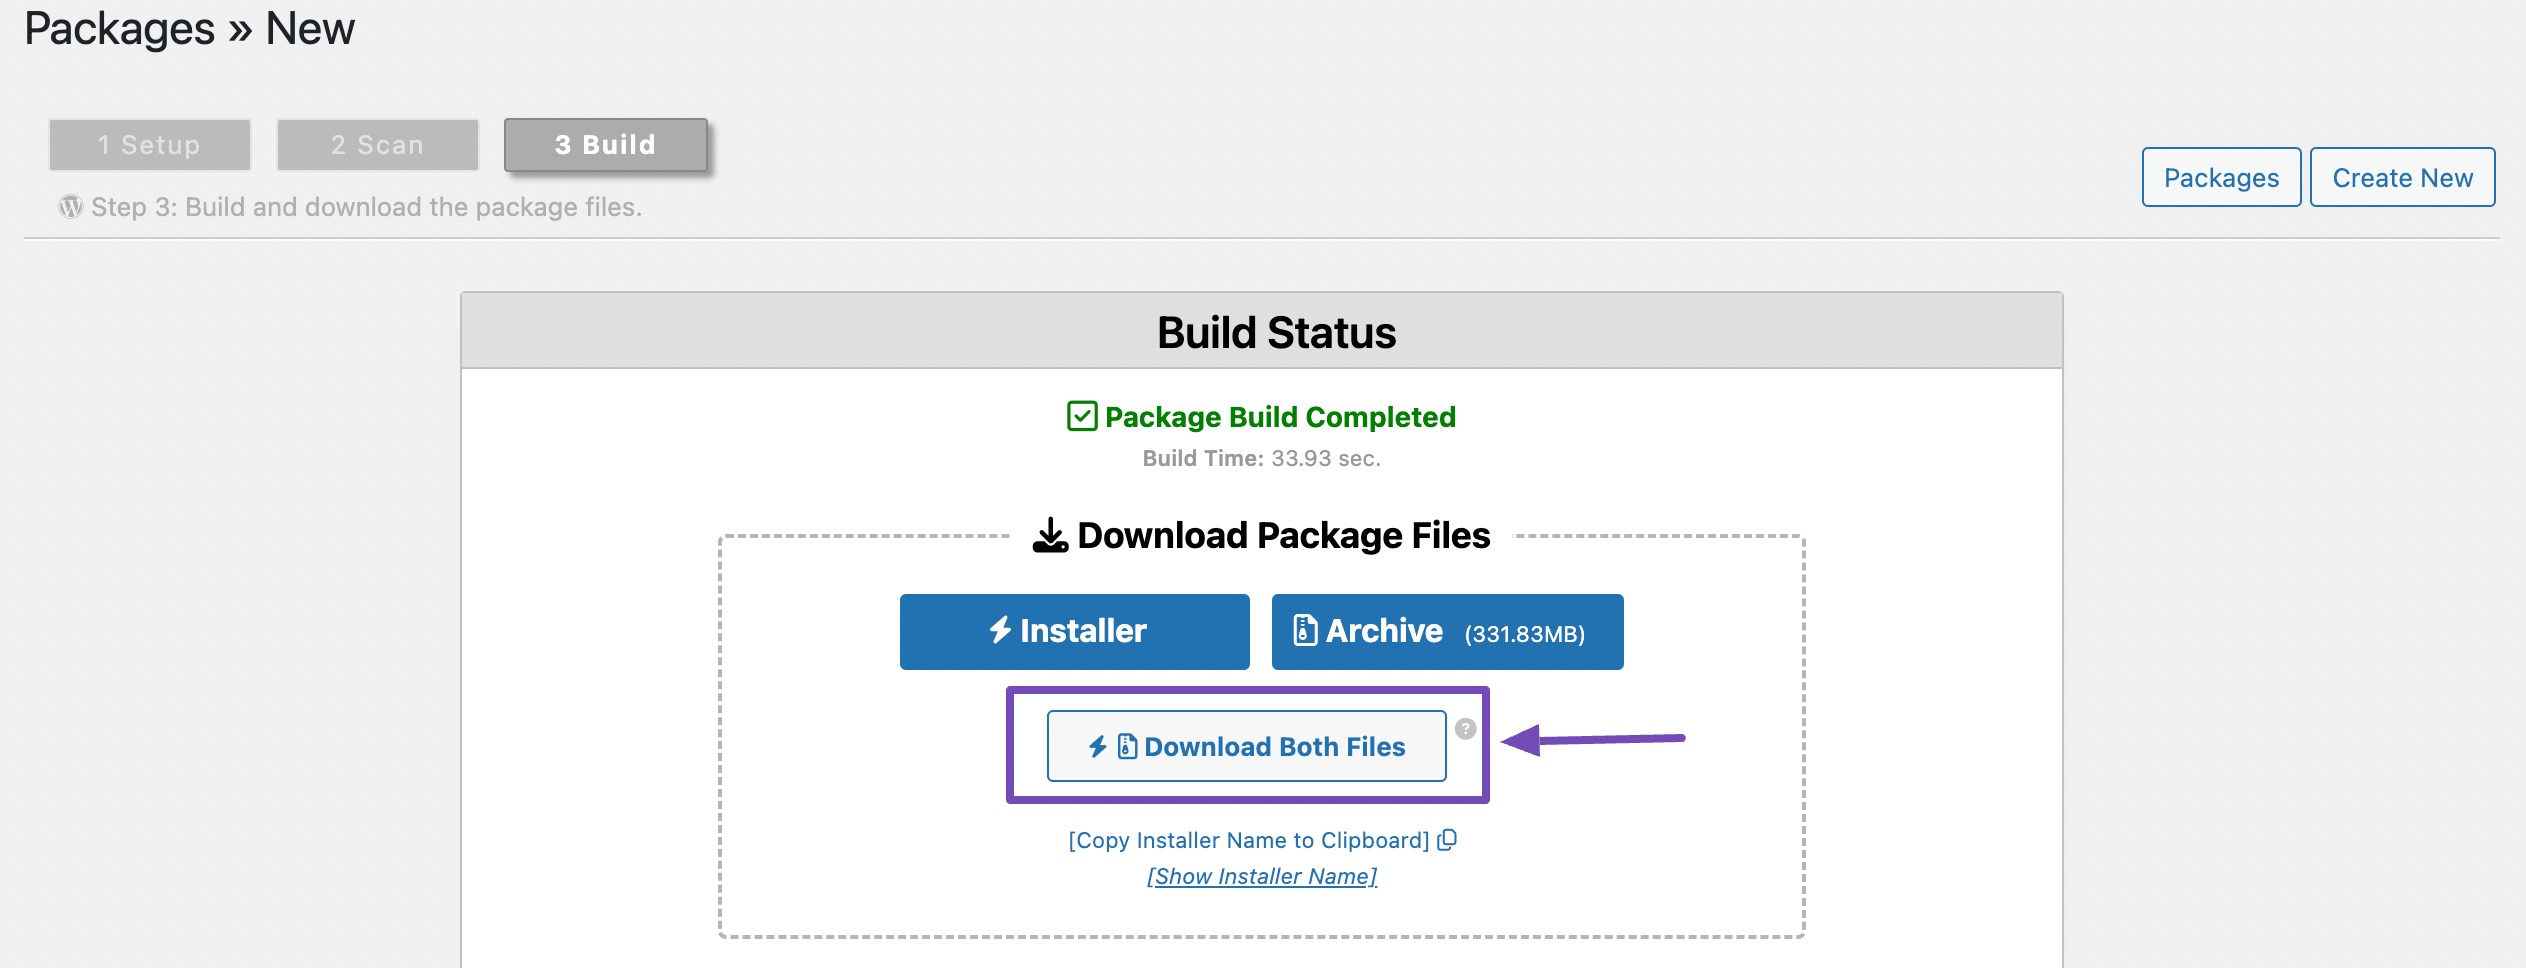
Once the build process is complete, you will have two files to download: the Installer responsible for unpacking the Archive and the Archive containing your backup.
To proceed, click on the Download Both Files button.
Upload Files to Local or New Hosting Server
After the backup process completes, proceed by uploading both the backup and installer files to the desired location. This can be a live WordPress site or a local server.
If opting for a local server, create a new folder in the root directory where all websites are stored.
Uploading to Local Server
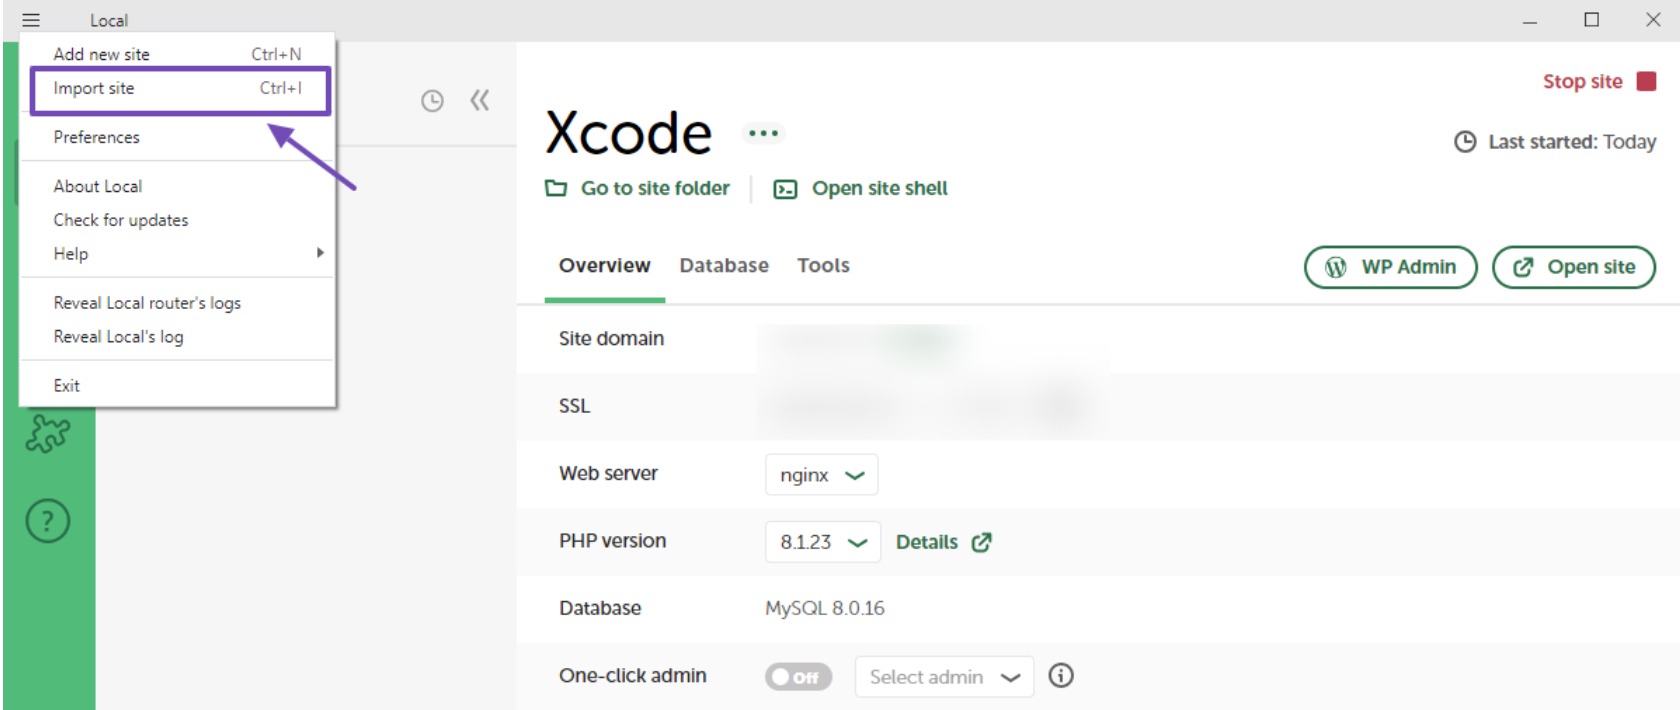
If you’re using Local WP to create a local site, simply open it and select Import site from the menu, as shown below.
When you click Import site in Local WP, your computer files will open. At this point, select only the archive file. The Installer file is unnecessary since the software will handle it automatically.
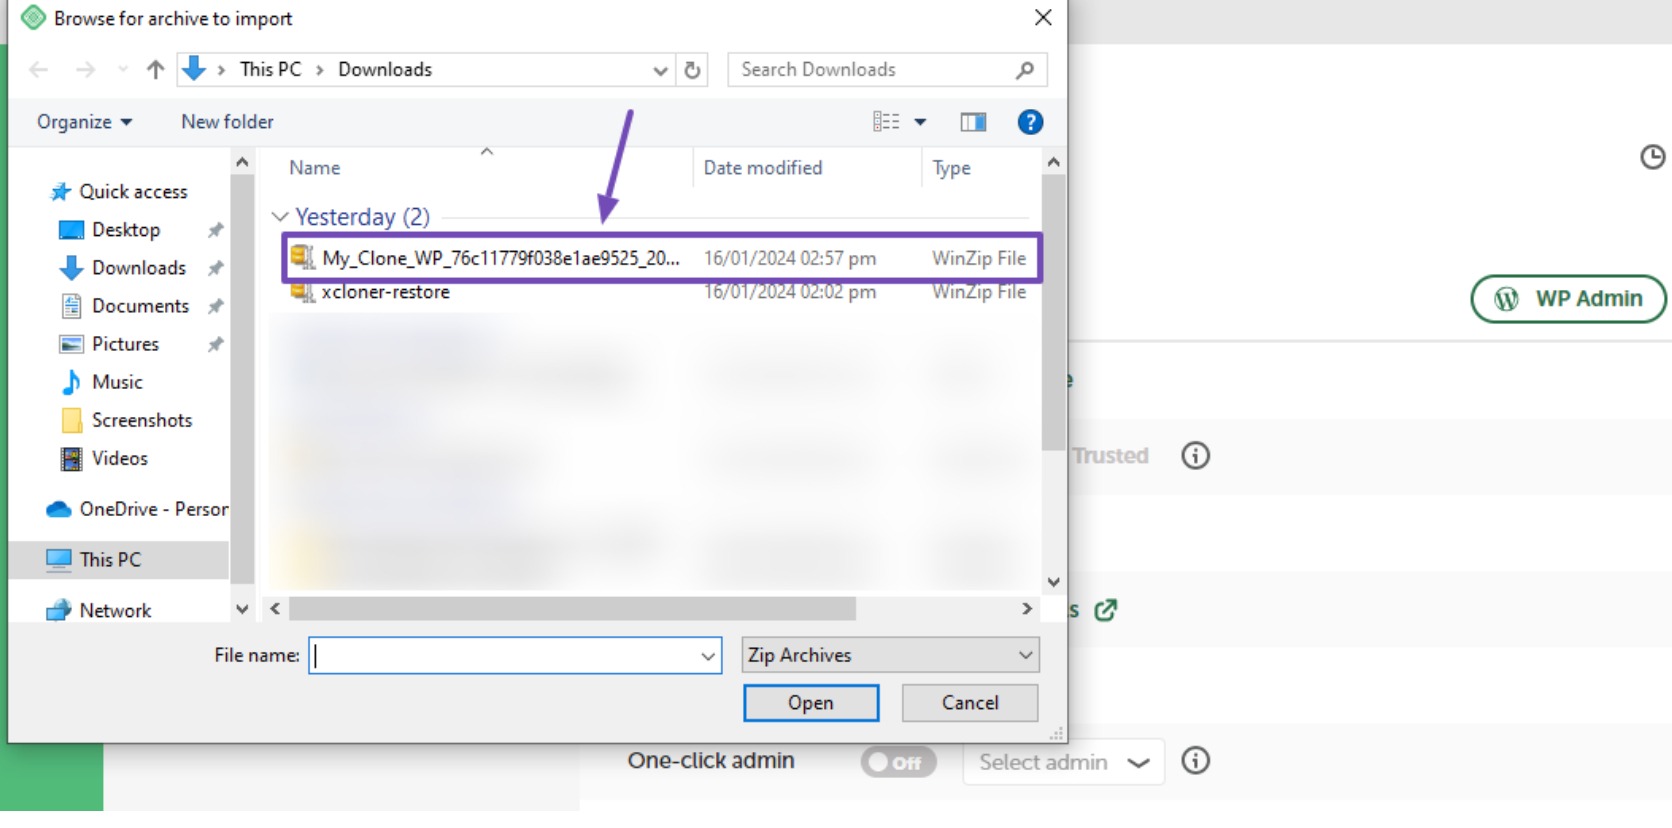
After uploading the archive file, you’ll need to complete two additional steps before the site is imported.
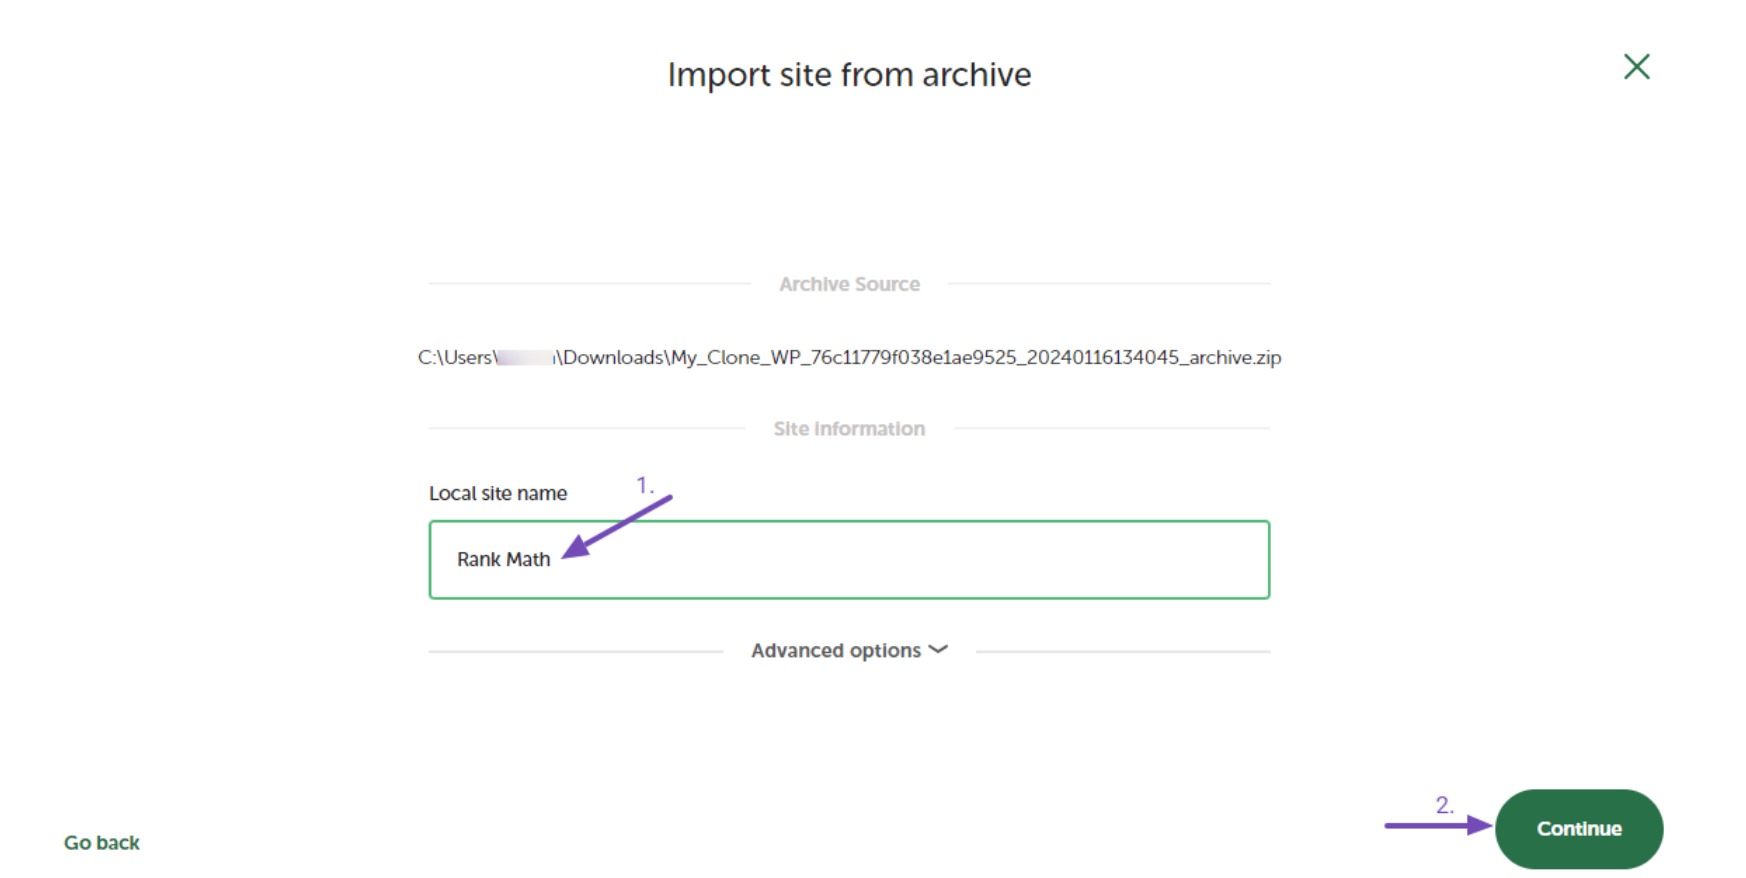
In the first step, provide a name for your local site. Then, click the Continue button to proceed to the next stage.
In the second step, select your environment—either leave it at ‘Preferred‘ or customize it using the ‘Custom‘ option if needed. Click the Import site button when you’re ready to proceed.
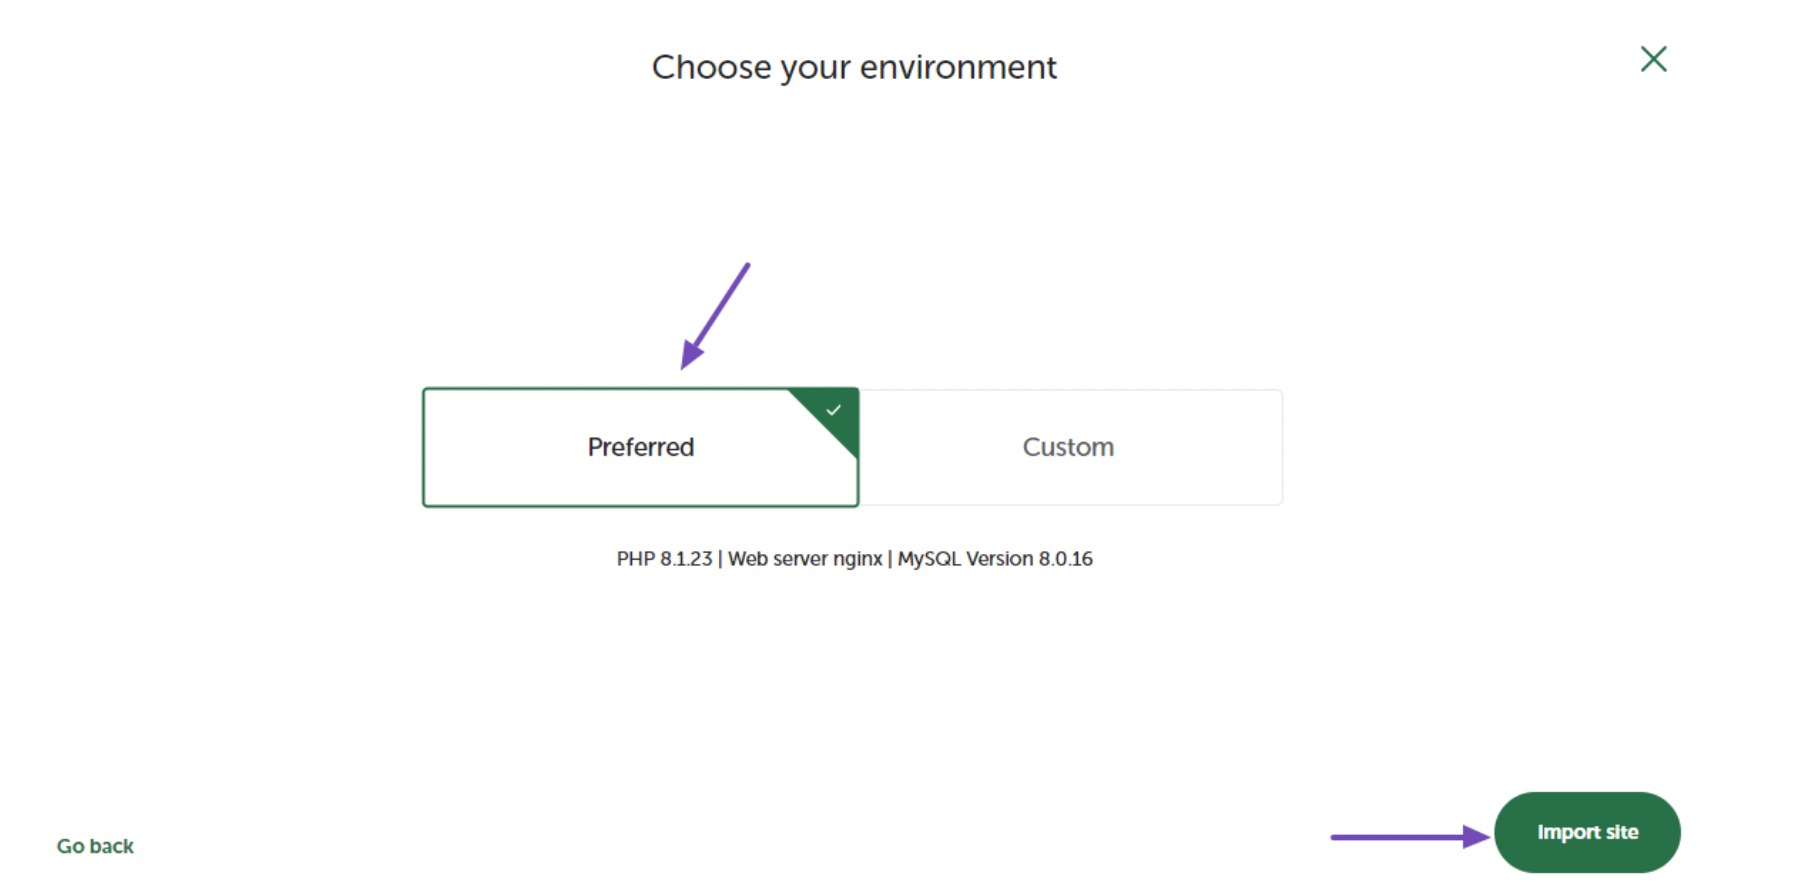
Clicking the button will begin the import of the cloned website, and you will need to wait for the process to finish.
Uploading to New Hosting Server
For a live website, upload the Installer and Archive files to the root directory using an FTP client.
Alternatively, navigate to your hosting panel or cPanel, and then to the public_html folder.

If you’ve previously installed websites in your file directory that are still relevant, consider backing them up and deleting them before uploading the clone website files.
Create a New Database
Upon uploading the two files, proceed to create a new WordPress database to unpack your cloned website version. If you’ve already completed this step, feel free to skip it.
To create a new database, access the MySQL Databases option in your cPanel.

On the MySQL Databases page, input the desired name for your cloned site database, then click on the Create Database button.

Once the database is created, revisit the MySQL Databases page, and scroll down to the MySQL Users section. Input the database username and password, then click the Create User button when done.
Ensure that you securely store the database name, username, and password, as this information will be required later.
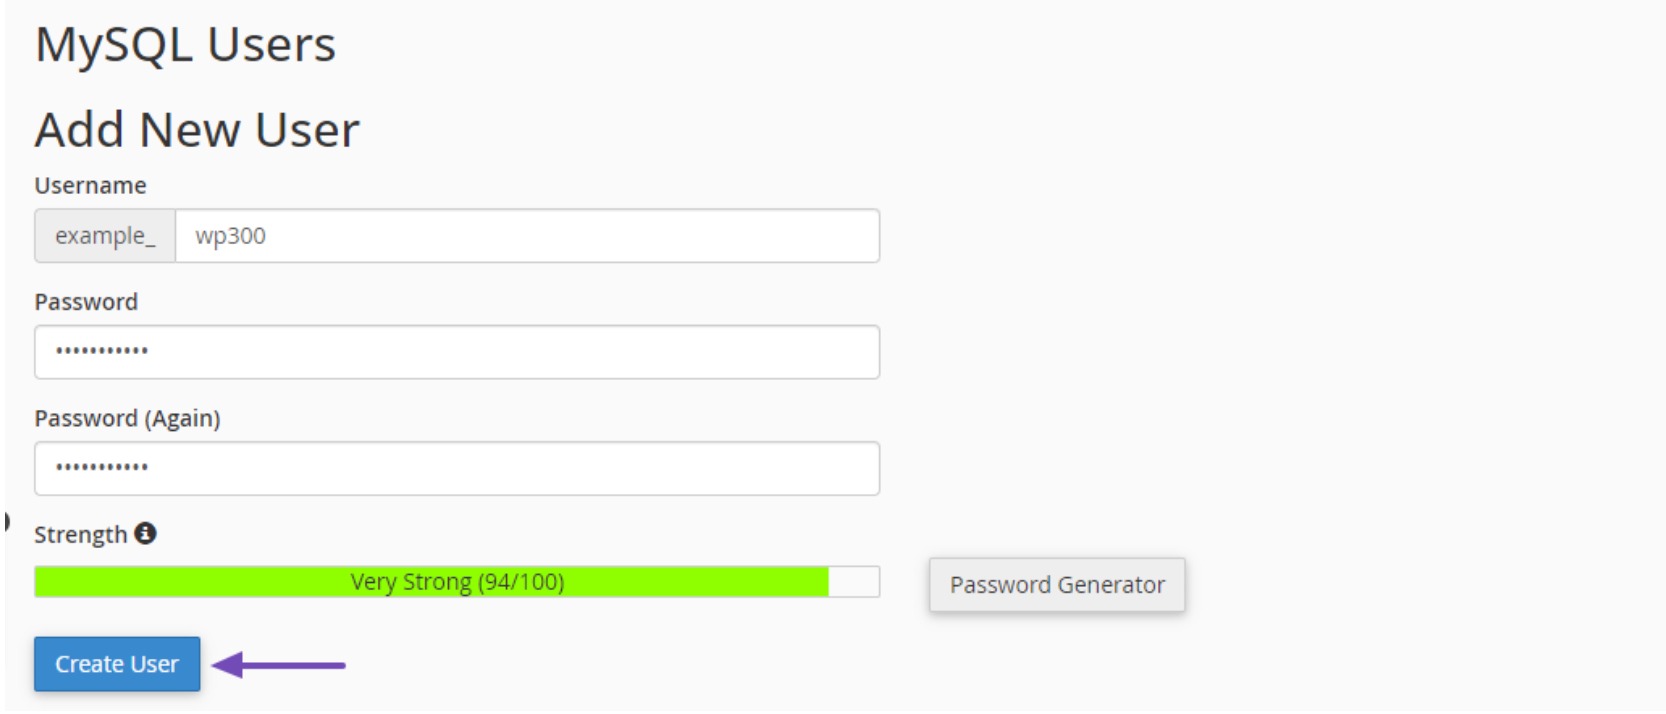
Once you’ve finished creating the user, move on to adding the user to your database. Scroll to the Add User To Database section and expand the User dropdown. Select the database user you created earlier.
Next, expand the Database dropdown, choose the previously created database, and click the Add button.

Now, choose the user privileges for your new database. Opt for the ALL PRIVILEGES option to grant all privileges simultaneously. Scroll to the bottom of the page and click the Make Changes button.
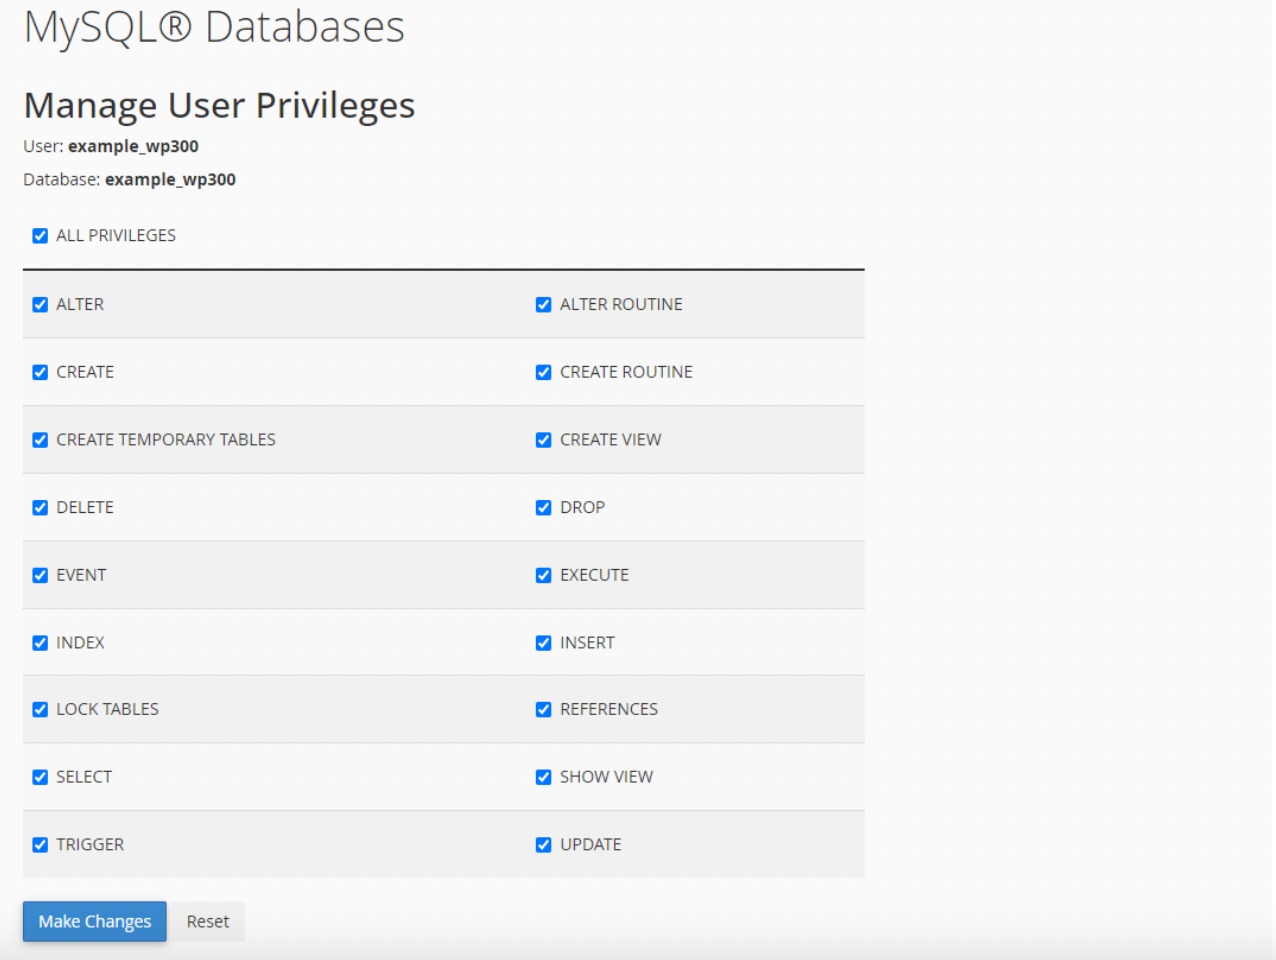
After saving your changes, a notification confirming successful completion will appear on your screen.
Now, you can move forward with the Duplicator installer script to effortlessly extract your archive file in a few simple stages.
Run the Duplicator Installer
To begin, open your web browser and enter your website’s URL followed by ‘/installer.php’. For example, if your domain is ‘example.com,’ the URL will be ‘https://example.com/installer.php.’
Make sure to replace ‘example.com’ with your actual domain name.
By doing so, the Duplicator installer script will launch and automatically detect any existing backup files and initial settings.
Next, scroll down to the Setup section and provide the database name, username, and password you previously created.
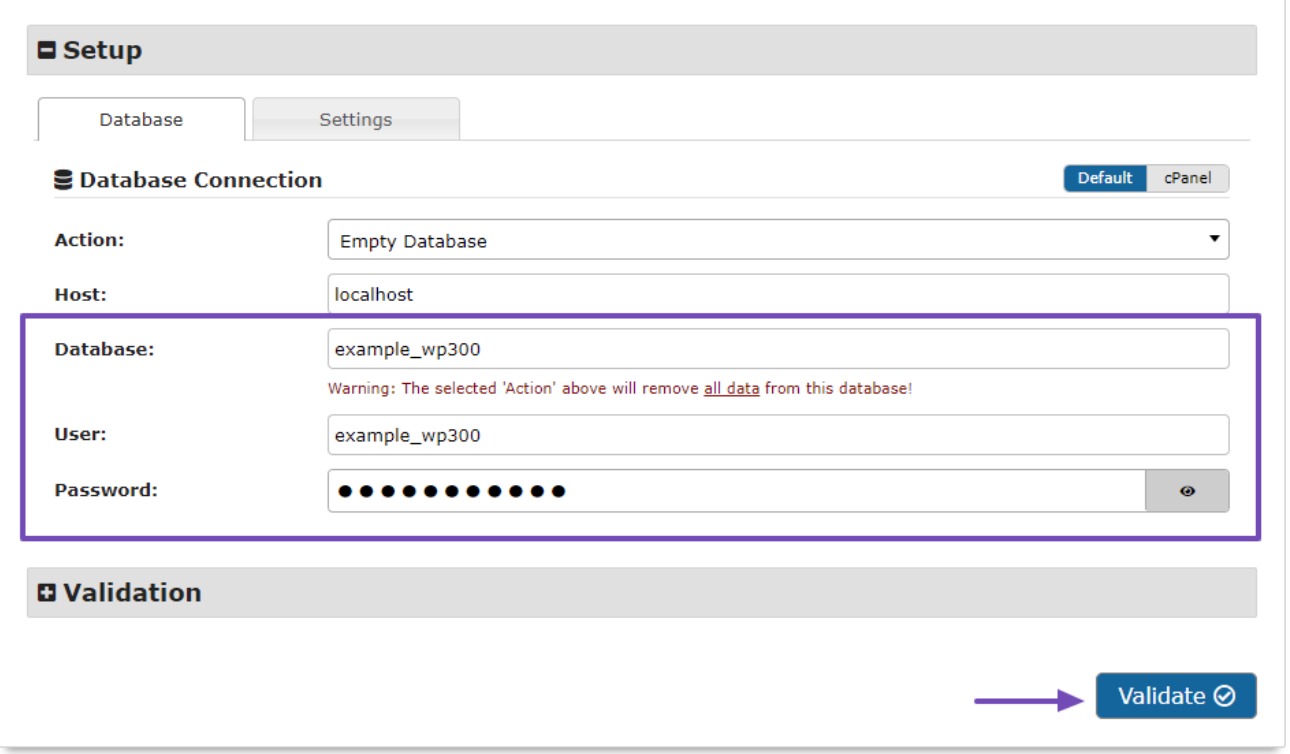
After accurately providing these details, click on the Validate button. This ensures the system is prepared for installation.
If any issues arise, a ‘Warn’ message will be displayed. In such cases, resolve the issues, confirm the terms and checks, and then click on the Next button to proceed to the next step.
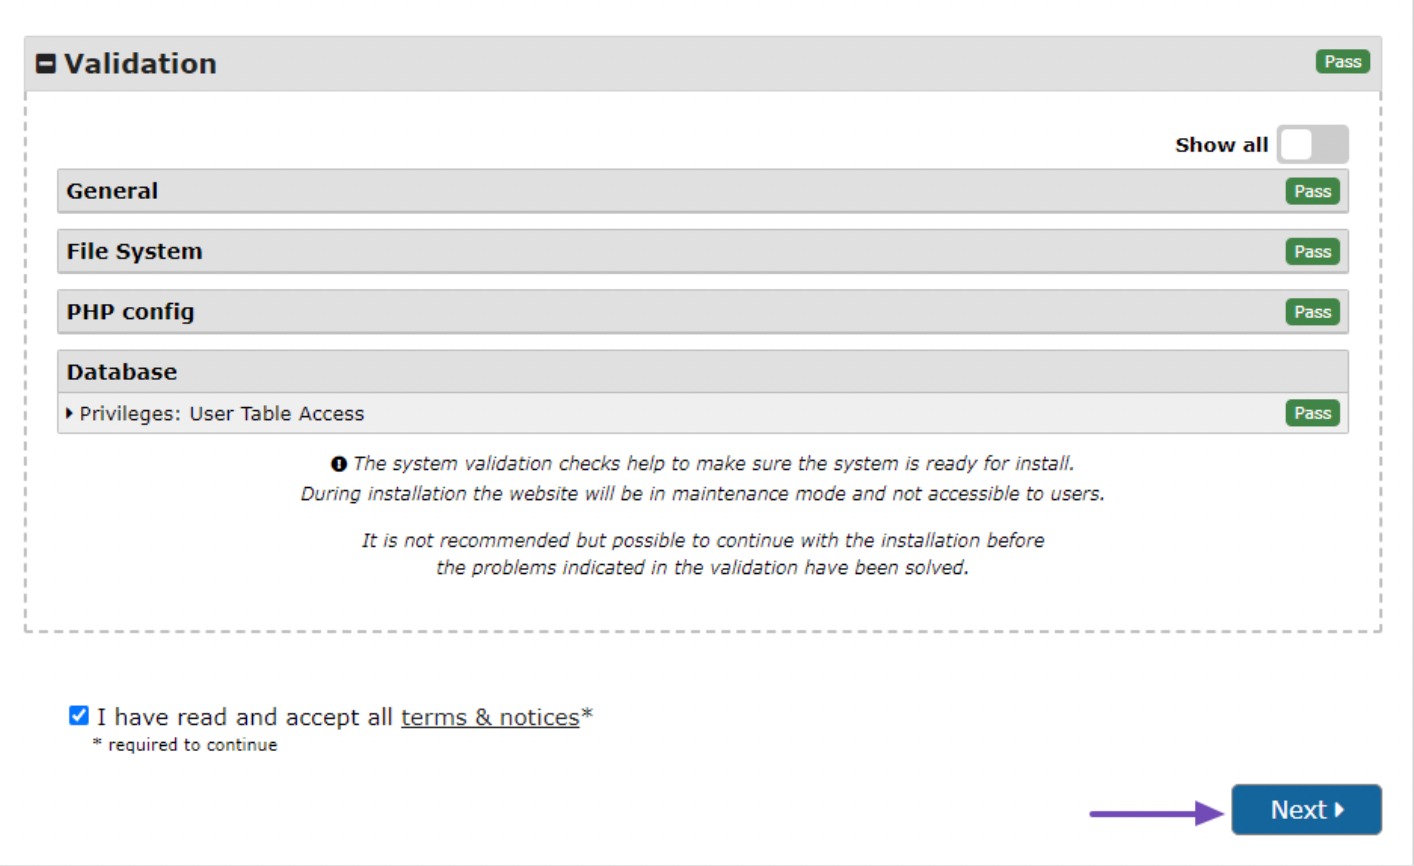
Next, review the details, and upon confirmation, click the OK button to proceed.
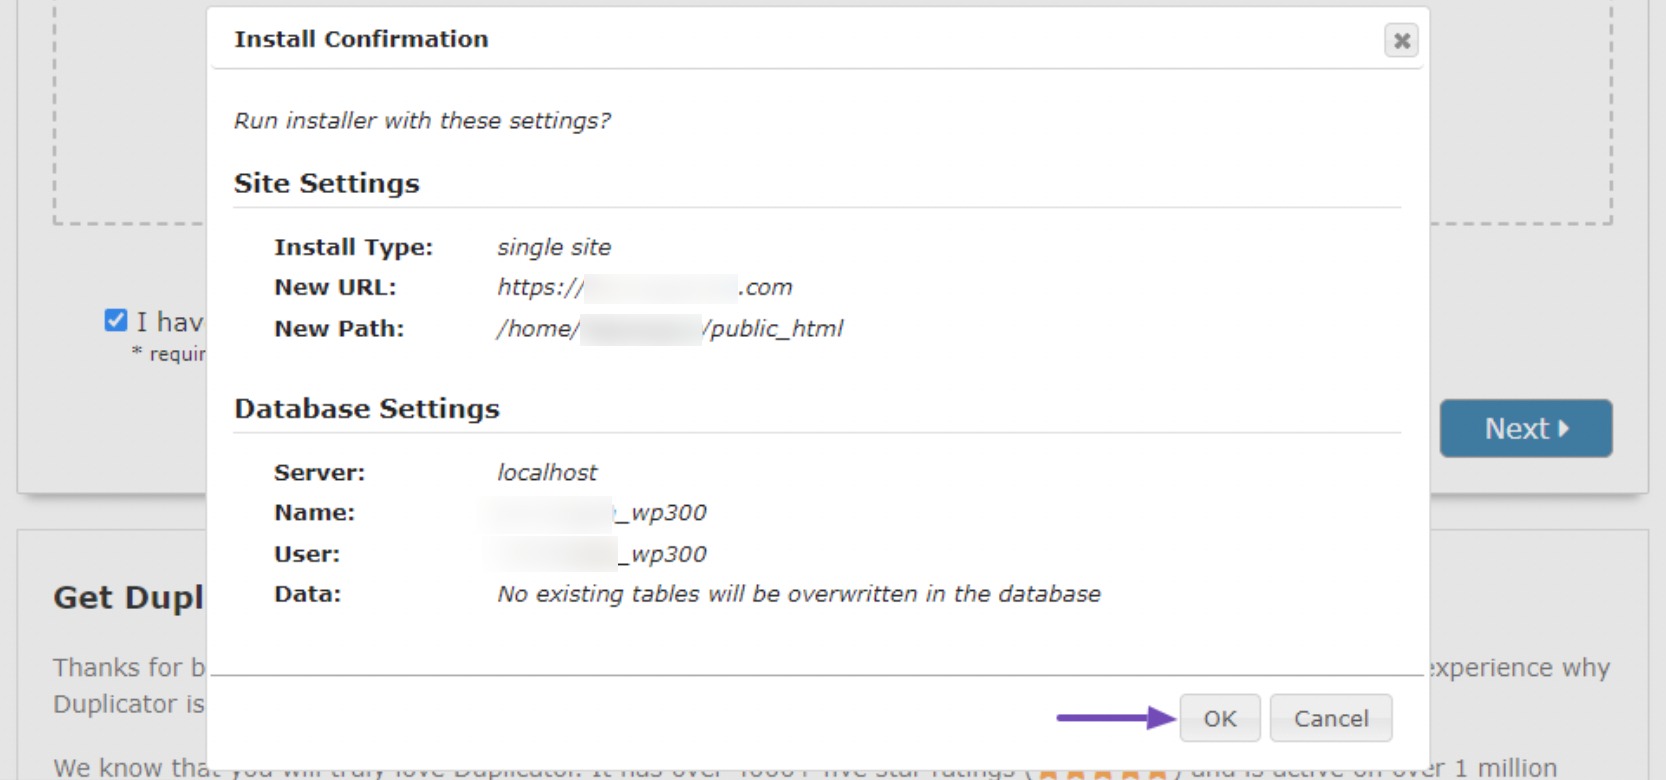
After completing the previous steps, the installation process will commence, which may take some time to complete.
Once the files are successfully installed, you will be presented with an Admin Login button. Simply click on the button to access your newly cloned website.

Before visiting your cloned website, WordPress will request your username and password. Use the same credentials you were using on your old website.
Once logged in, a success message will appear, confirming the migration was successful.
Test Your Cloned Website and Delete Temporary Files
Now, it’s time to thoroughly test your website to make sure everything is working as expected.
Examine your pages, posts, images, and other functionalities to verify that all data has been transferred correctly. Don’t limit your review to the admin area; inspect your website’s front end.
Once you’re satisfied that everything has been imported correctly, you can delete the installation files generated by the Duplicator plugin.
To accomplish this, access the cloned WordPress dashboard and navigate to Duplicator → Tools. From there, locate the Data Cleanup section and click the Remove Installation Files button.

Failure to remove the installation files indicates an incomplete migration process and may pose security risks.
4 Conclusion
Cloning a WordPress site can be a valuable skill whether you’re looking to create a backup, test new features, or migrate your site to a new server.
By following the steps outlined in this post, you can easily and effectively clone your WordPress site.
Also, create a backup of your original site before proceeding with the cloning process.
Remember to update your cloned site’s URLs and make necessary configuration changes to ensure it functions correctly. Finally, thoroughly test your cloned site to ensure all functionality is intact and matches your original site.
By cloning your site, you’ll have the power to streamline your WordPress site management and confidently experiment with new ideas without the fear of disrupting your live site.
If you like this post, let us know by Tweeting @rankmathseo.
