Have you ever stopped reading an article because it was too long, you got bored, or you couldn’t find the section you were looking for? This might not have happened if the author had included a table of contents.
Agree?
But you need not worry. We’re always looking for ways to make your work easier. One of the tools that can help you improve the readability of an article is a table of contents located at the top of the page.
Rank Math makes it extremely simple to add a Table of Contents block to your article without hassle. In this knowledgebase article, we’ll show you how to create a TOC block using Rank Math.

Note: Rank Math’s Table of Contents Block is available only for the Block Editor. If you’re using Classic Editor or other page builders like Elementor, Divi, we recommend checking other compatible TOC plugins listed here.
Table Of Contents
- Add TOC Block Using Rank Math
- Customizing Table of Contents Block
- Table of Contents Block Settings
- Table of Contents Block Global Settings
- Create a Reusable Table of Contents Block
- Convert Table of Contents Blocks from Yoast / AIOSEO to Rank Math
- Common Table of Contents Issues and Their Fixes
- Frequently Asked Questions
1 Add TOC Block Using Rank Math
We’ll now discuss how to add a TOC block using Rank Math.
1.1 Install and Activate Rank Math
First, install and activate the Rank Math plugin on your site. We recommend using Rank Math as it saves you time by automatically generating the table of contents based on your headings and making it completely customizable with editable links.
Upon activation, you’ll need to configure the plugin using the Rank Math setup wizard. For detailed instructions, see our guide on correctly setting up Rank Math for WordPress.
Once you’ve installed and configured the plugin, adding a TOC block using Rank Math is a pretty simple process.
Note: To use the TOC block, please ensure you’ve enabled the Schema module.
1.2 Adding Table of Contents Block
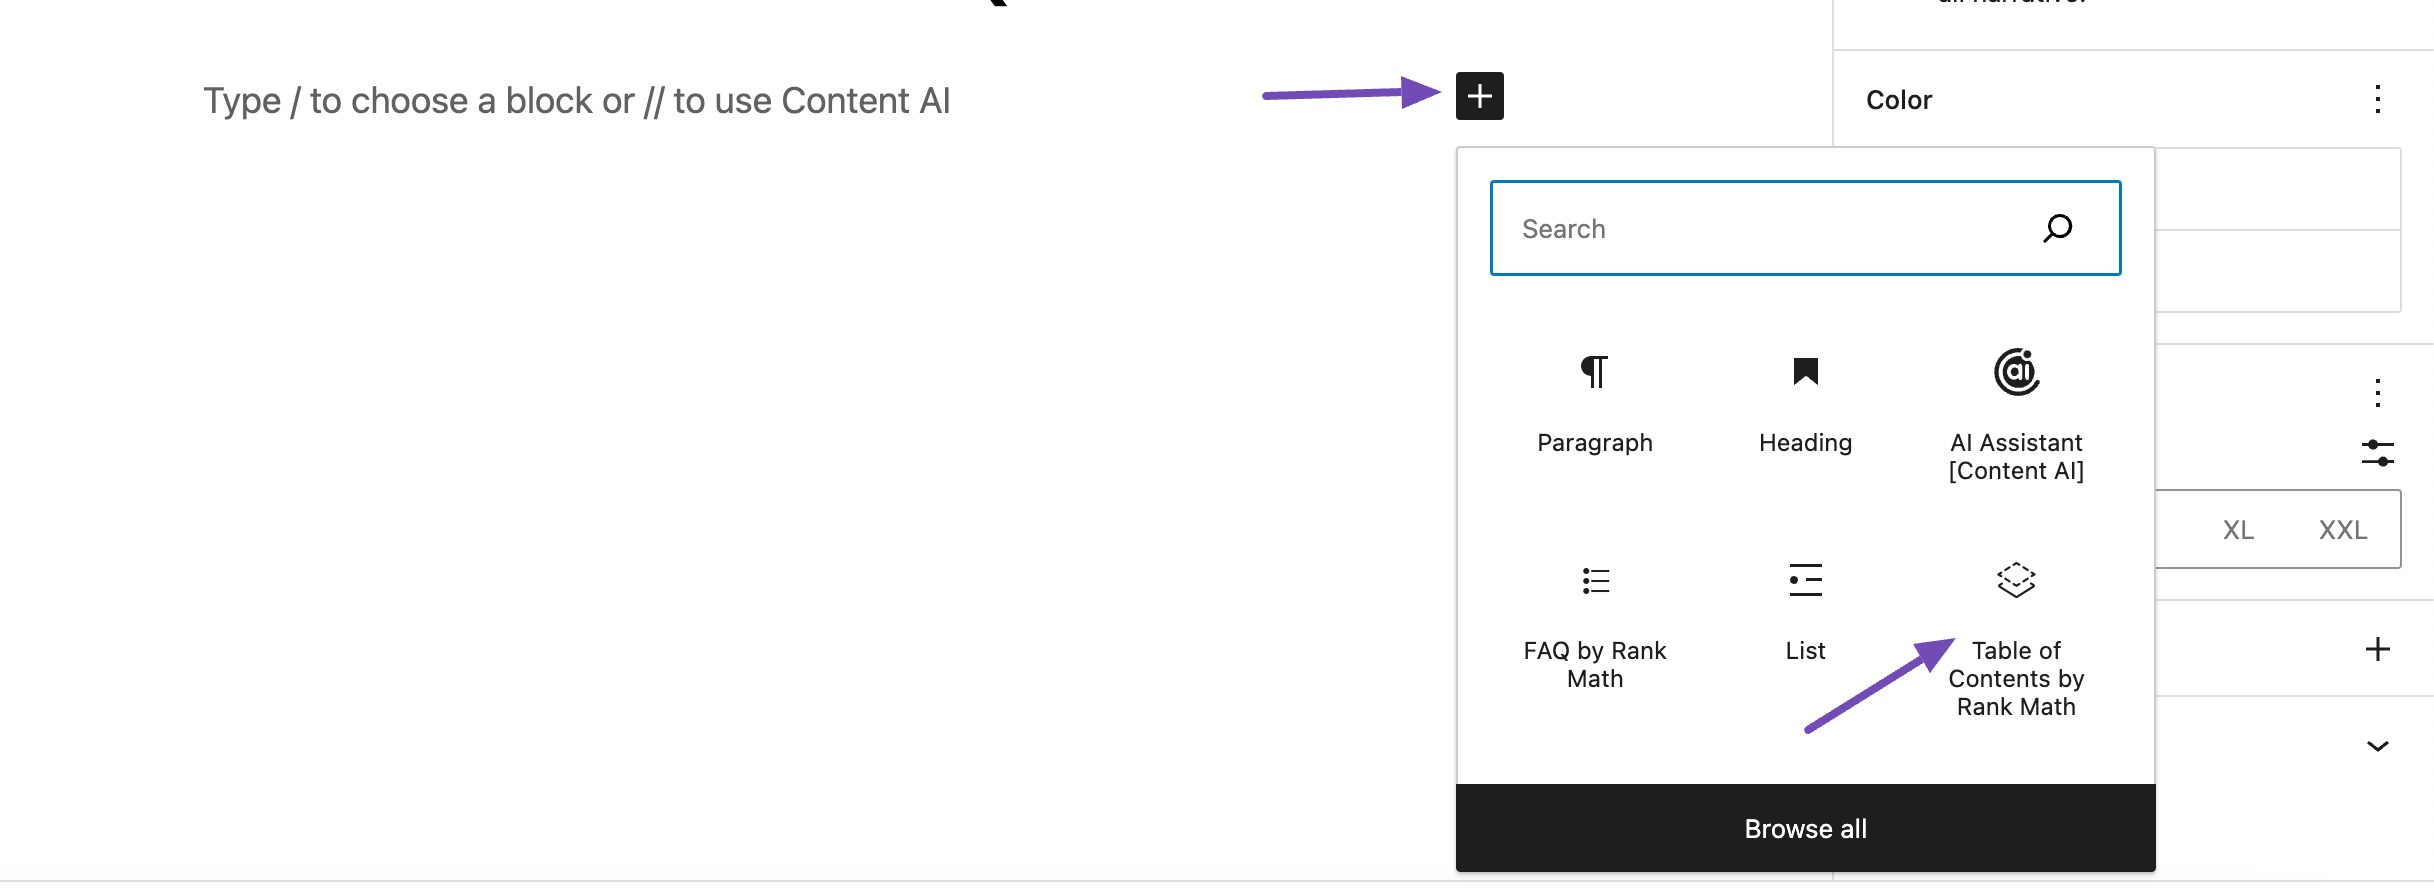
Navigate to your post/page editing screen where you wish to add the table of contents. In the post-editing screen, click the ‘+ ‘ icon and locate the Table of Contents by Rank Math block.
Once you’ve added the Table of Contents by Rank Math block, add a title for your table of contents. Next, Rank Math will automatically generate TOC from the post’s content.
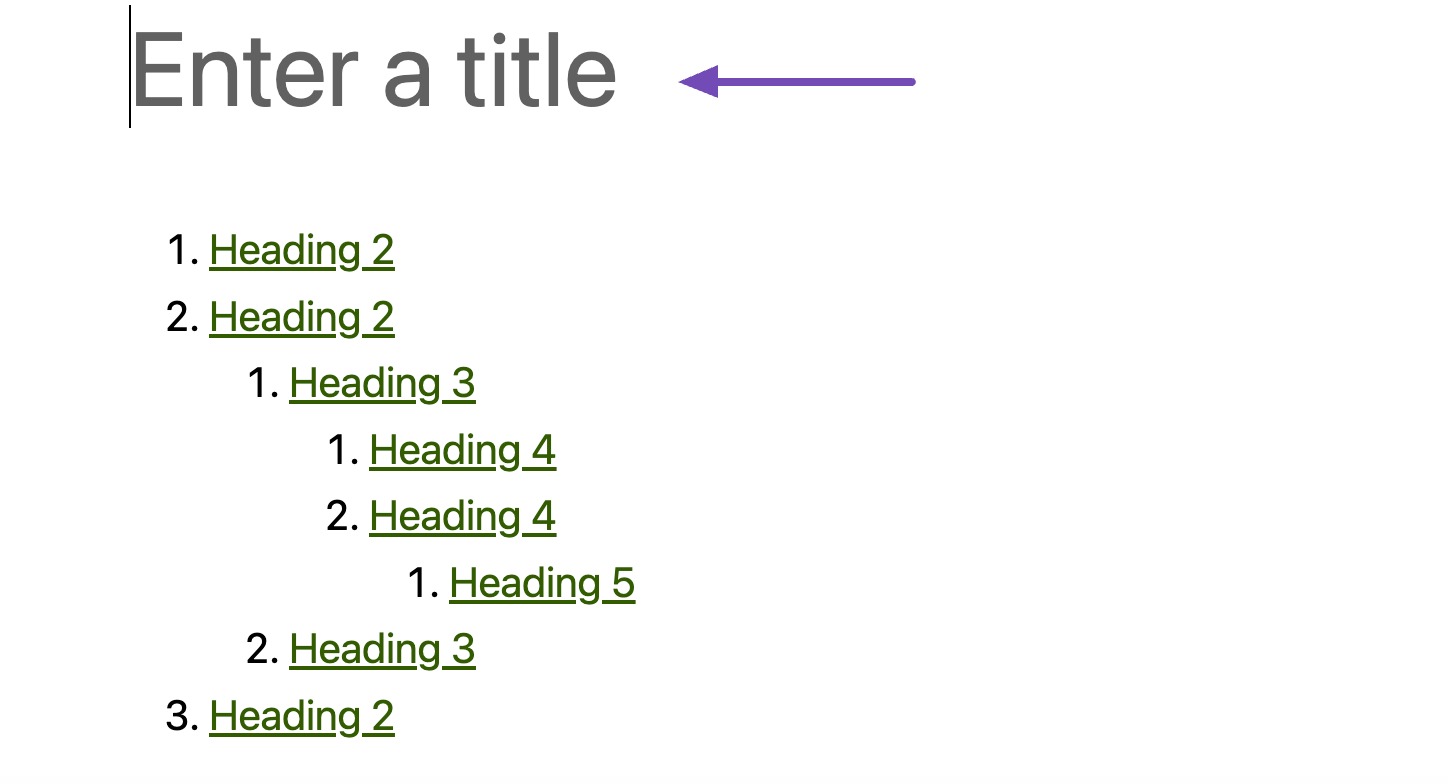
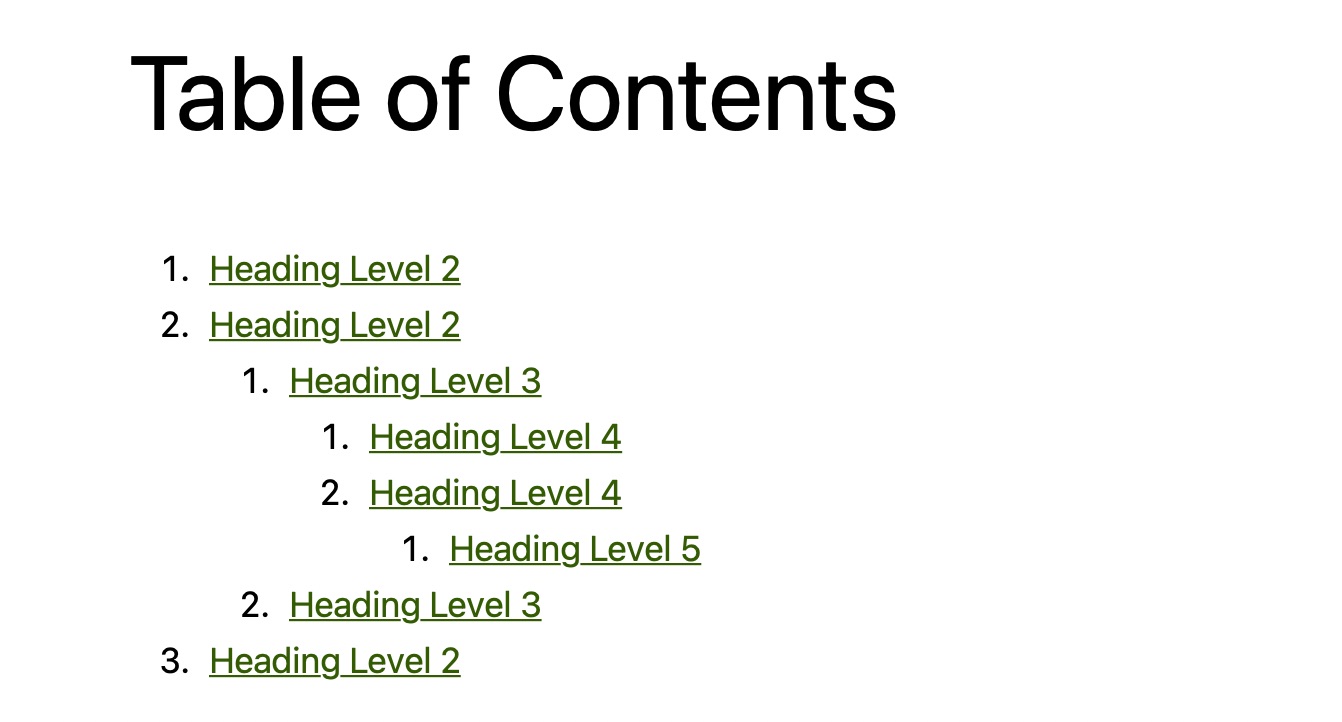
The plugin automatically identifies the headings on the page and adds them to your table of contents, linking to the corresponding sections within your post or page. If you use different heading tags (say H2 and H3), lower-level headings will be indented to show the structure of your content.
For instance, if you start with an H2 Heading block and then add an H3 to H5 below it, these will get incrementally nested and added as sub-headings, as shown below.
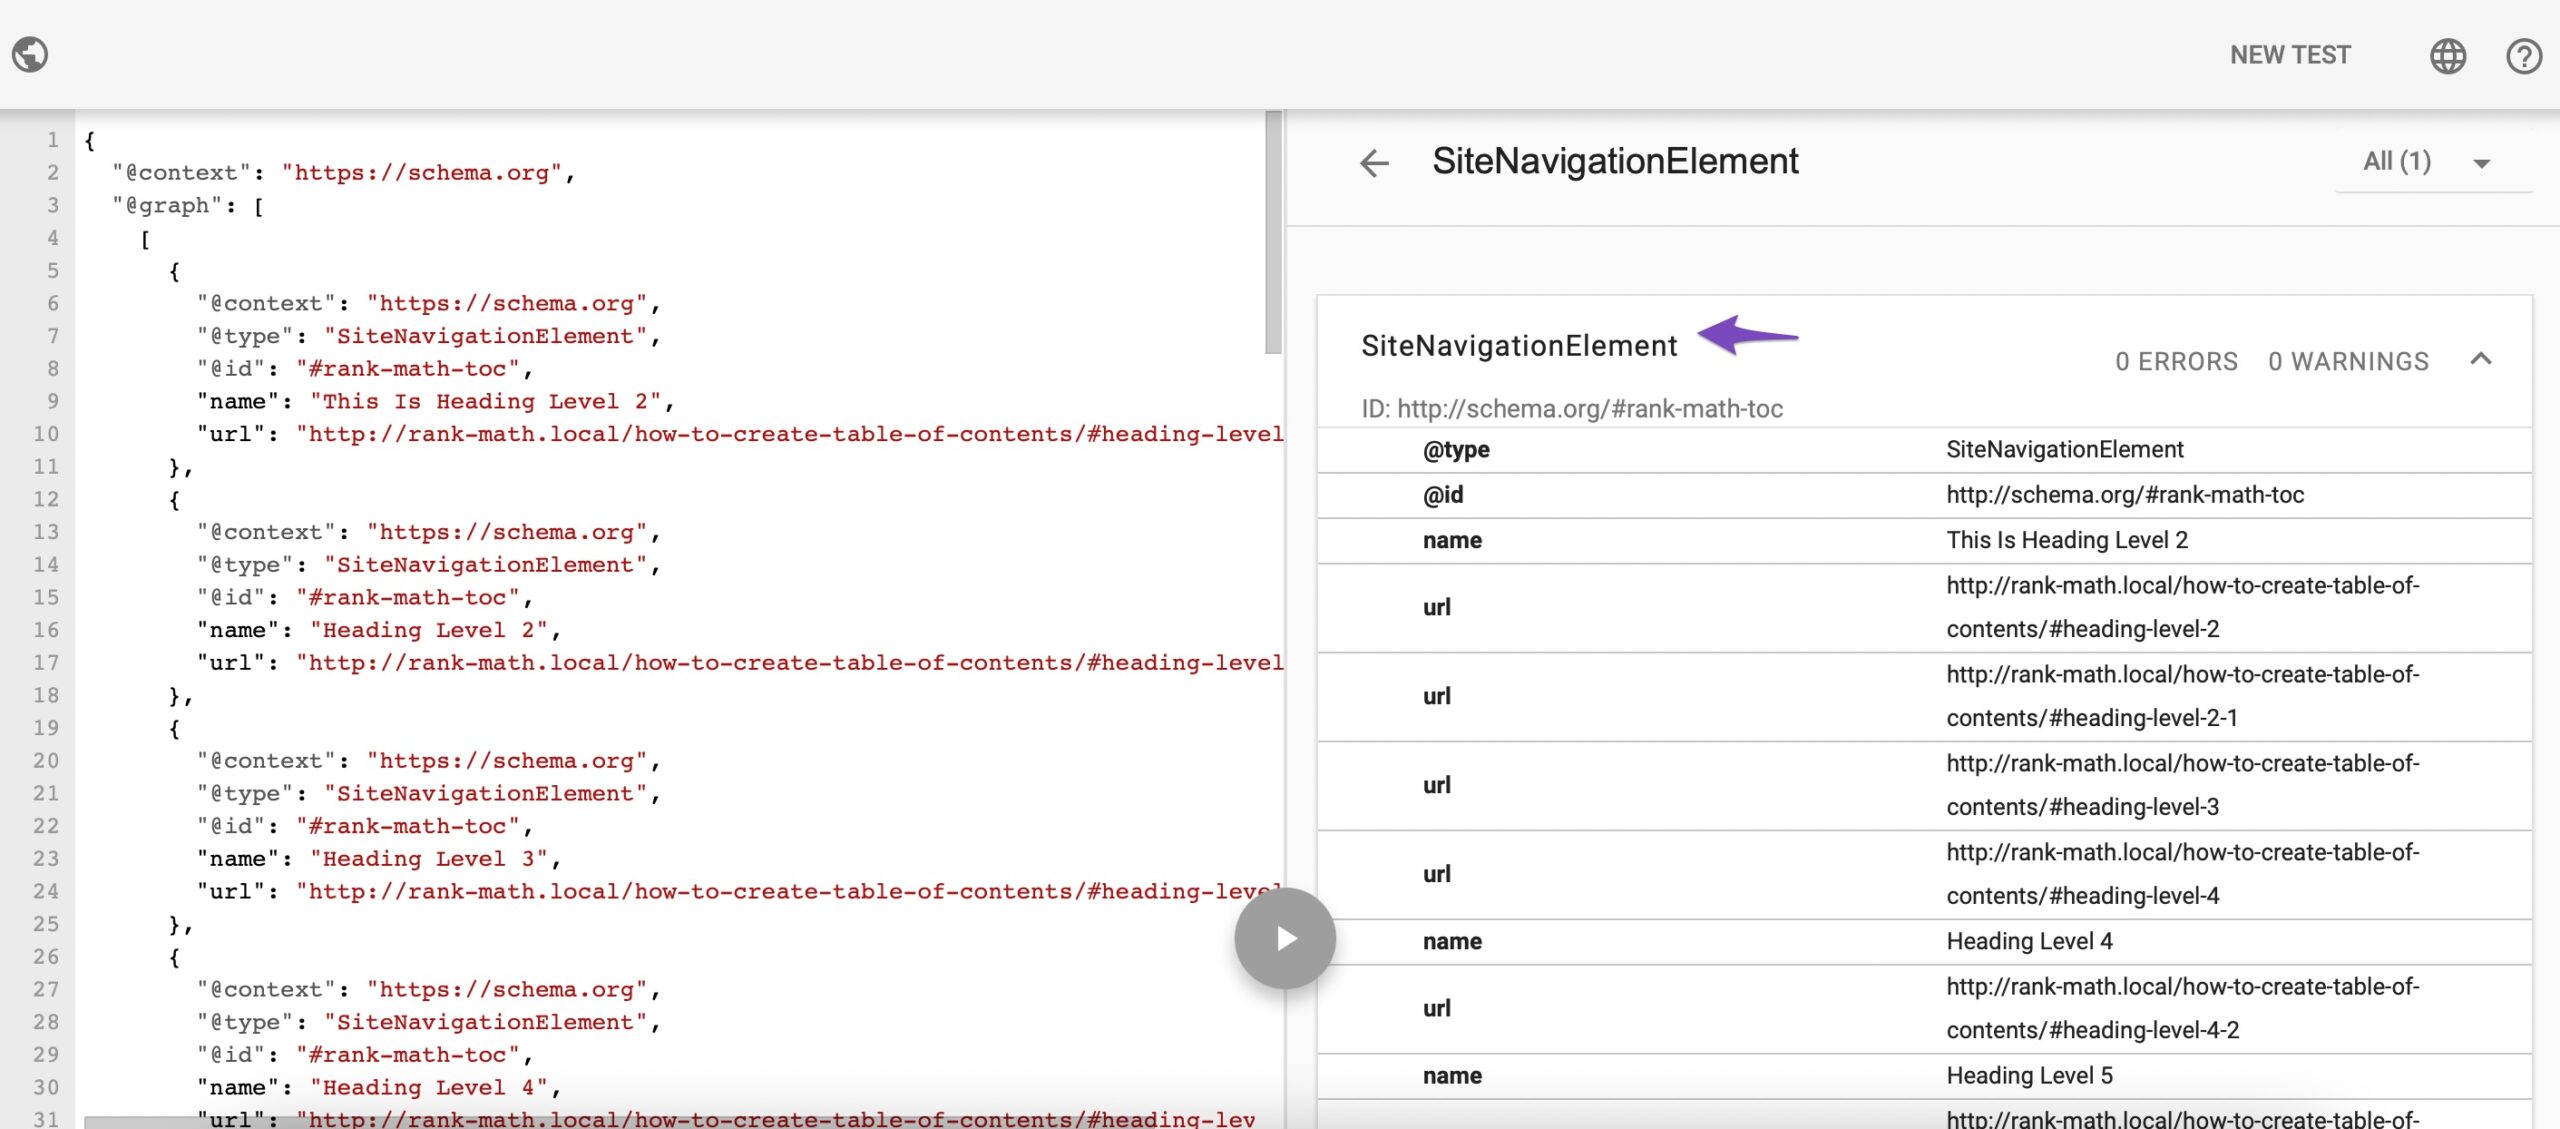
Rank Math automatically includes the SiteNavigationElement Schema for the headings added to the Table of Contents block. This is applicable only to the Table of Contents block by Rank Math and not to all the Table of Contents plugins.
2 Customizing Table of Contents Block
Rank Math’s Table of Contents Block includes several options to help you customize the table of contents to suit your needs. Let’s discuss them in detail.
2.1 Edit Headings in TOC Block
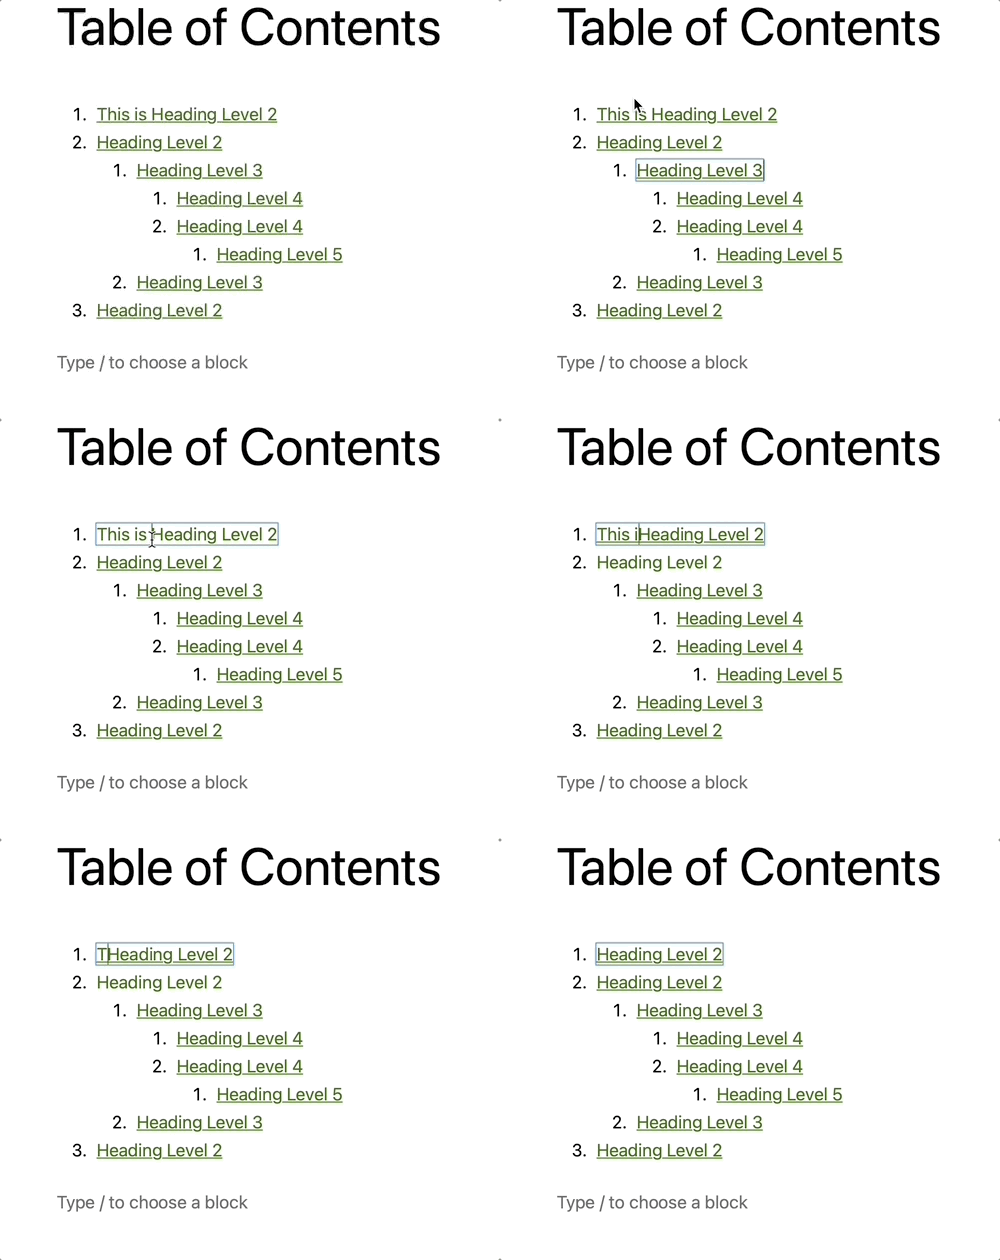
Our Table of Contents block is also completely editable. For instance, if the heading in the article is too long, you can consider having a trimmed version in the Table of Contents block by directly editing it in the Table of Contents block, as shown below.
2.2 Hide Headings in TOC Block
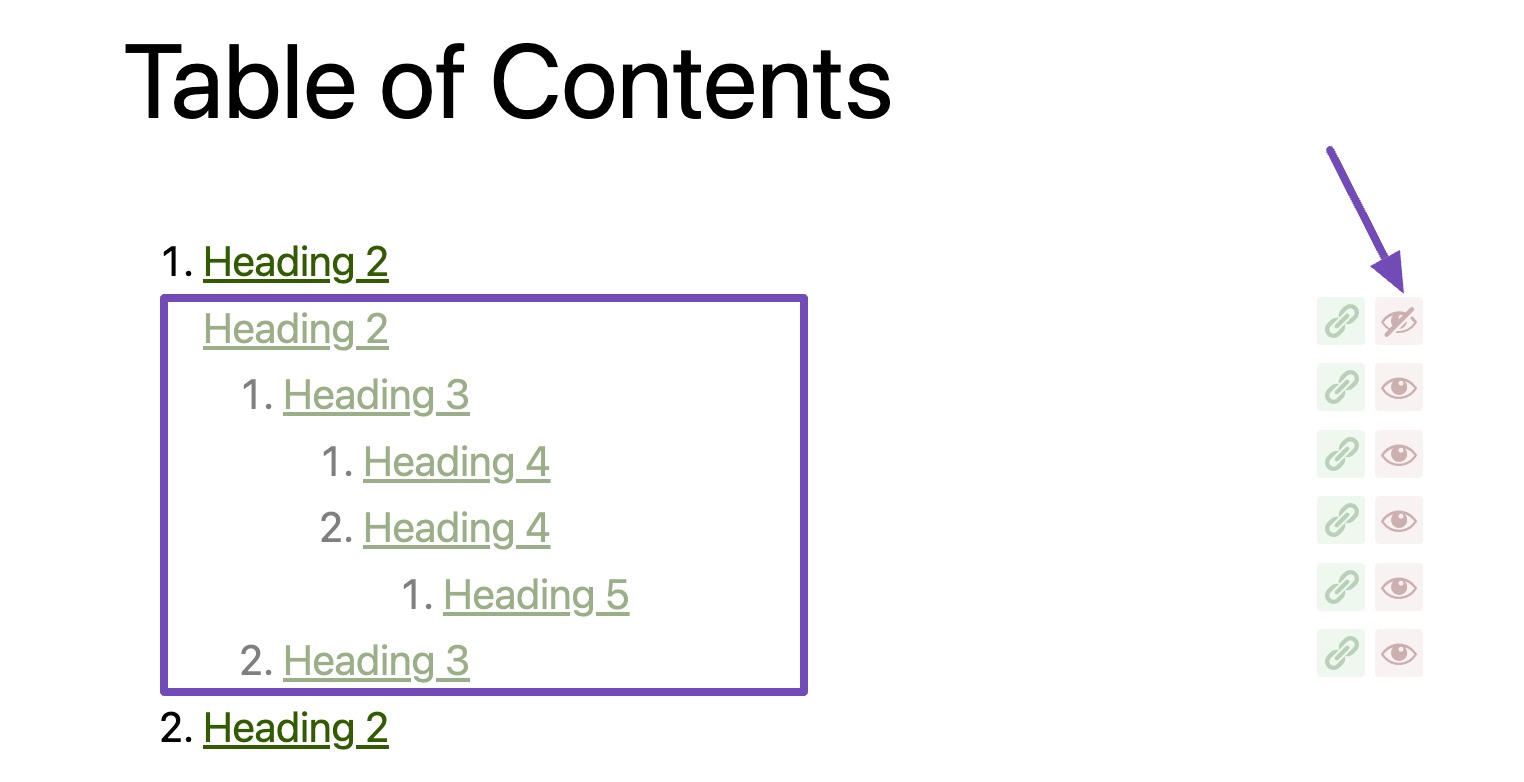
You can click the eye icon next to the headings if you wish to hide a certain heading.
2.3 Automatic Anchor Links for Headings
The plugin also adds the anchor links to the headings automatically. If you wish to change the anchor links, you can always do so by clicking on the Link icon, as shown below.
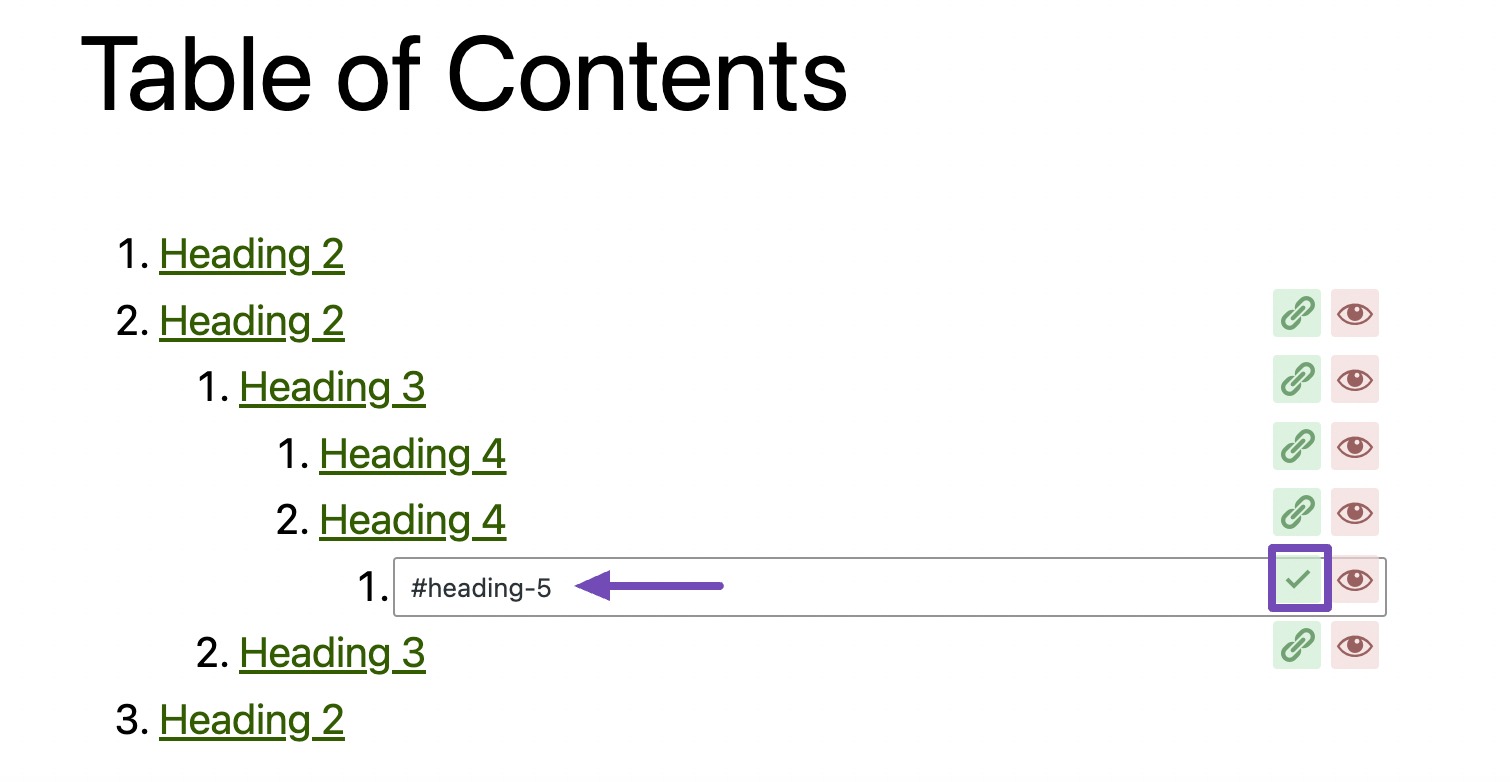
But please note if you’ve already set your own anchor link, then we don’t change it.
When visitors click a link in the table of contents, they’ll be immediately navigated to that particular heading in the post or page. This allows users to jump to the section they’re most interested in without wasting time.

2.4 Alignment
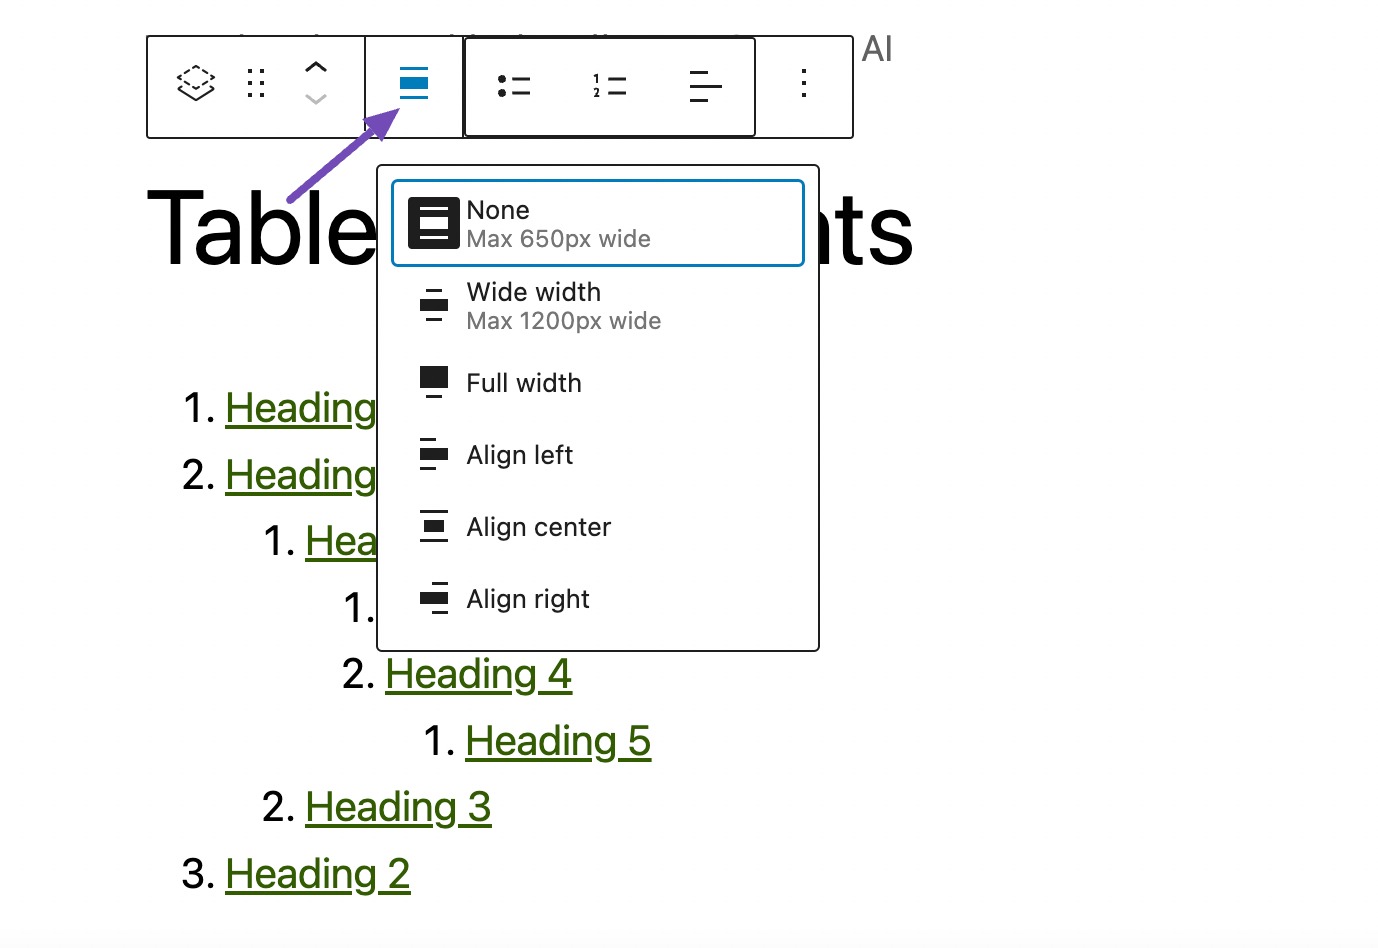
The Align option sets the alignment for the table of contents. Available options are: None, align left, align center, align right, wide width, and full width.
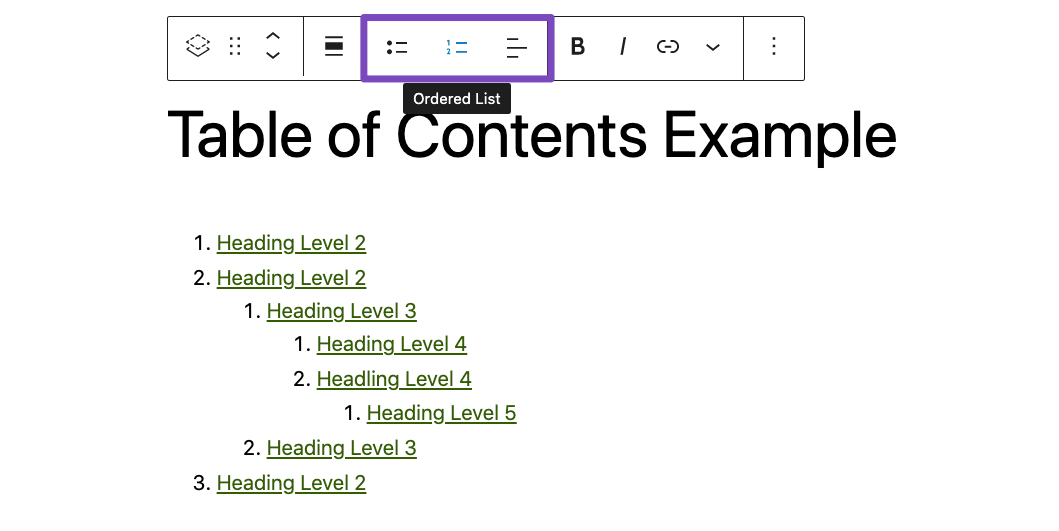
2.5 List Style
The List option lets you choose a list style for your table of contents. You can choose a bulleted or numbered list style for your table of contents or choose none if you do not want to set any list style.
3 Table of Contents Block Settings
When you select the Table of Contents block, the following settings appear in the Block section, as shown below.
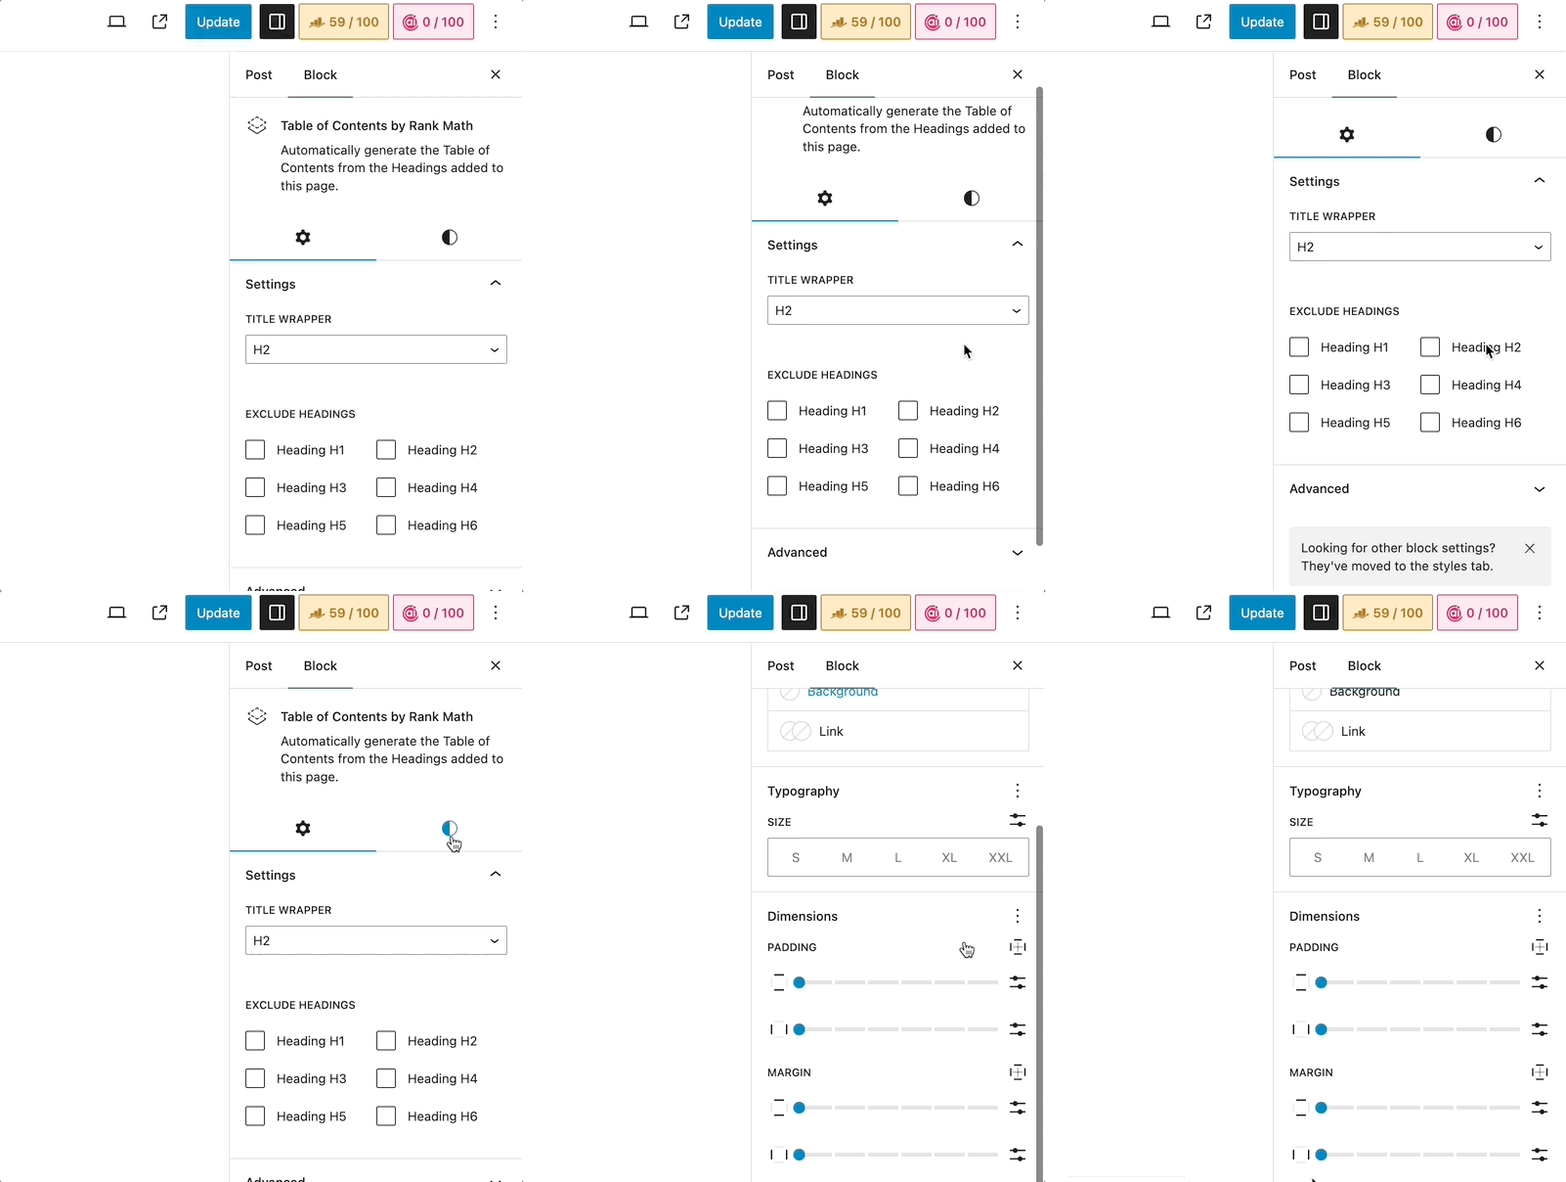
Let’s discuss each one of them in detail.
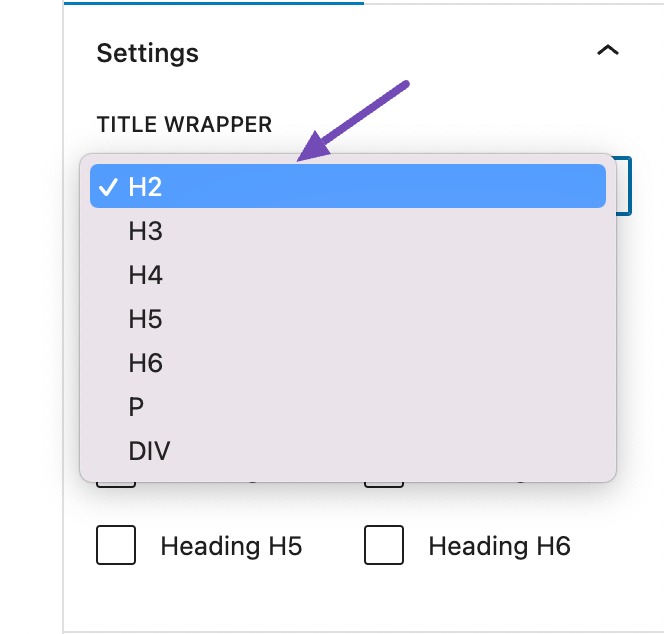
3.1 Title Wrapper
This setting sets the HTML tag you want to use for the title. Available options are H2-H6, P, and DIV.
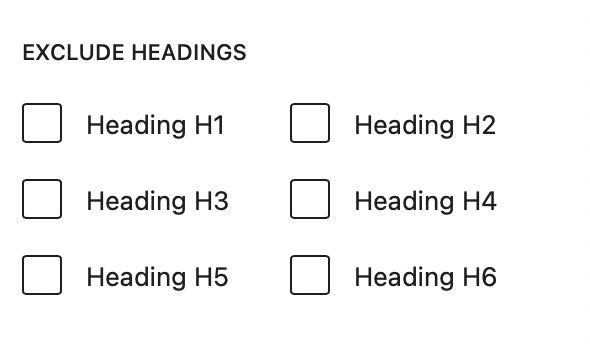
3.2 Exclude Headings
This setting lets you choose the heading tags you don’t wish to include in the TOC block. Available options are Heading H1-Heading H6.
Exclude Headings is also available under the Global settings, discussed in the later section. You may see some of these options might be checked already based on what you’ve configured under the Global settings.
3.3 Color
This setting in the Styles tab lets you choose the color for the text and background.
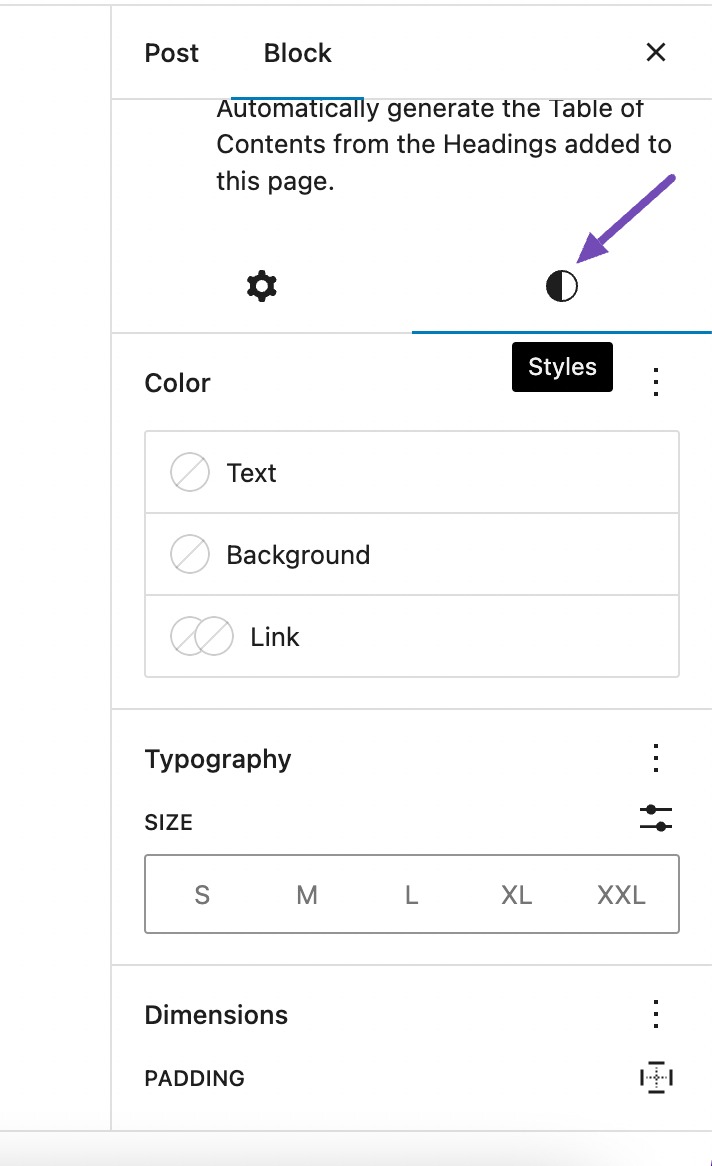
You can either select from your theme colors or any other specific color of your choice or add a gradient.
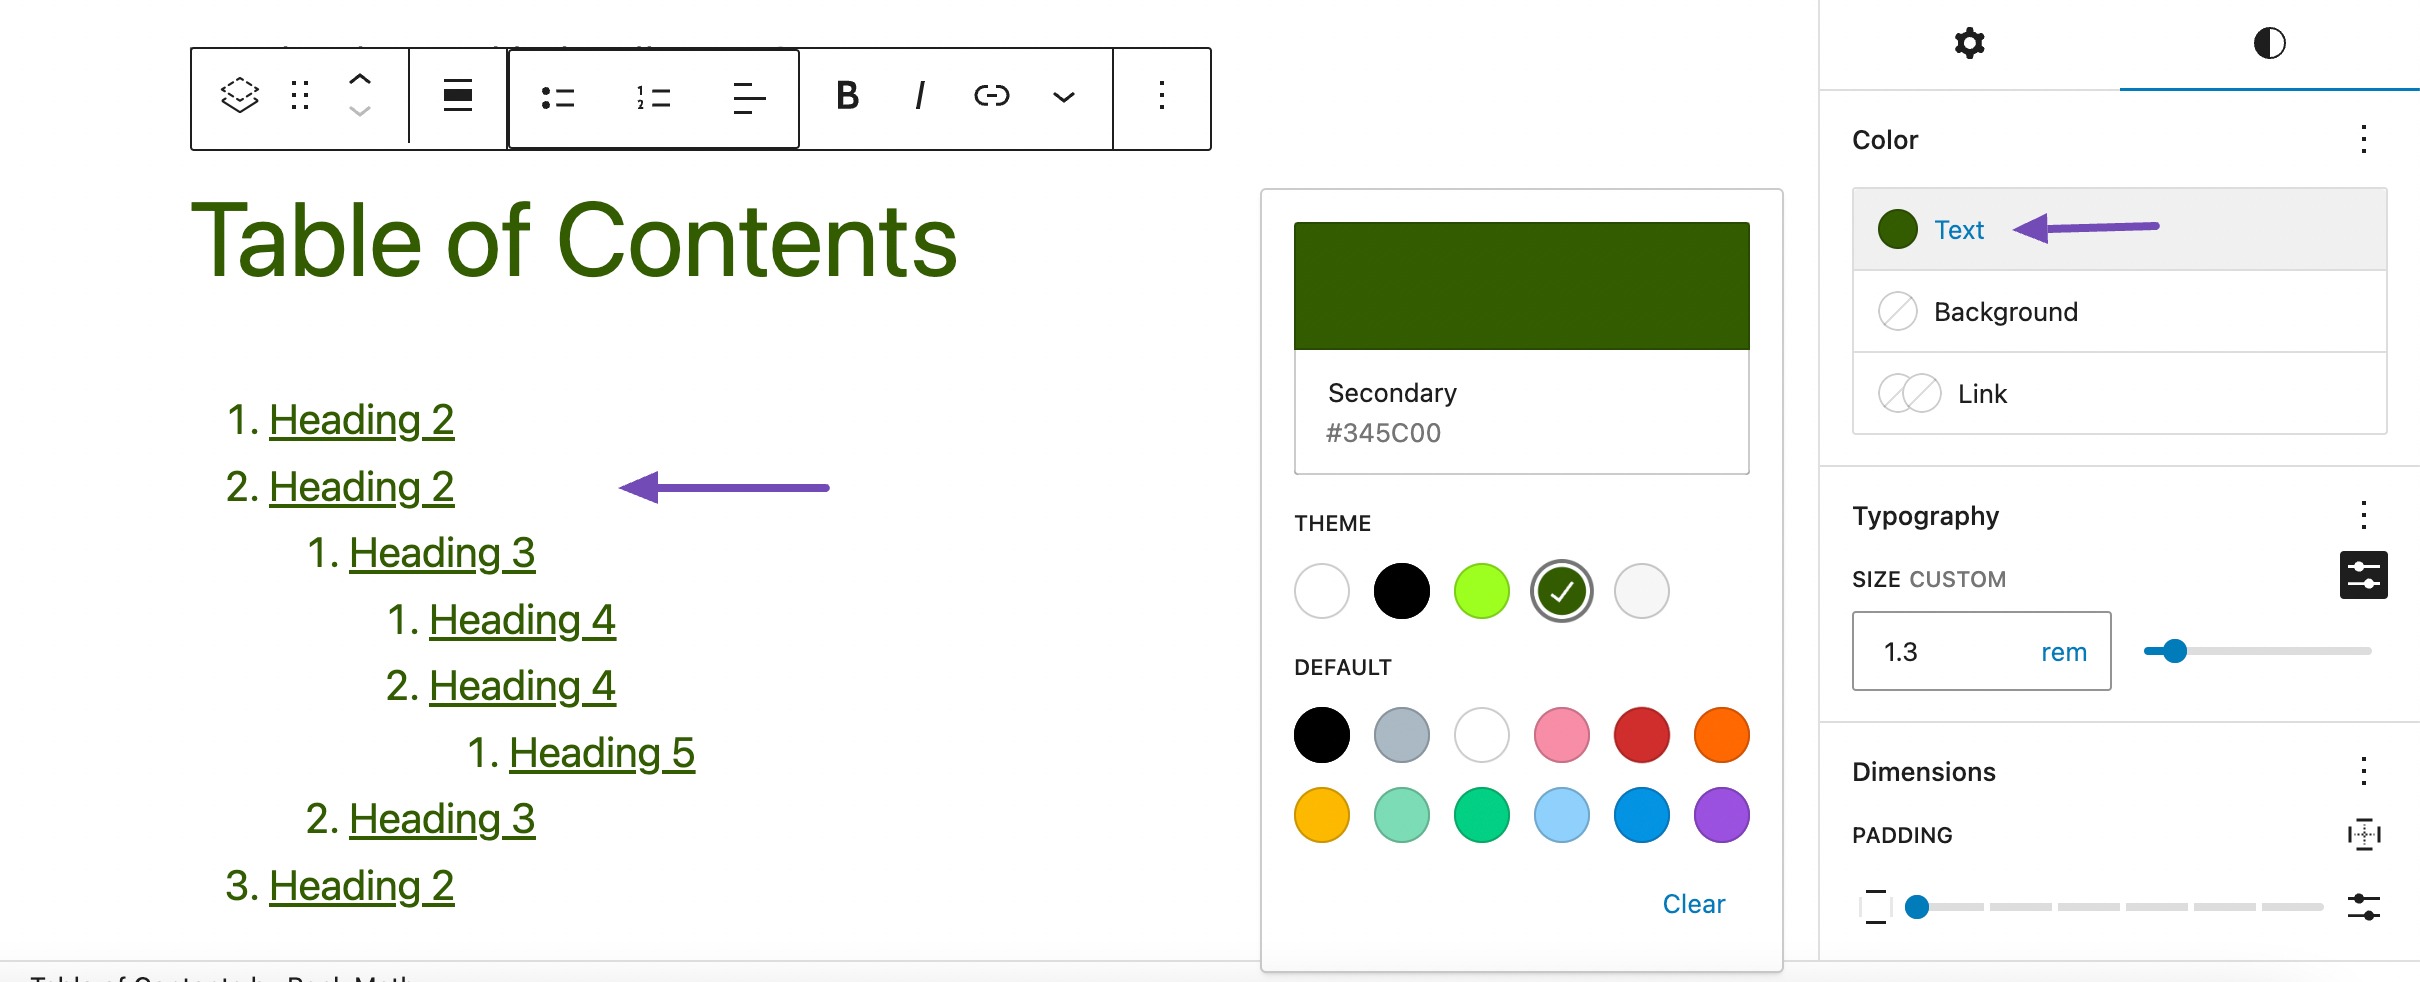
For instance, you can set the Text color, as shown below.
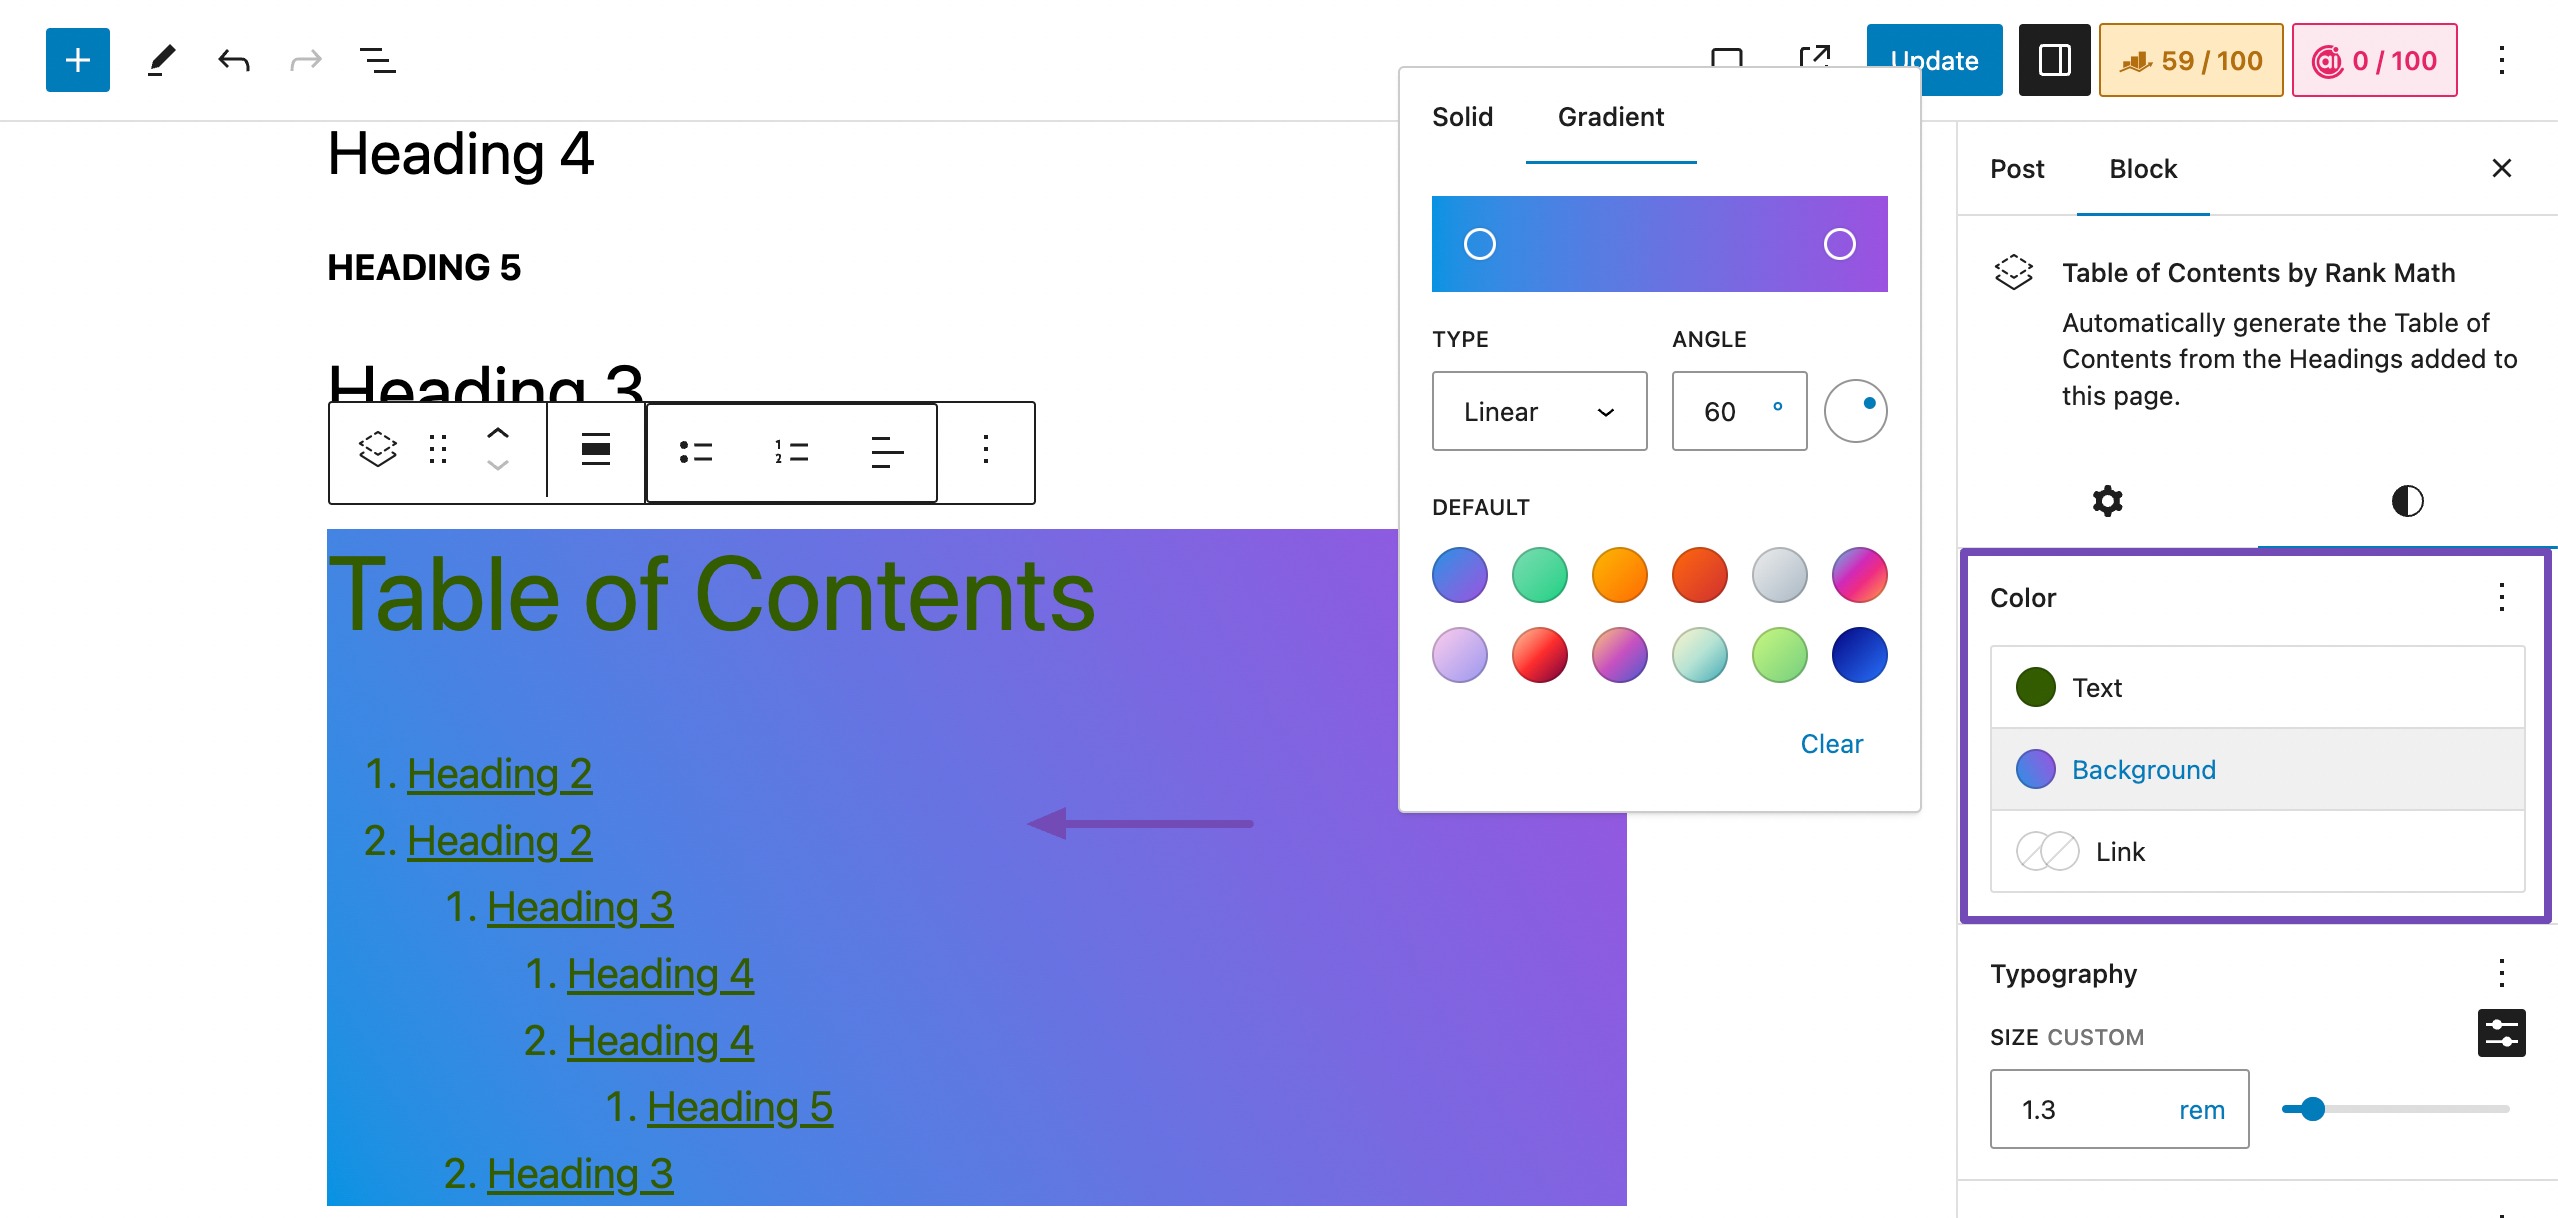
You can set Background color, as shown below.
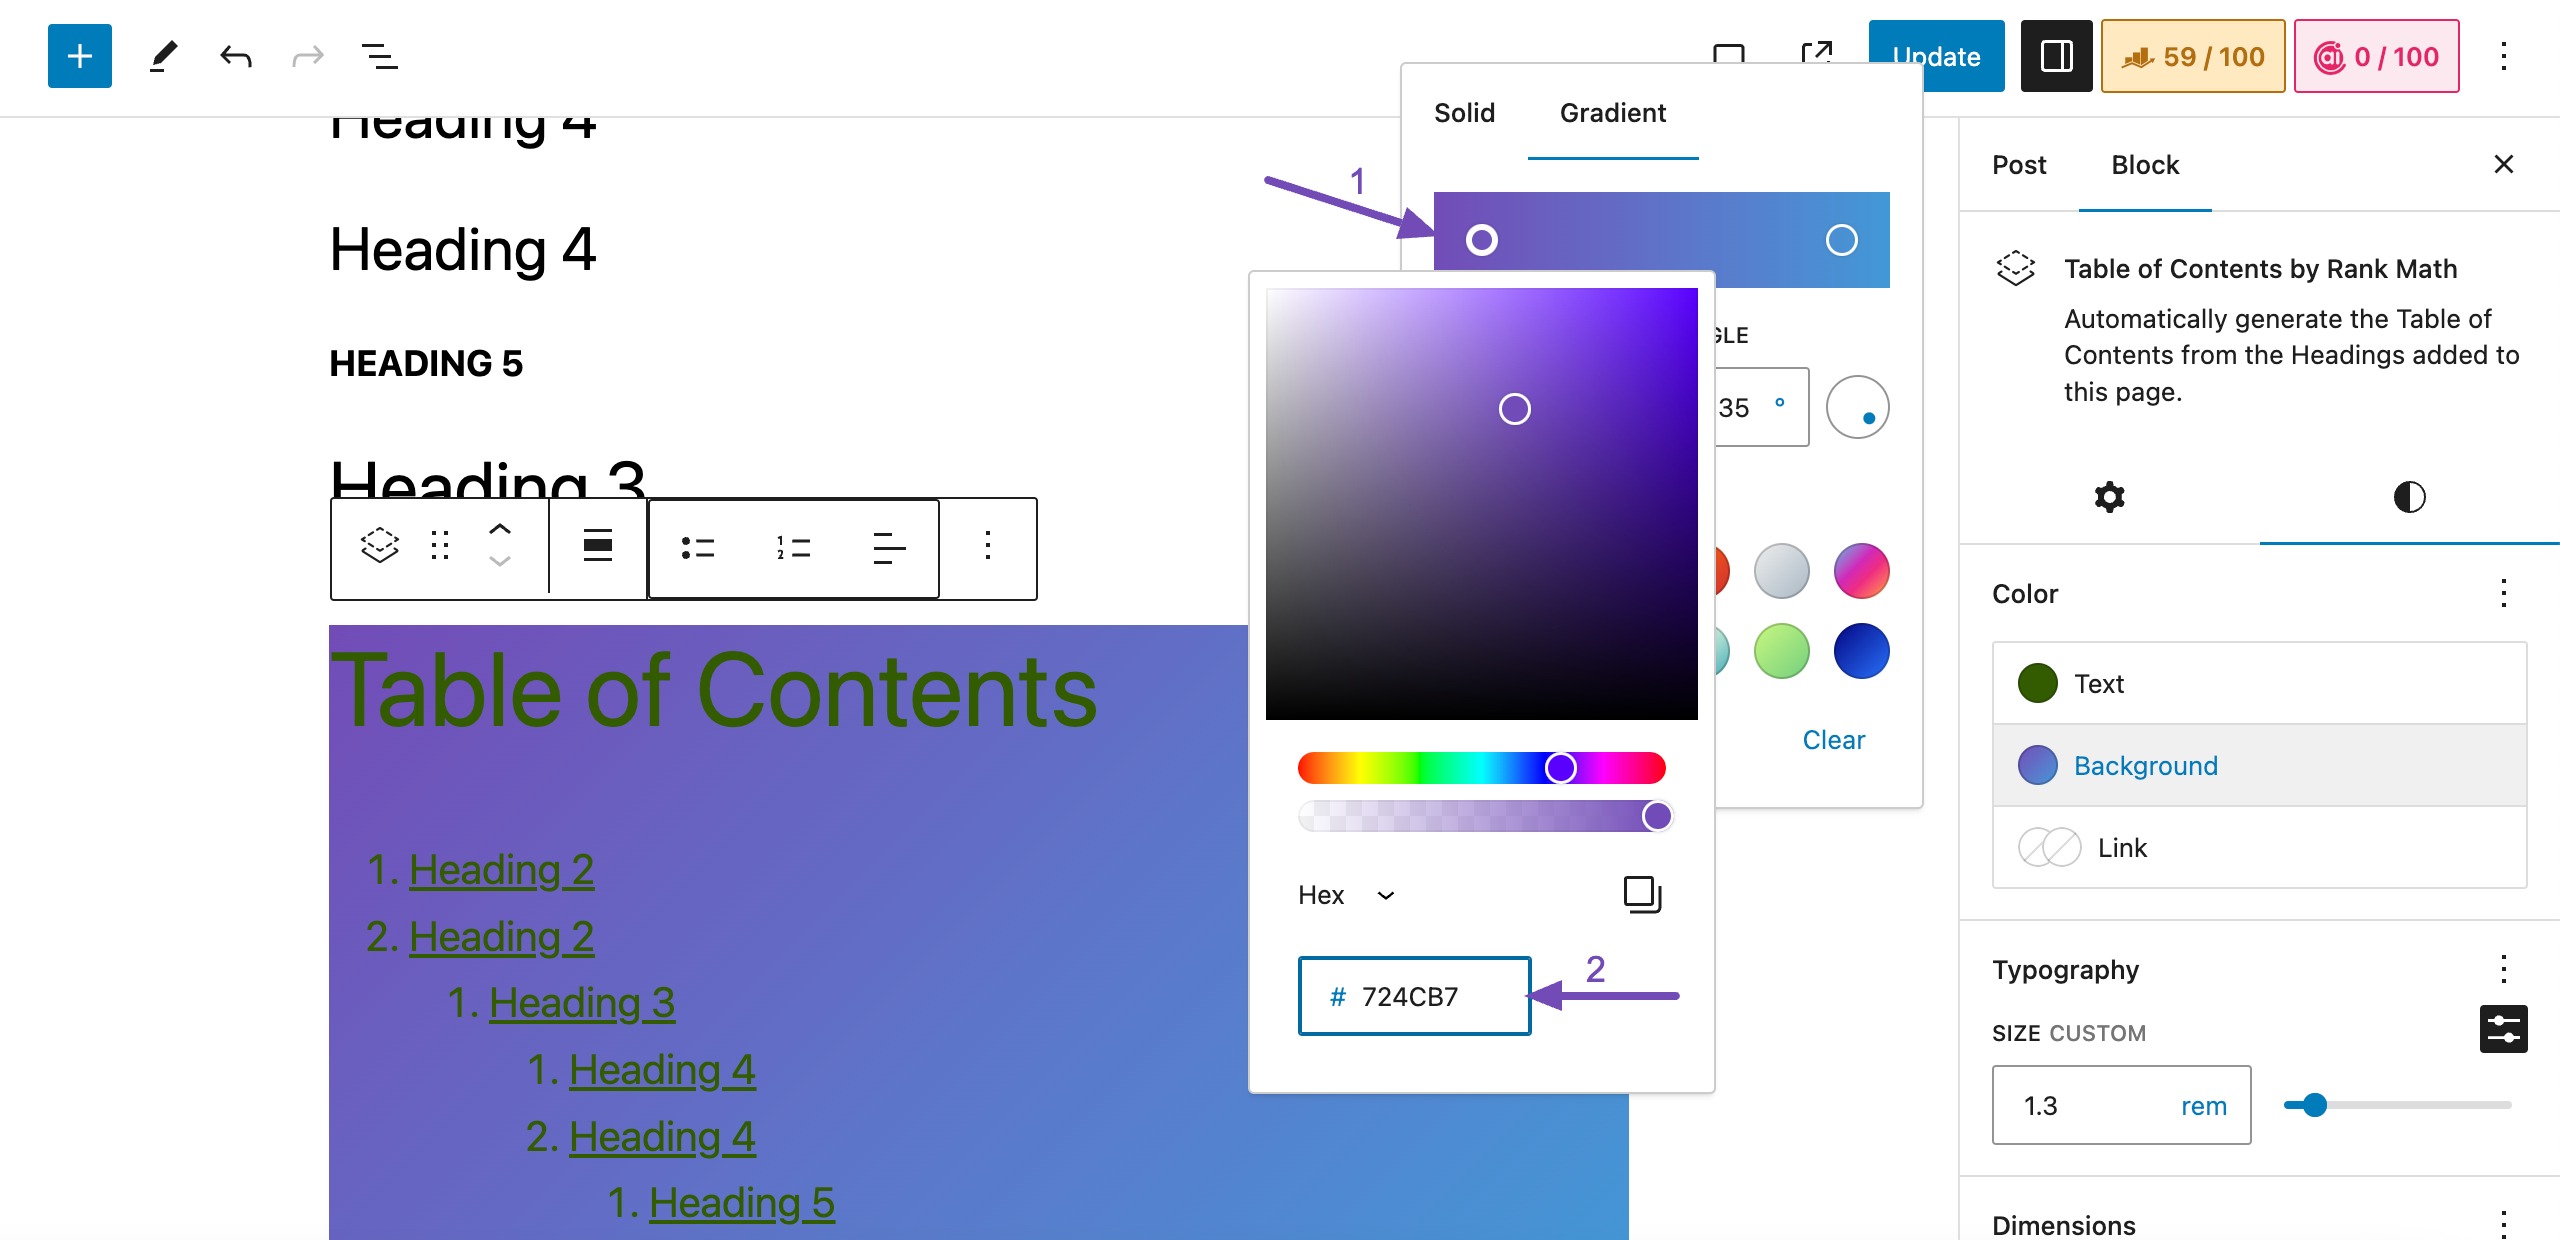
If you wish to customize the background color further, click on the control points that control the color on the left and right and add the Hexadecimal code of the color, as shown below. You can also adjust the angle of the color as per your preference.
You can set the color of the link, as shown below. To do so, click the Link section, and set the color of the link, as shown below.
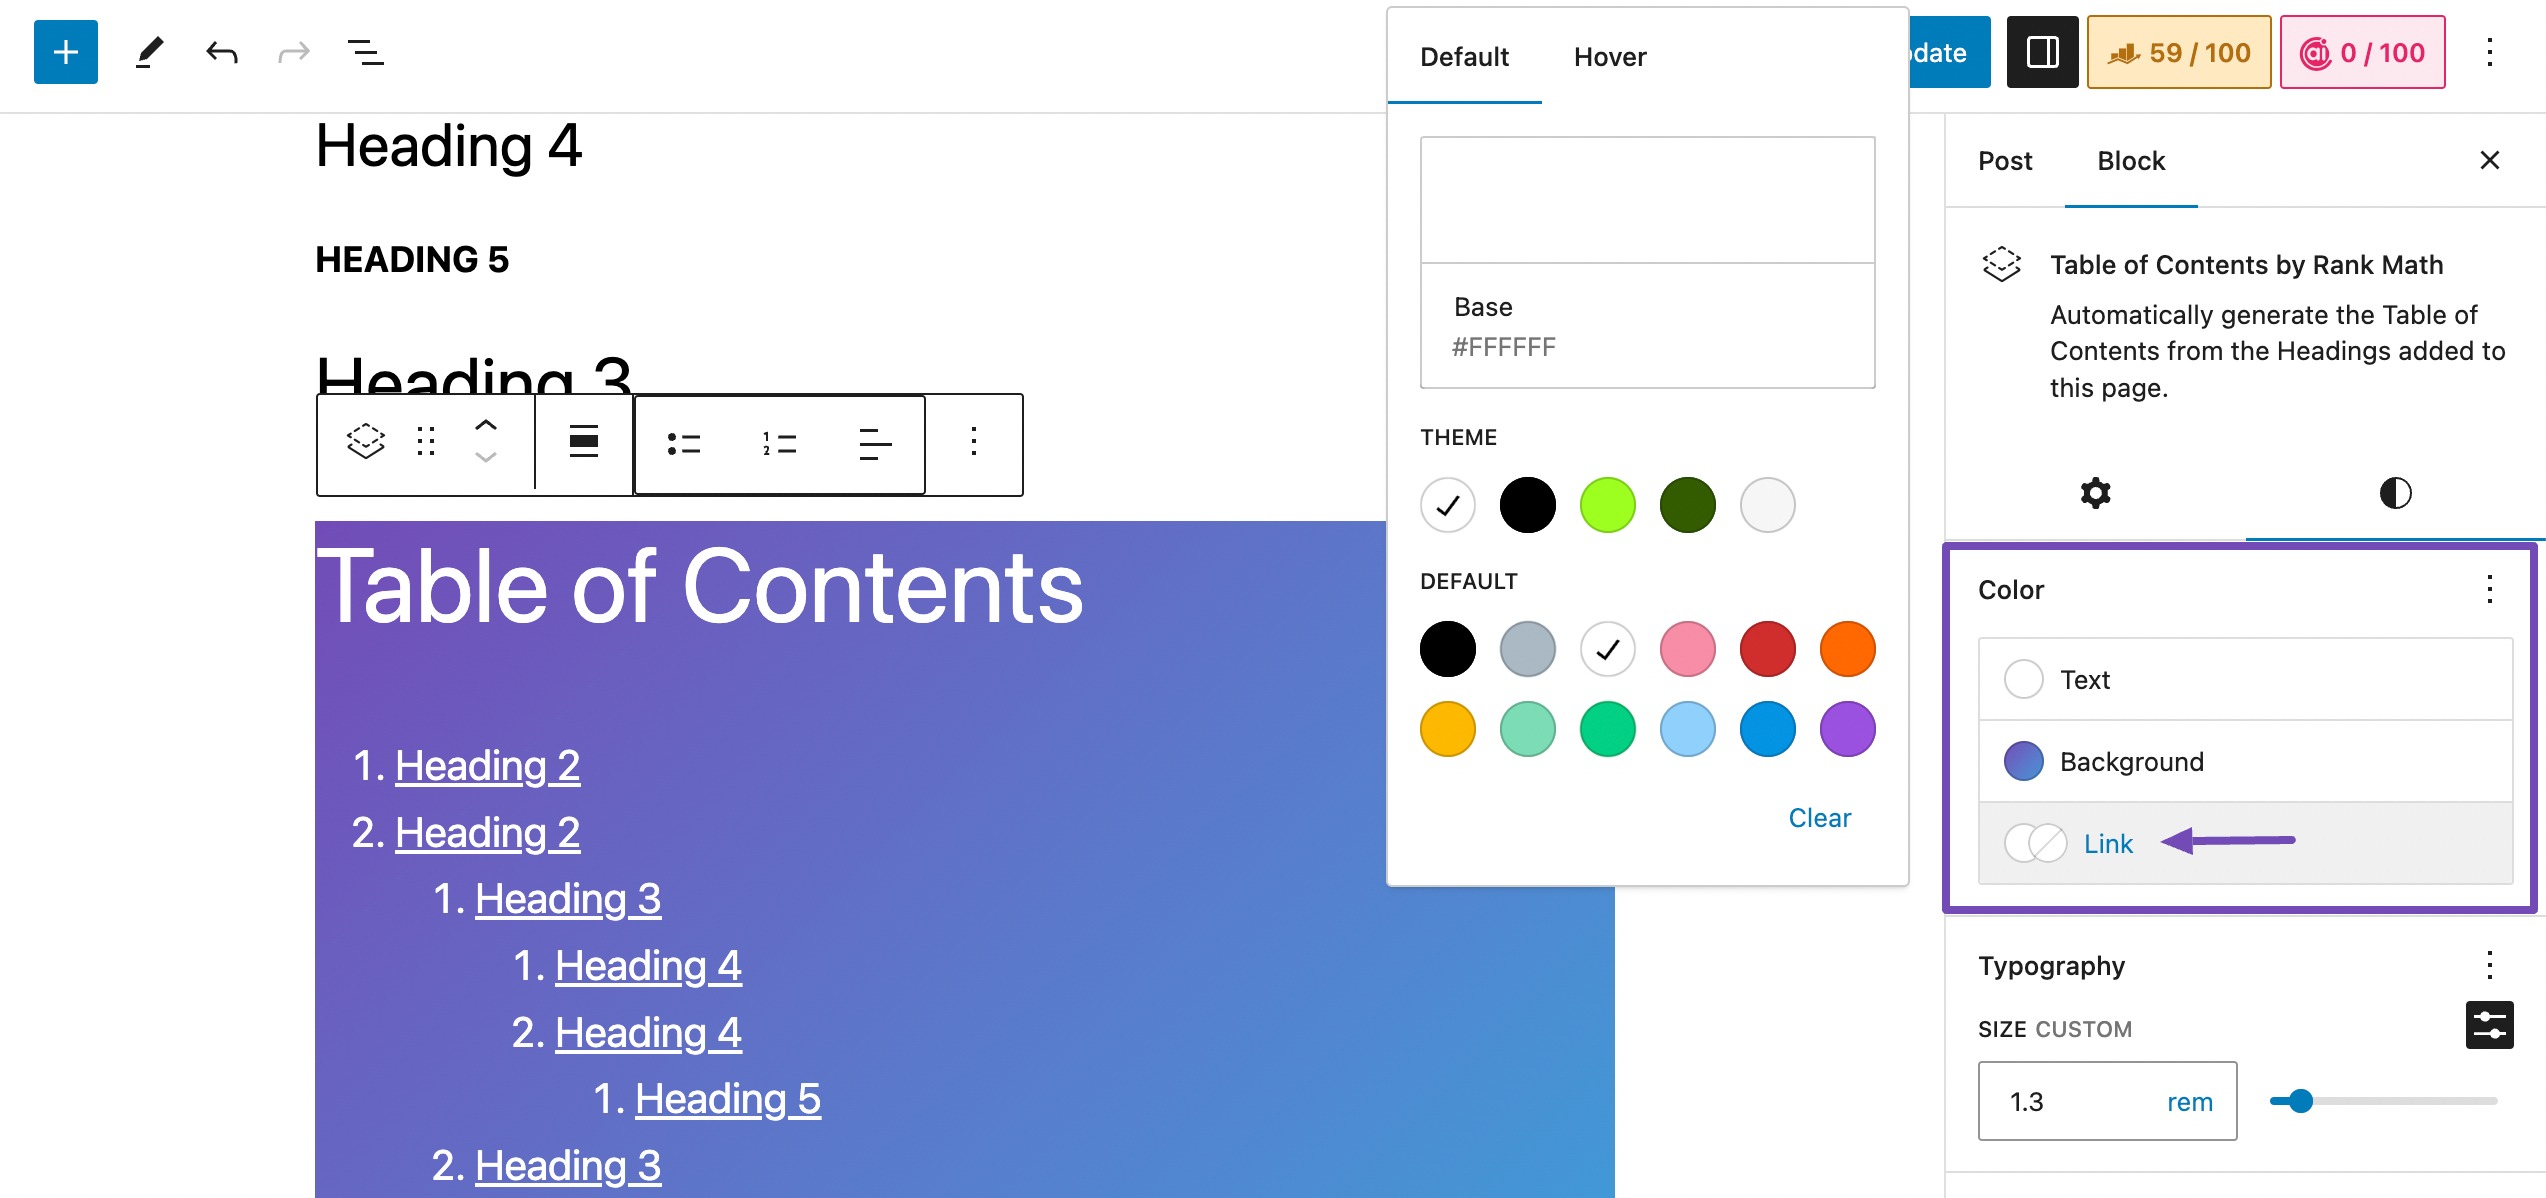
If the Link color option is not available then its probably due to the theme not supporting the feature. You can try using the default themes or contact the theme developer to further add the feature.
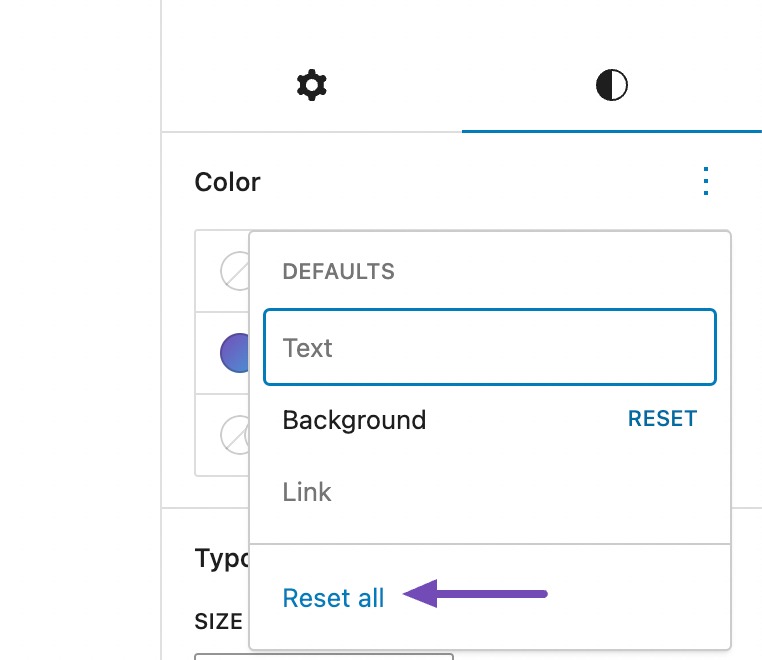
If you wish to remove the Text, Background, or Link color settings from your Table of Contents, click the Color options (three dots) and the RESET option to remove a particular setting, as shown below.

If you wish to reset all the Color settings, click the Reset all option, as shown below.
3.4 Typography
This setting in the Styles tab lets you change the font size and line height. You can choose from the available sizes like Small, Medium, Large, Extra Large, and XXL. You can use the up and down arrows to increase or decrease the line height.

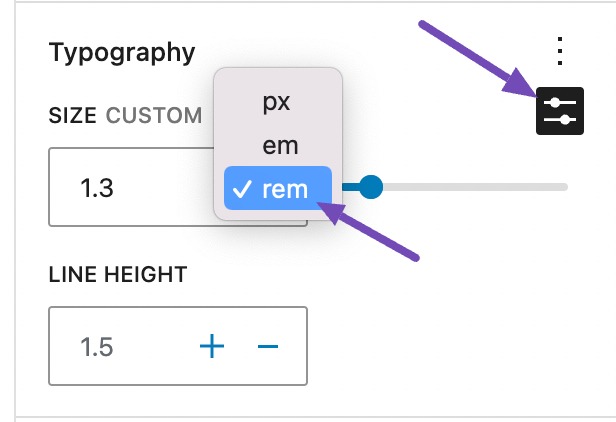
You can also set a specific value by clicking the slider icon and also change the units, as shown below. The choices are pixels, em, or rem.
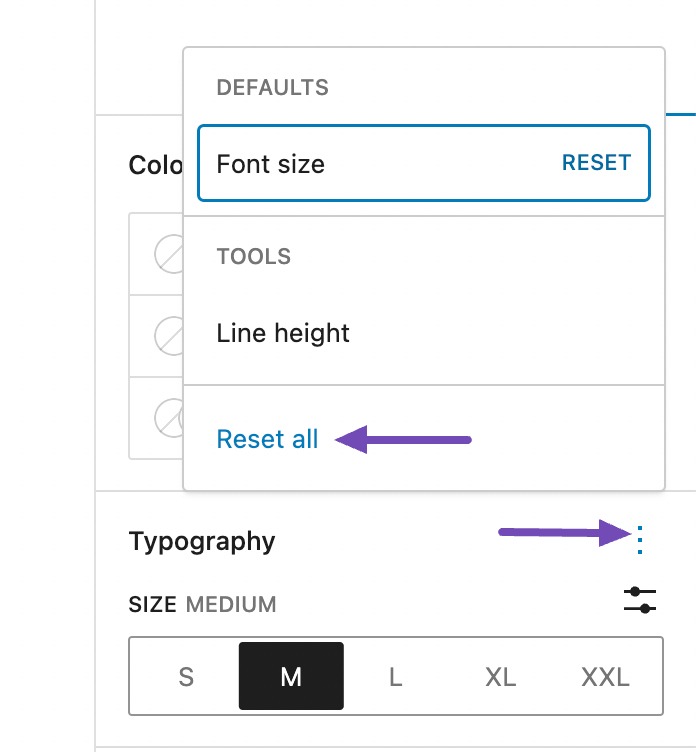
To remove the Font size setting, click on the Typography options (three dots) and then click RESET, as shown below.
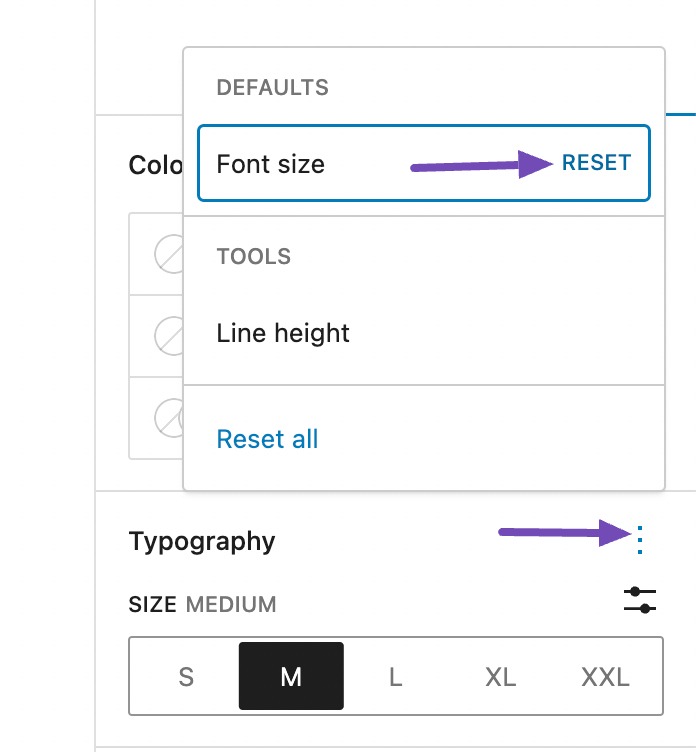
To reset all the Typography settings, click the Reset all option, and all your Typography settings will reset.
3.5 Dimensions
This setting in the Styles tab lets you add padding and margin to your Table of Contents. Padding is the area between an element’s border and its content, whereas a margin is an area around an element’s border. In other words, the padding controls the spaces inside the block, and the margin controls the spacing outside it.
To add Padding and Margin, click the three dots sign and select the dimension you want to change.
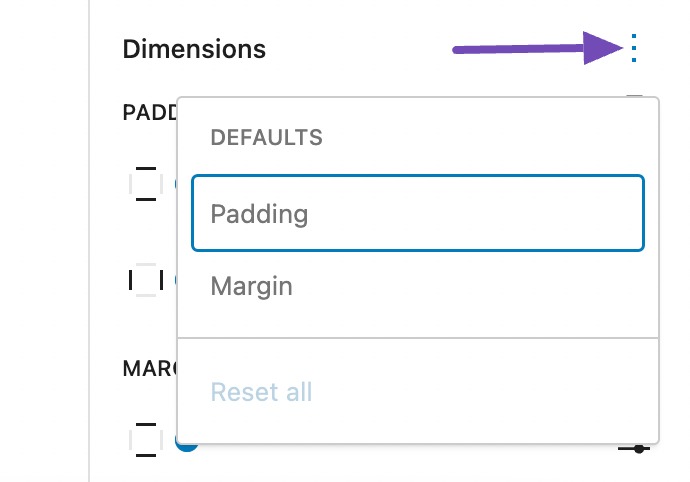
You can then change the padding and the margin for your Table of Contents, as shown below.

To set a custom padding and margin, click the slider icon and set a specific value. You can choose a unit from the available options.

If you wish to add padding and margins at various locations, such as the Top, Right, Bottom, and Left of your Table of Contents, click on the Padding options/Margin options sign, as shown below.
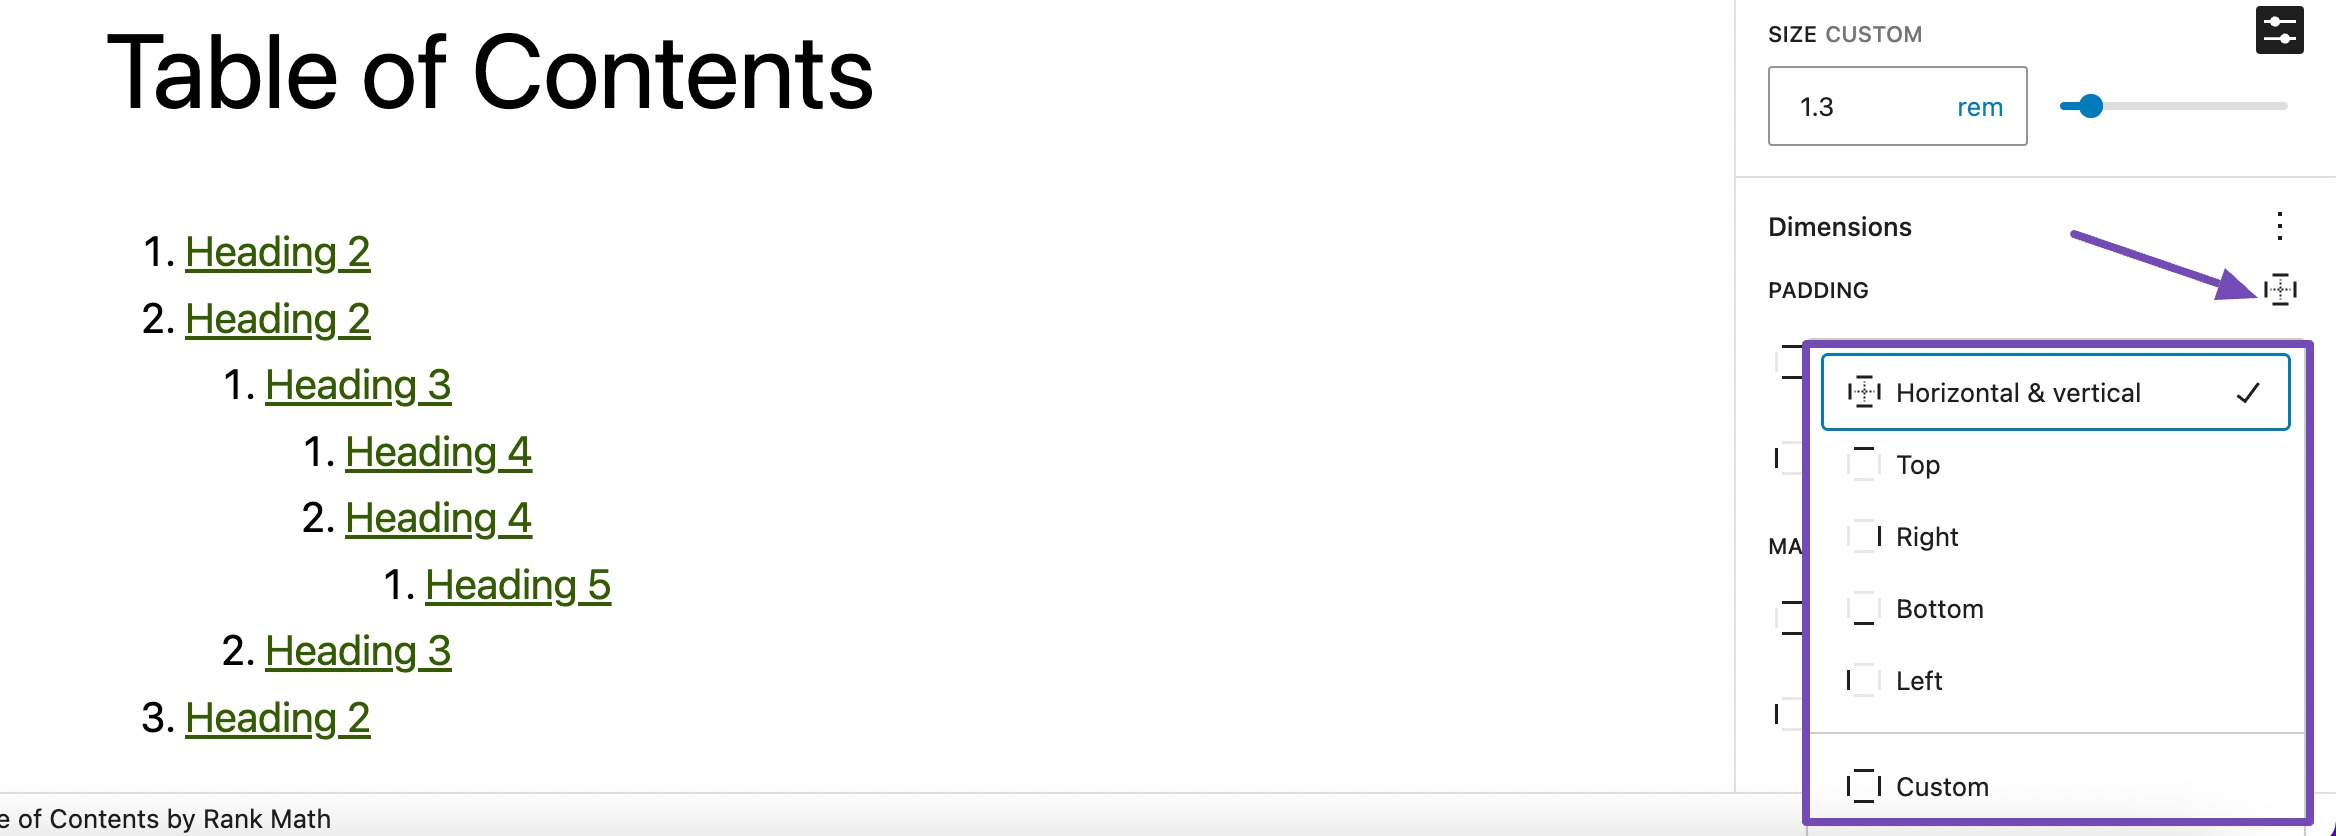
Set padding and margin as per your preference. You can also set a specific value to the padding and margins by clicking the slider icon.

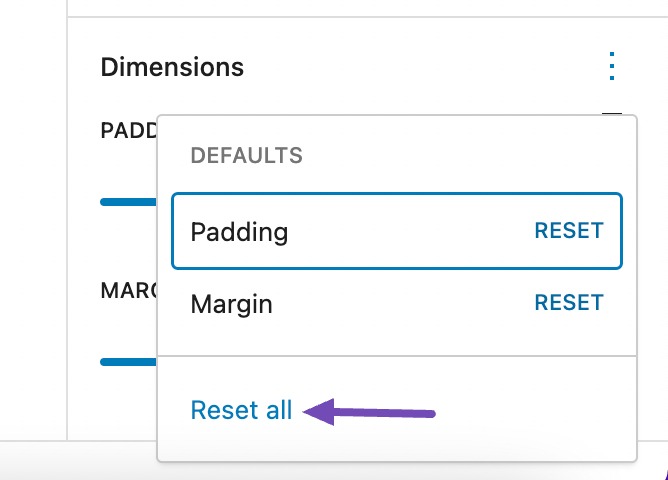
To reset all the Dimensions settings, click the Reset all option. Doing so will reset all your Dimensions settings.
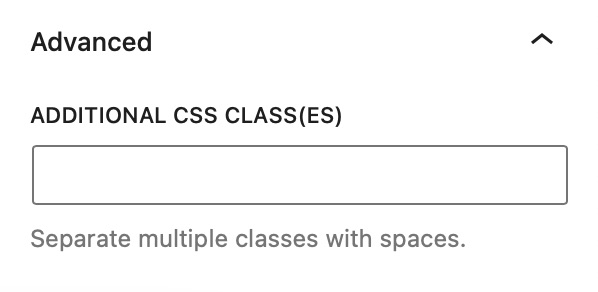
3.6 Advanced CSS Classes
This setting lets you customize the appearance of the TOC block by using CSS classes. You can also directly customize the CSS of the Rank Math Table of Contents block sitewide by adding CSS rules for #rank-math-toc.
4 Table of Contents Block Global Settings
To customize the TOC Block settings, navigate to Rank Math SEO → General Settings → Blocks, as shown below. The Blocks settings are available only when you enable the Schema (Structured data) module.
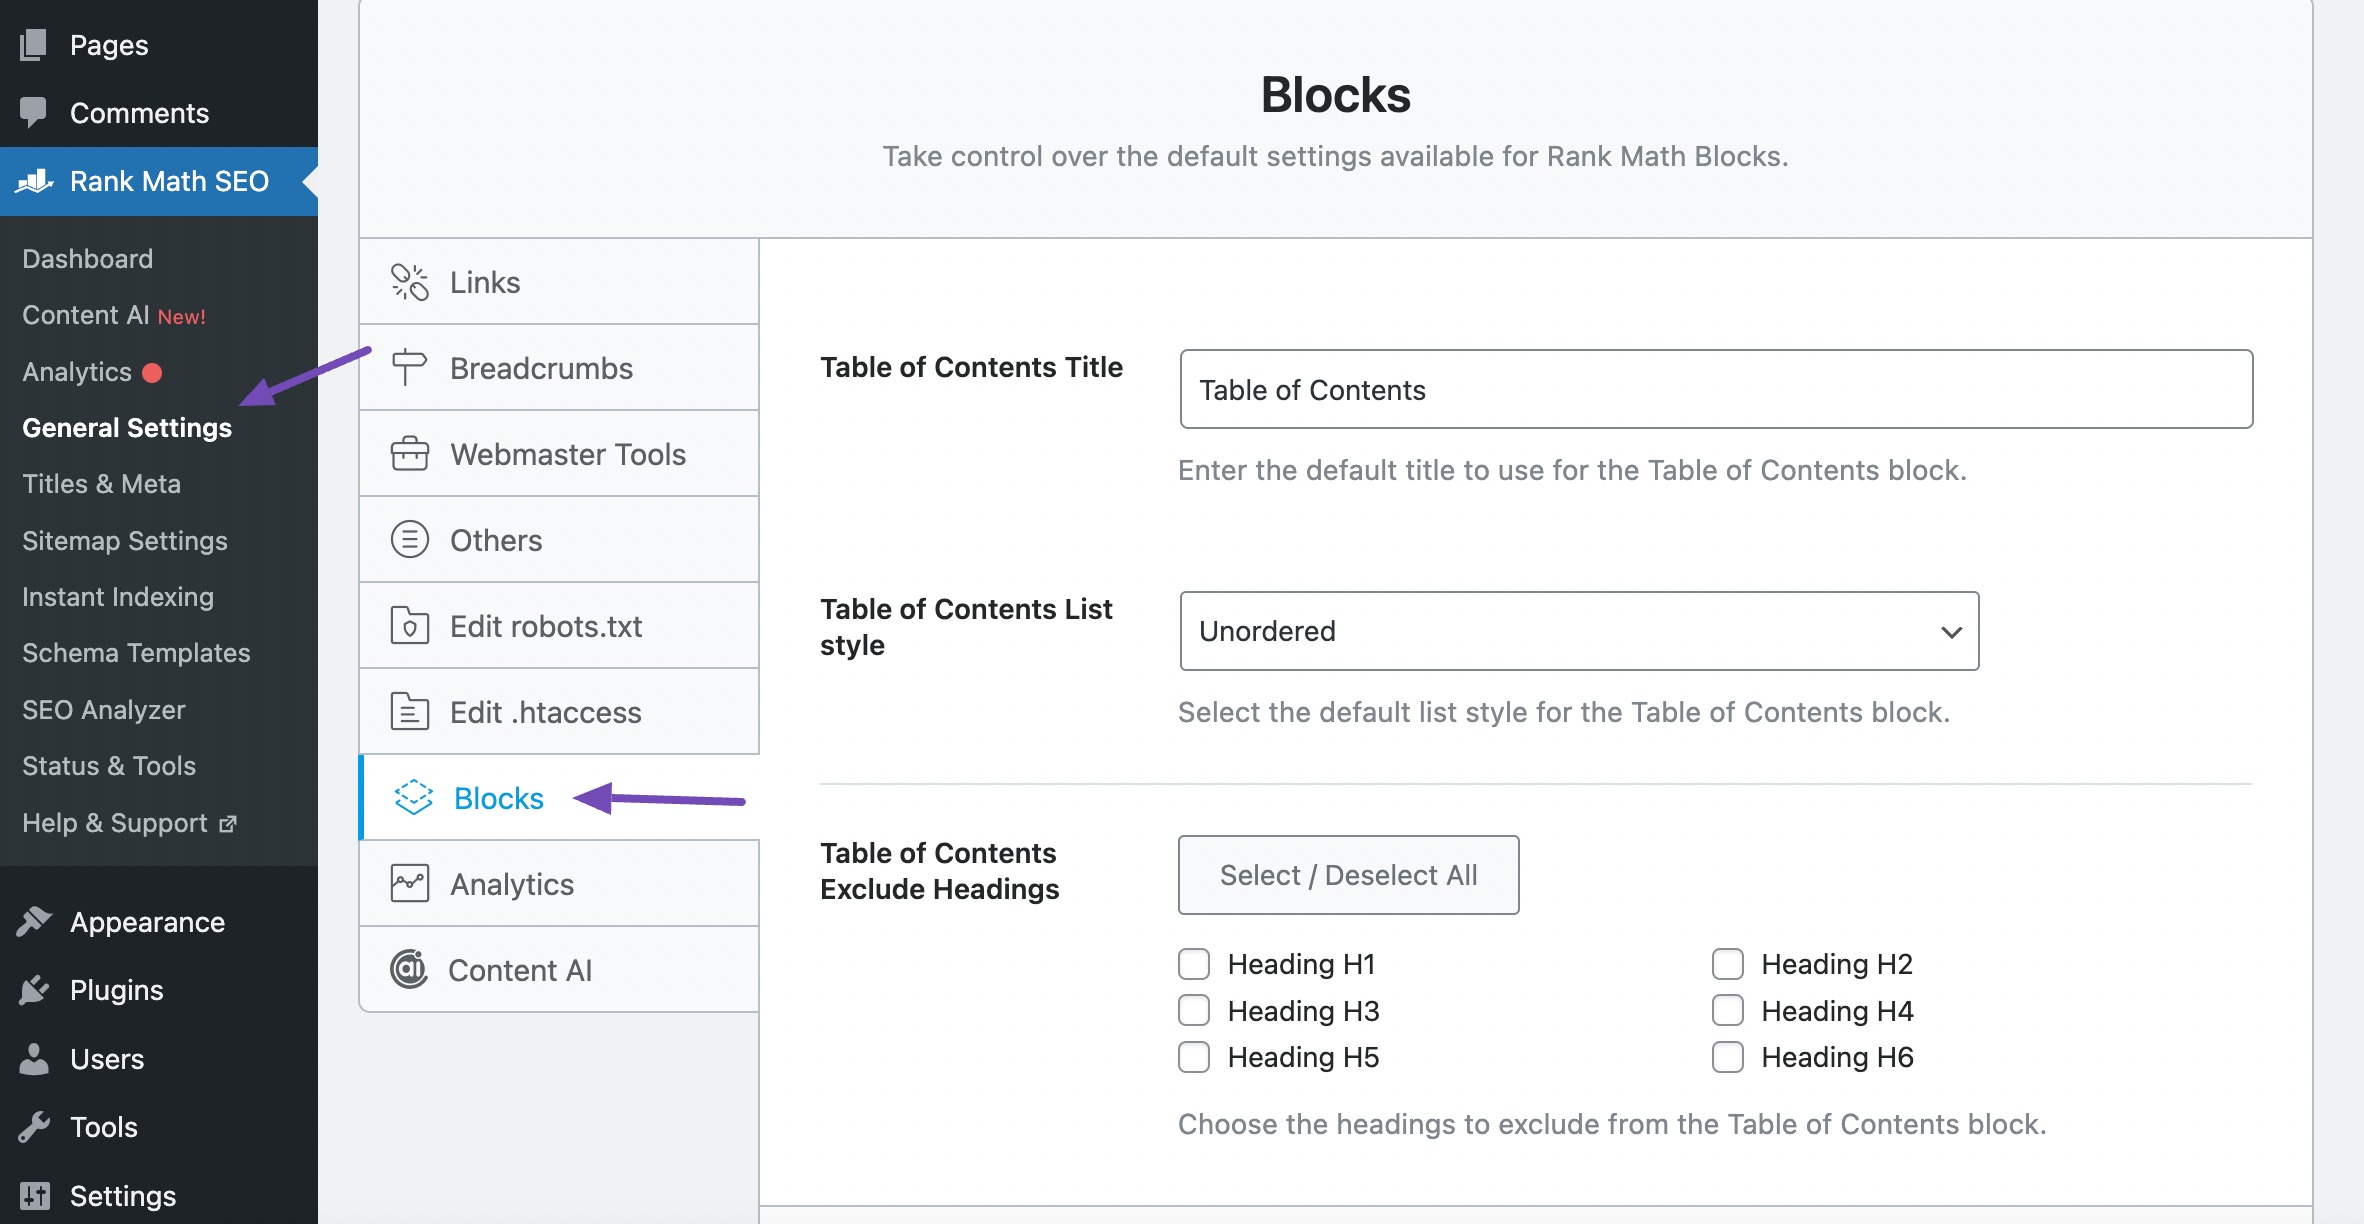
You can customize the following TOC options from here:
4.1 Table of Contents Title
Add the default title for your Table of Contents. But that said, you can always override this default title on a post level.
Table of Contents Title option is visible in the Advanced version of Rank Math. If you don’t see this option, ensure that you’re using Advanced Mode of Rank Math.

4.2 Table of Contents List style
Choose the default list style from the drop-down menu. Available options are None, Numbered, and Unordered.

4.3 Table of Contents Exclude Headings
Select the headings you wish to exclude from the Table of Contents.
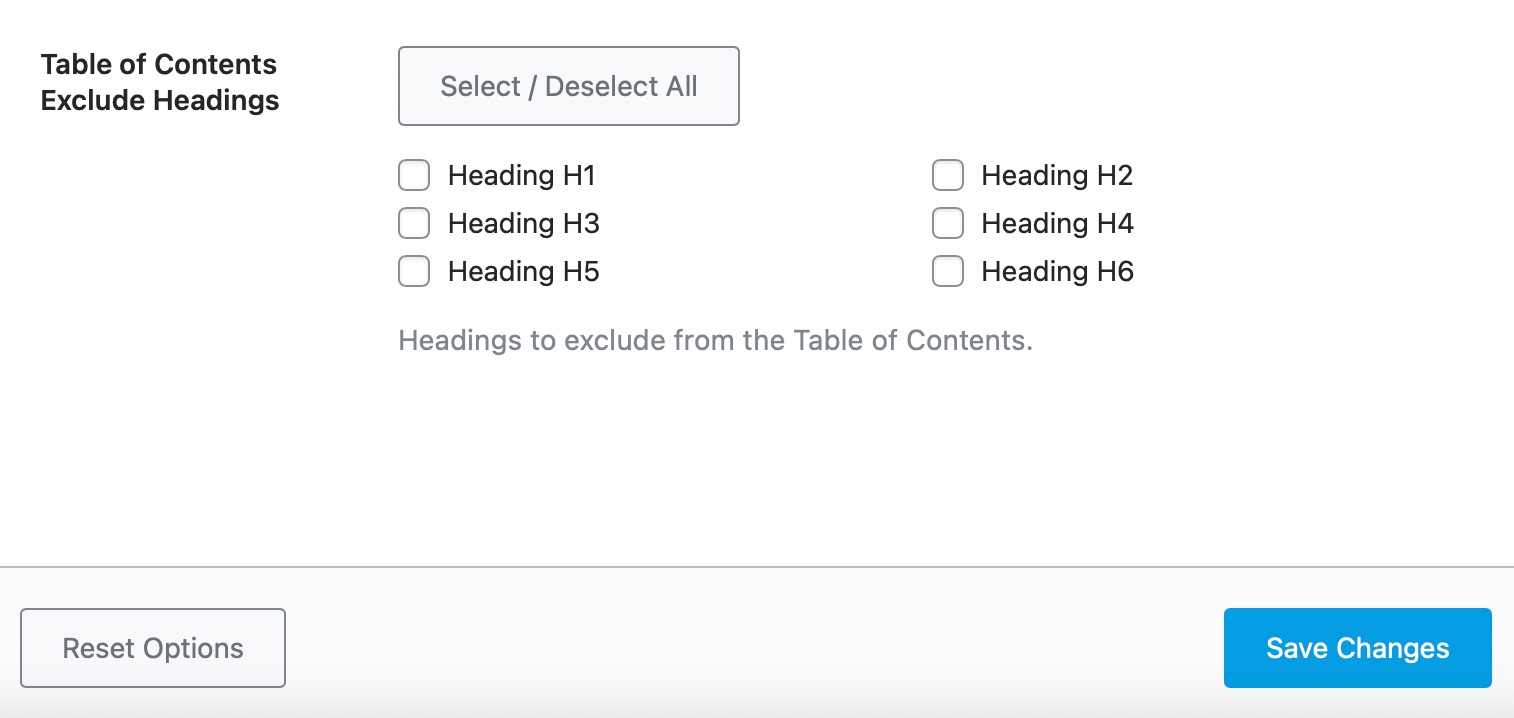
Once you’ve made changes, click the Save Changes button to save your settings.
5 Create a Reusable Table of Contents Block
Once you’ve created and configured the Tables of Contents block, you can save the customized Table of contents block as a Reusable Block.
The Reusable block allows you to save any content block and reuse them in other posts and pages on your website. Hence you don’t have to style them every time, thereby saving you time.
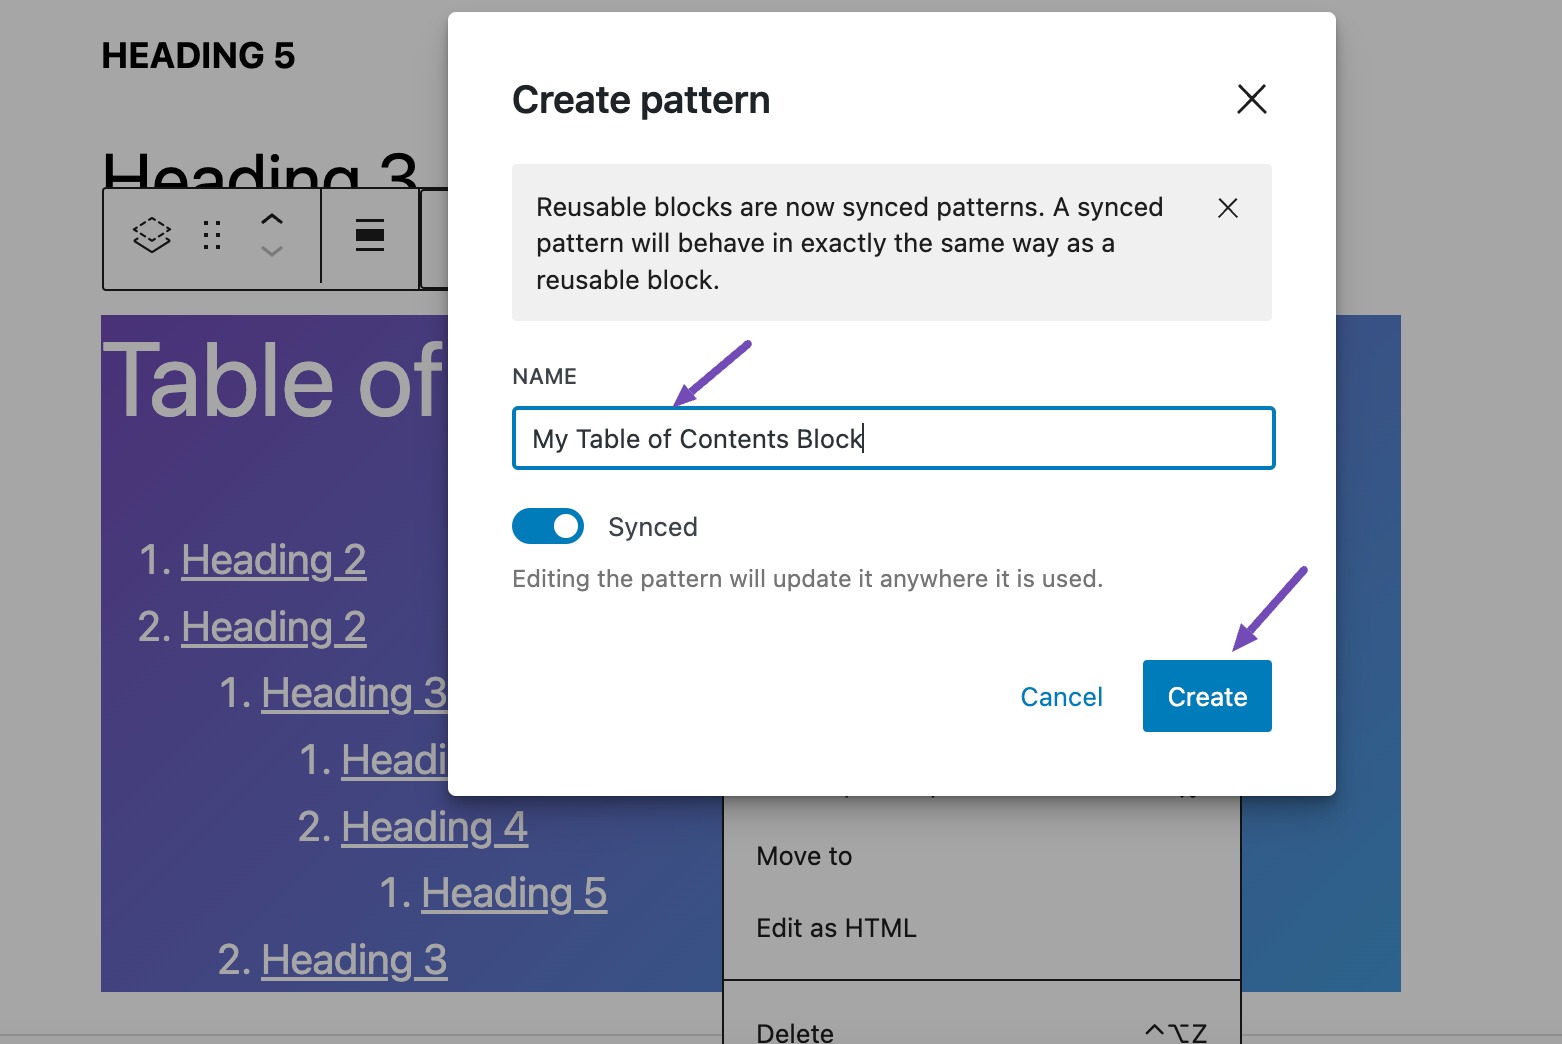
To save your Table of Contents as a Reusable block, select the Table of Contents and click on the Create pattern/reusable block, as shown below.
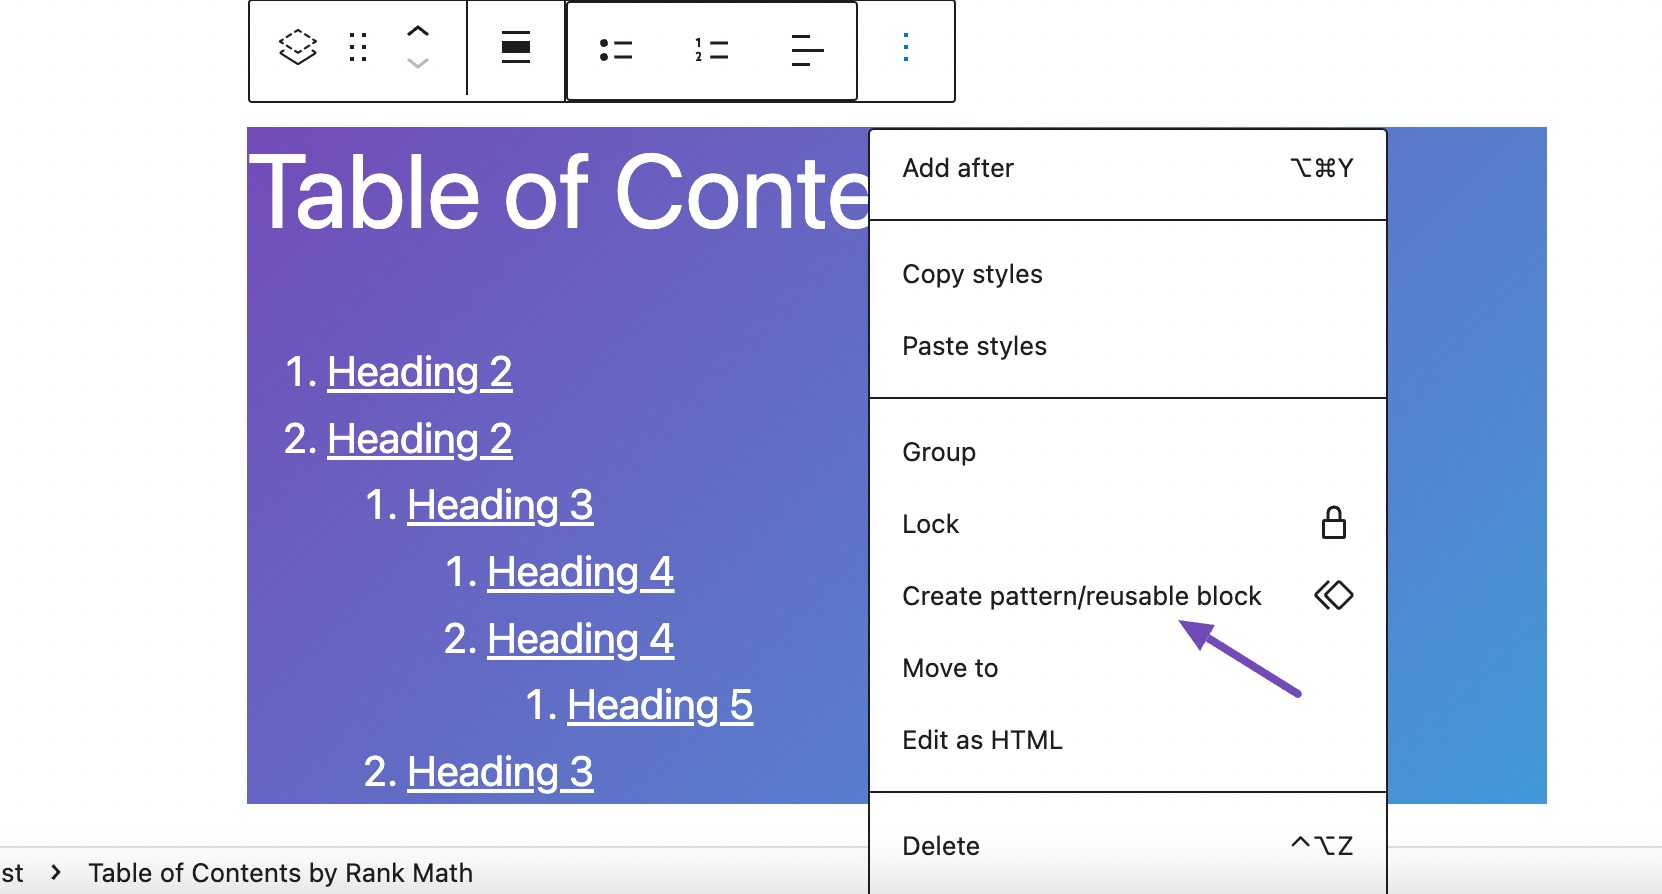
Next, add a name to your Reusable block and click on the Create button.
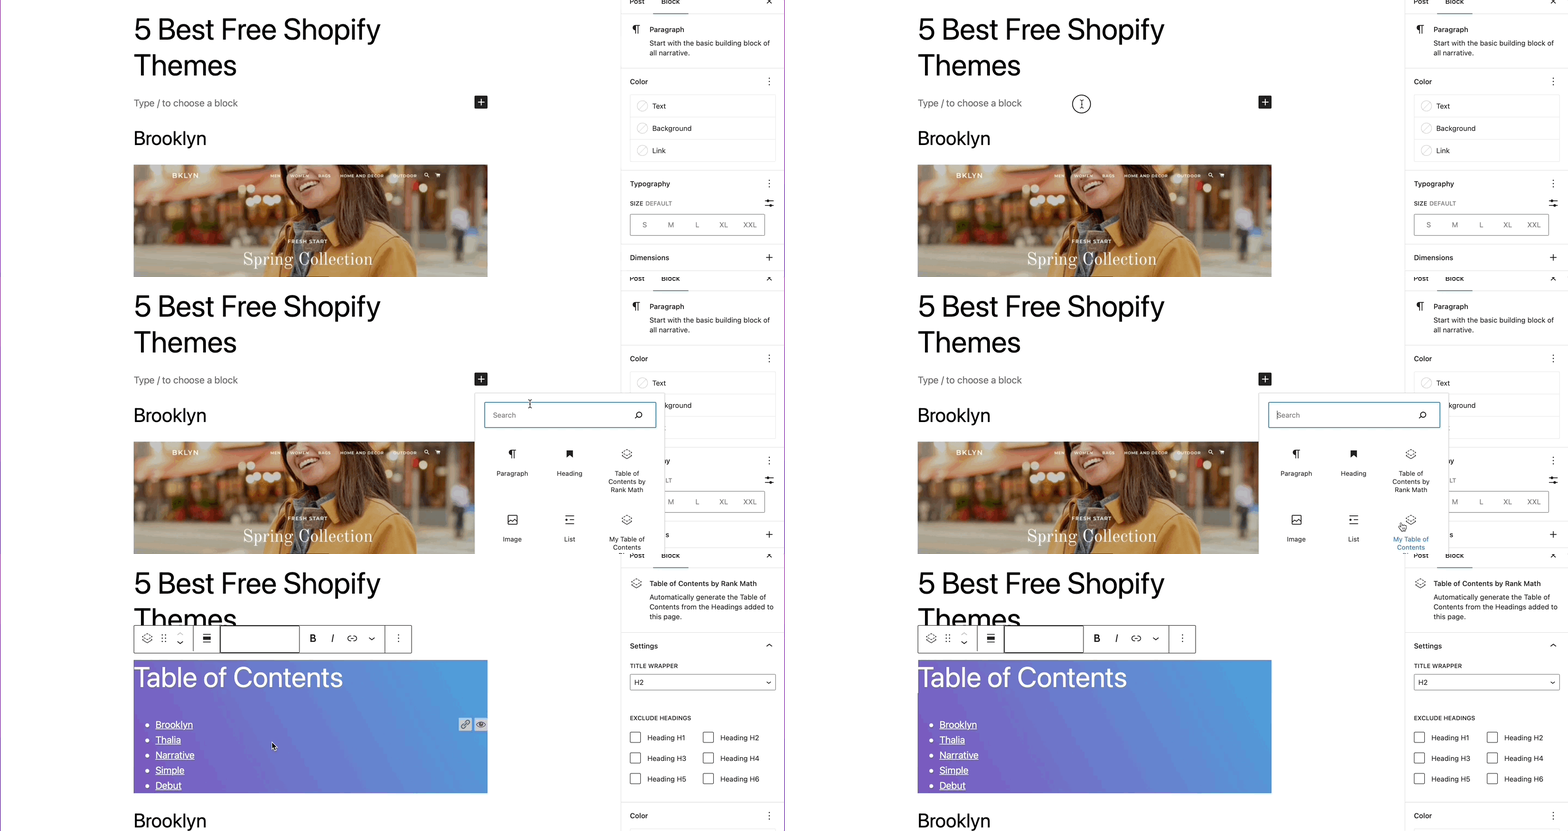
And that’s it! You can now reuse your Table of Contents block in other posts and pages, as shown below.
6 Convert Table of Contents Blocks from Yoast / AIOSEO to Rank Math
If you’ve existing Table of Contents blocks from Yoast/AIOSEO, and decide to migrate to Rank Math SEO, the plugin handles it in a breeze.
When you set up Rank Math for the very first time using the Setup Wizard, Rank Math can automatically import these blocks.
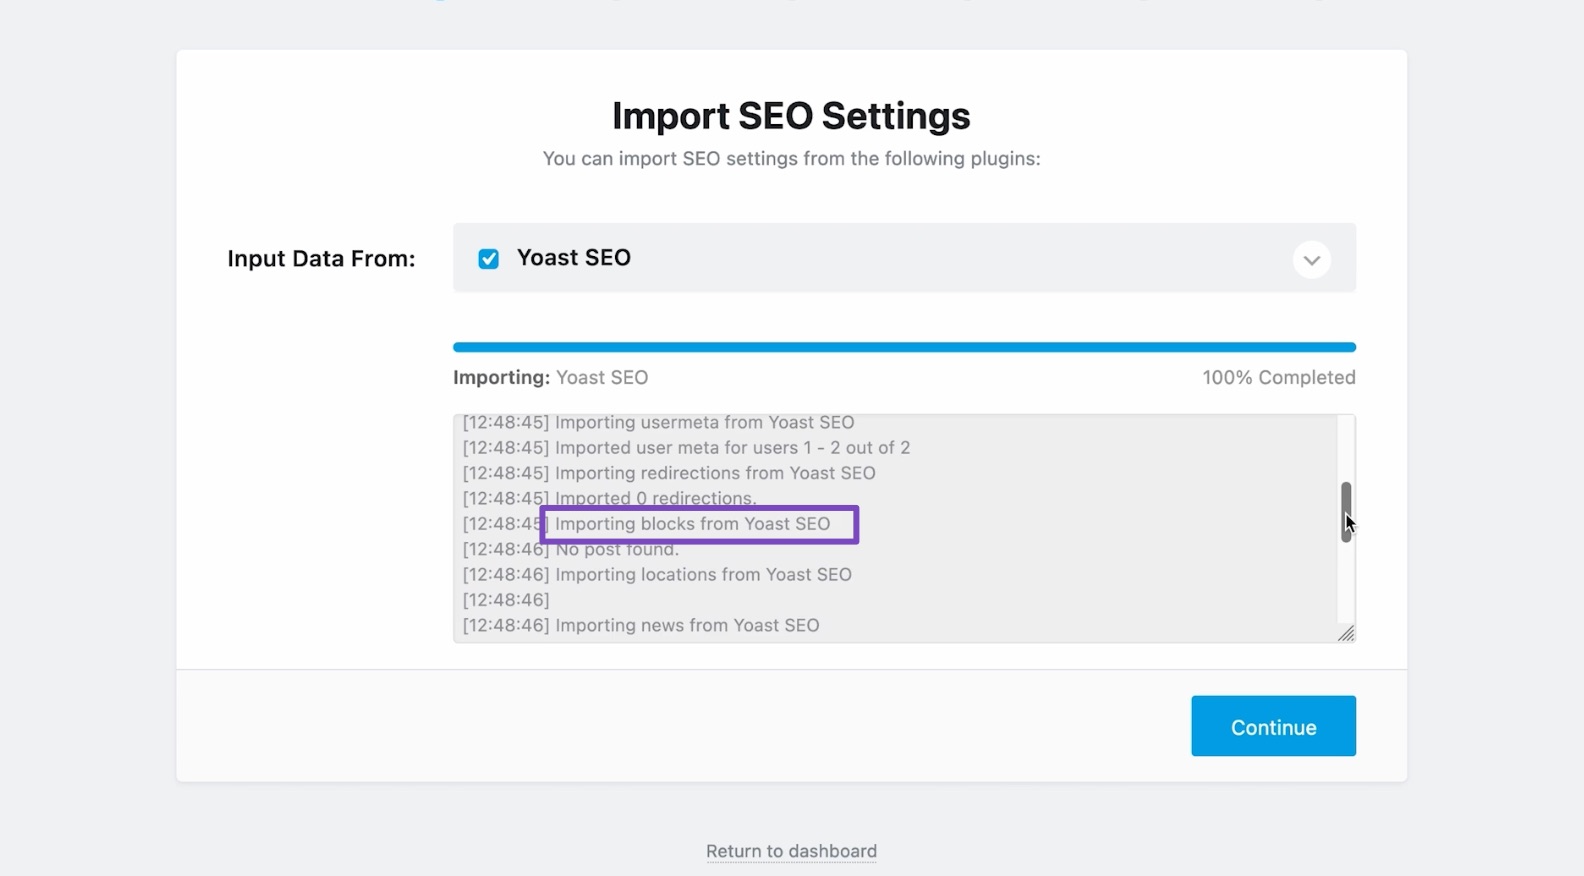
If you’re yet to import these blocks from AIOSEO/Yoast SEO, you can always do that by navigating to Rank Math SEO → Status & Tools → Database Tools. Here you’ll see Yoast Block Converter for Yoast SEO (or AIOSEO Block Converter for AIOSEO).

Click on the Convert Blocks button, click OK on the confirmation message, and the block will automatically be converted to Rank Math’s Table of Contents.

7 Common Table of Contents Issues and Their Fixes
7.1 The Table of Contents Does Not Display
If you cannot add the Table of Contents block to your posts and pages, or the Table of Contents block was added but doesn’t reflect in your SEO score, one of your plugins may conflict with Rank Math. You can refer to this guide to diagnose plugin conflicts.
7.2 The Table of Content Block Cannot Detect My Headings
If your headings are missing from the Table of Contents block, click on the block and navigate to Settings, as shown below.
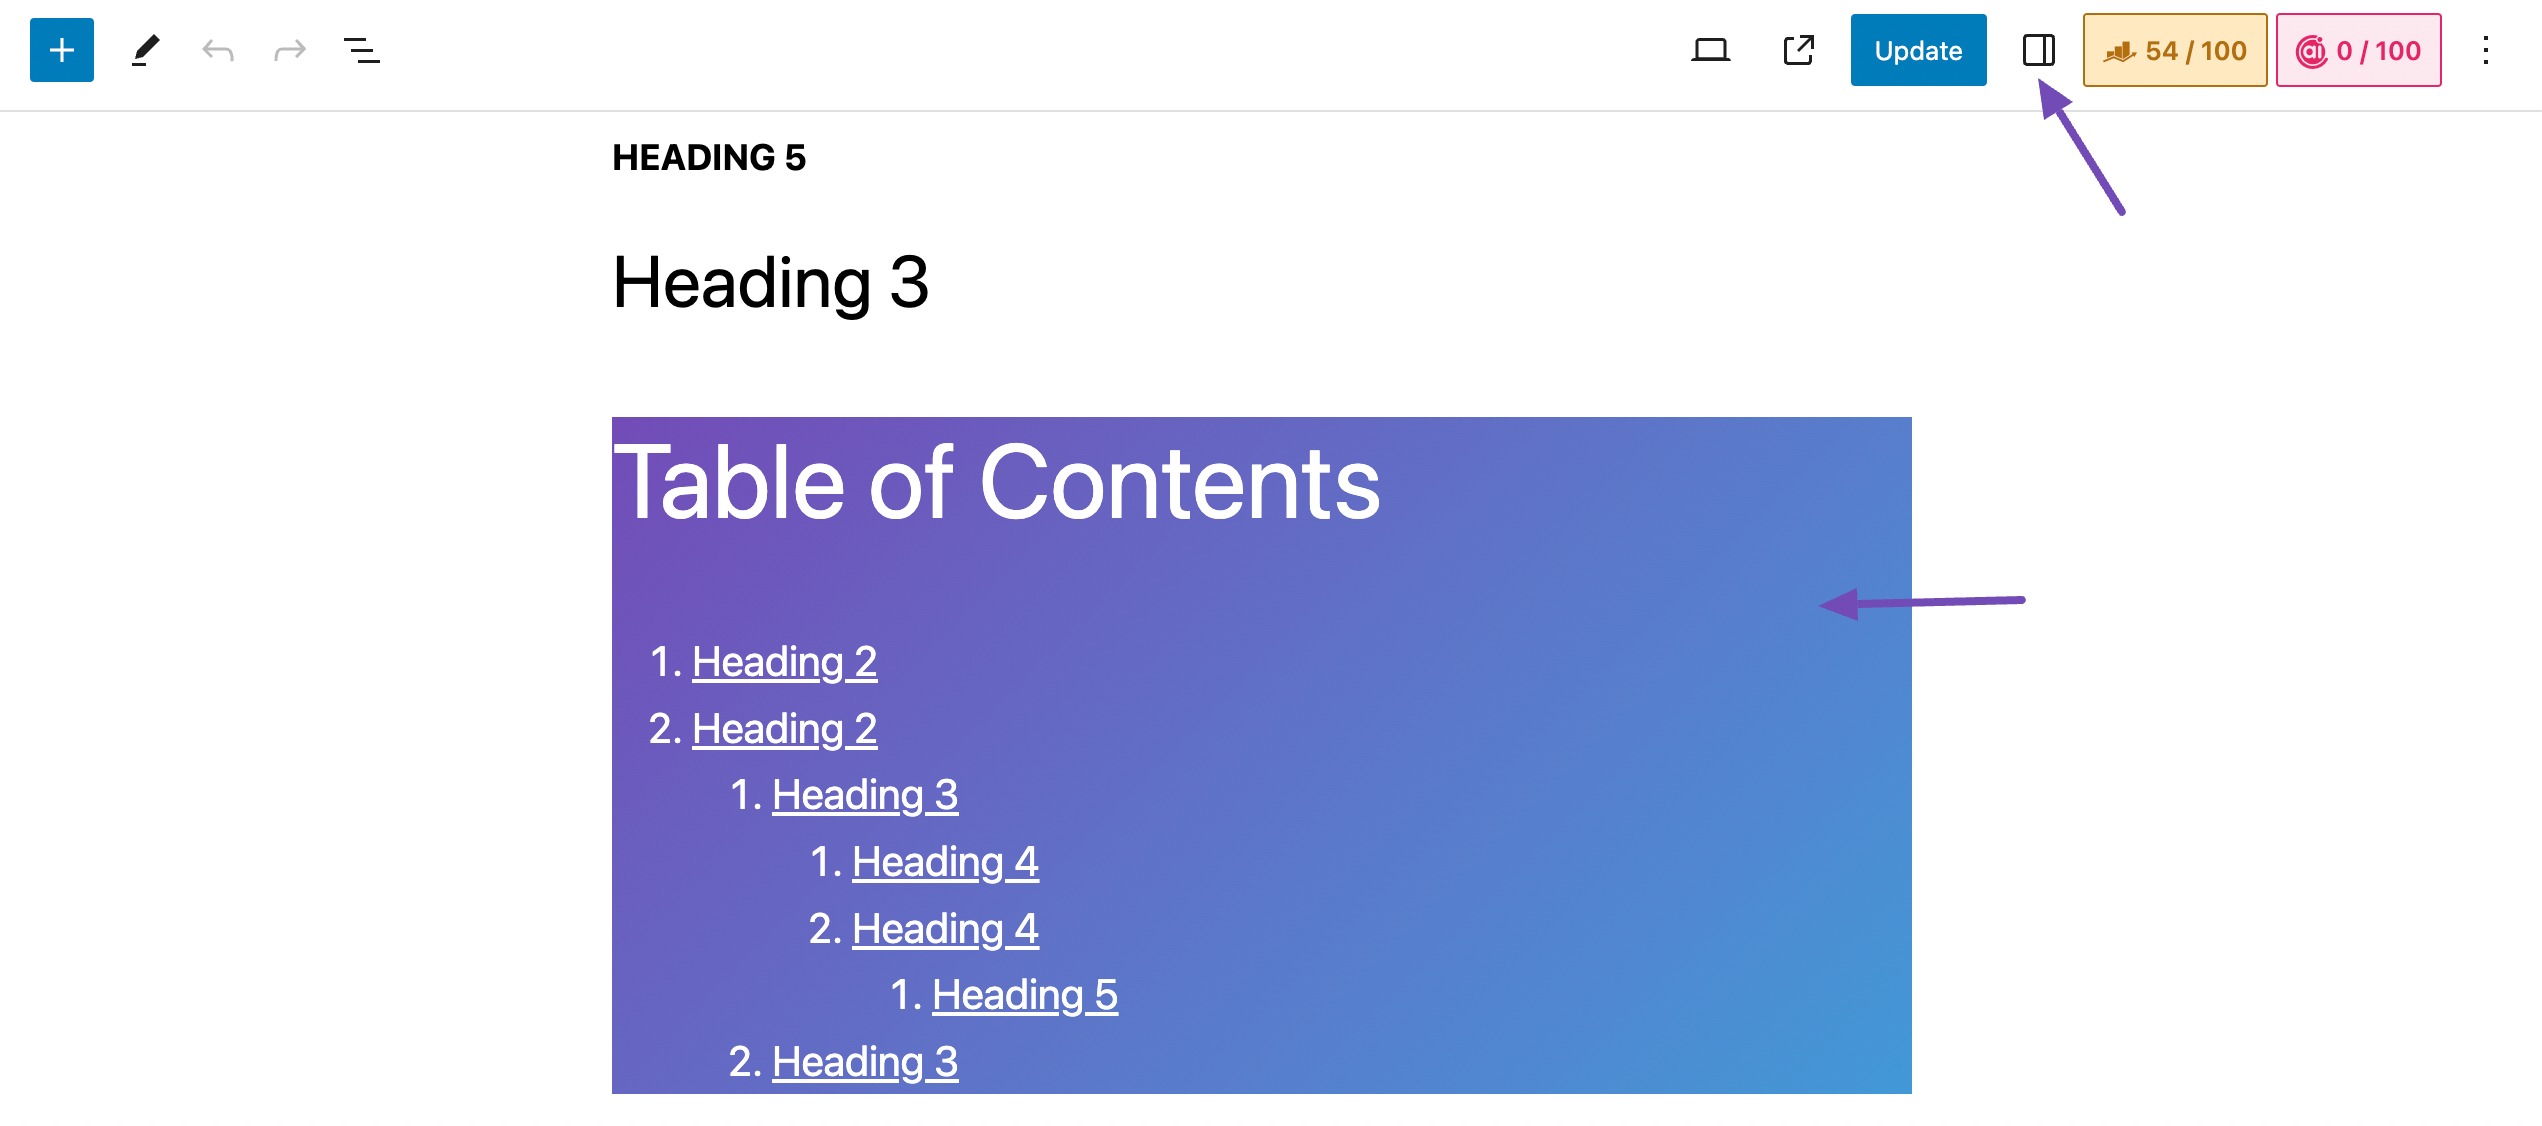
Next, head to Block → Settings → EXCLUDE HEADINGS and confirm you have not excluded any heading from appearing in the table.
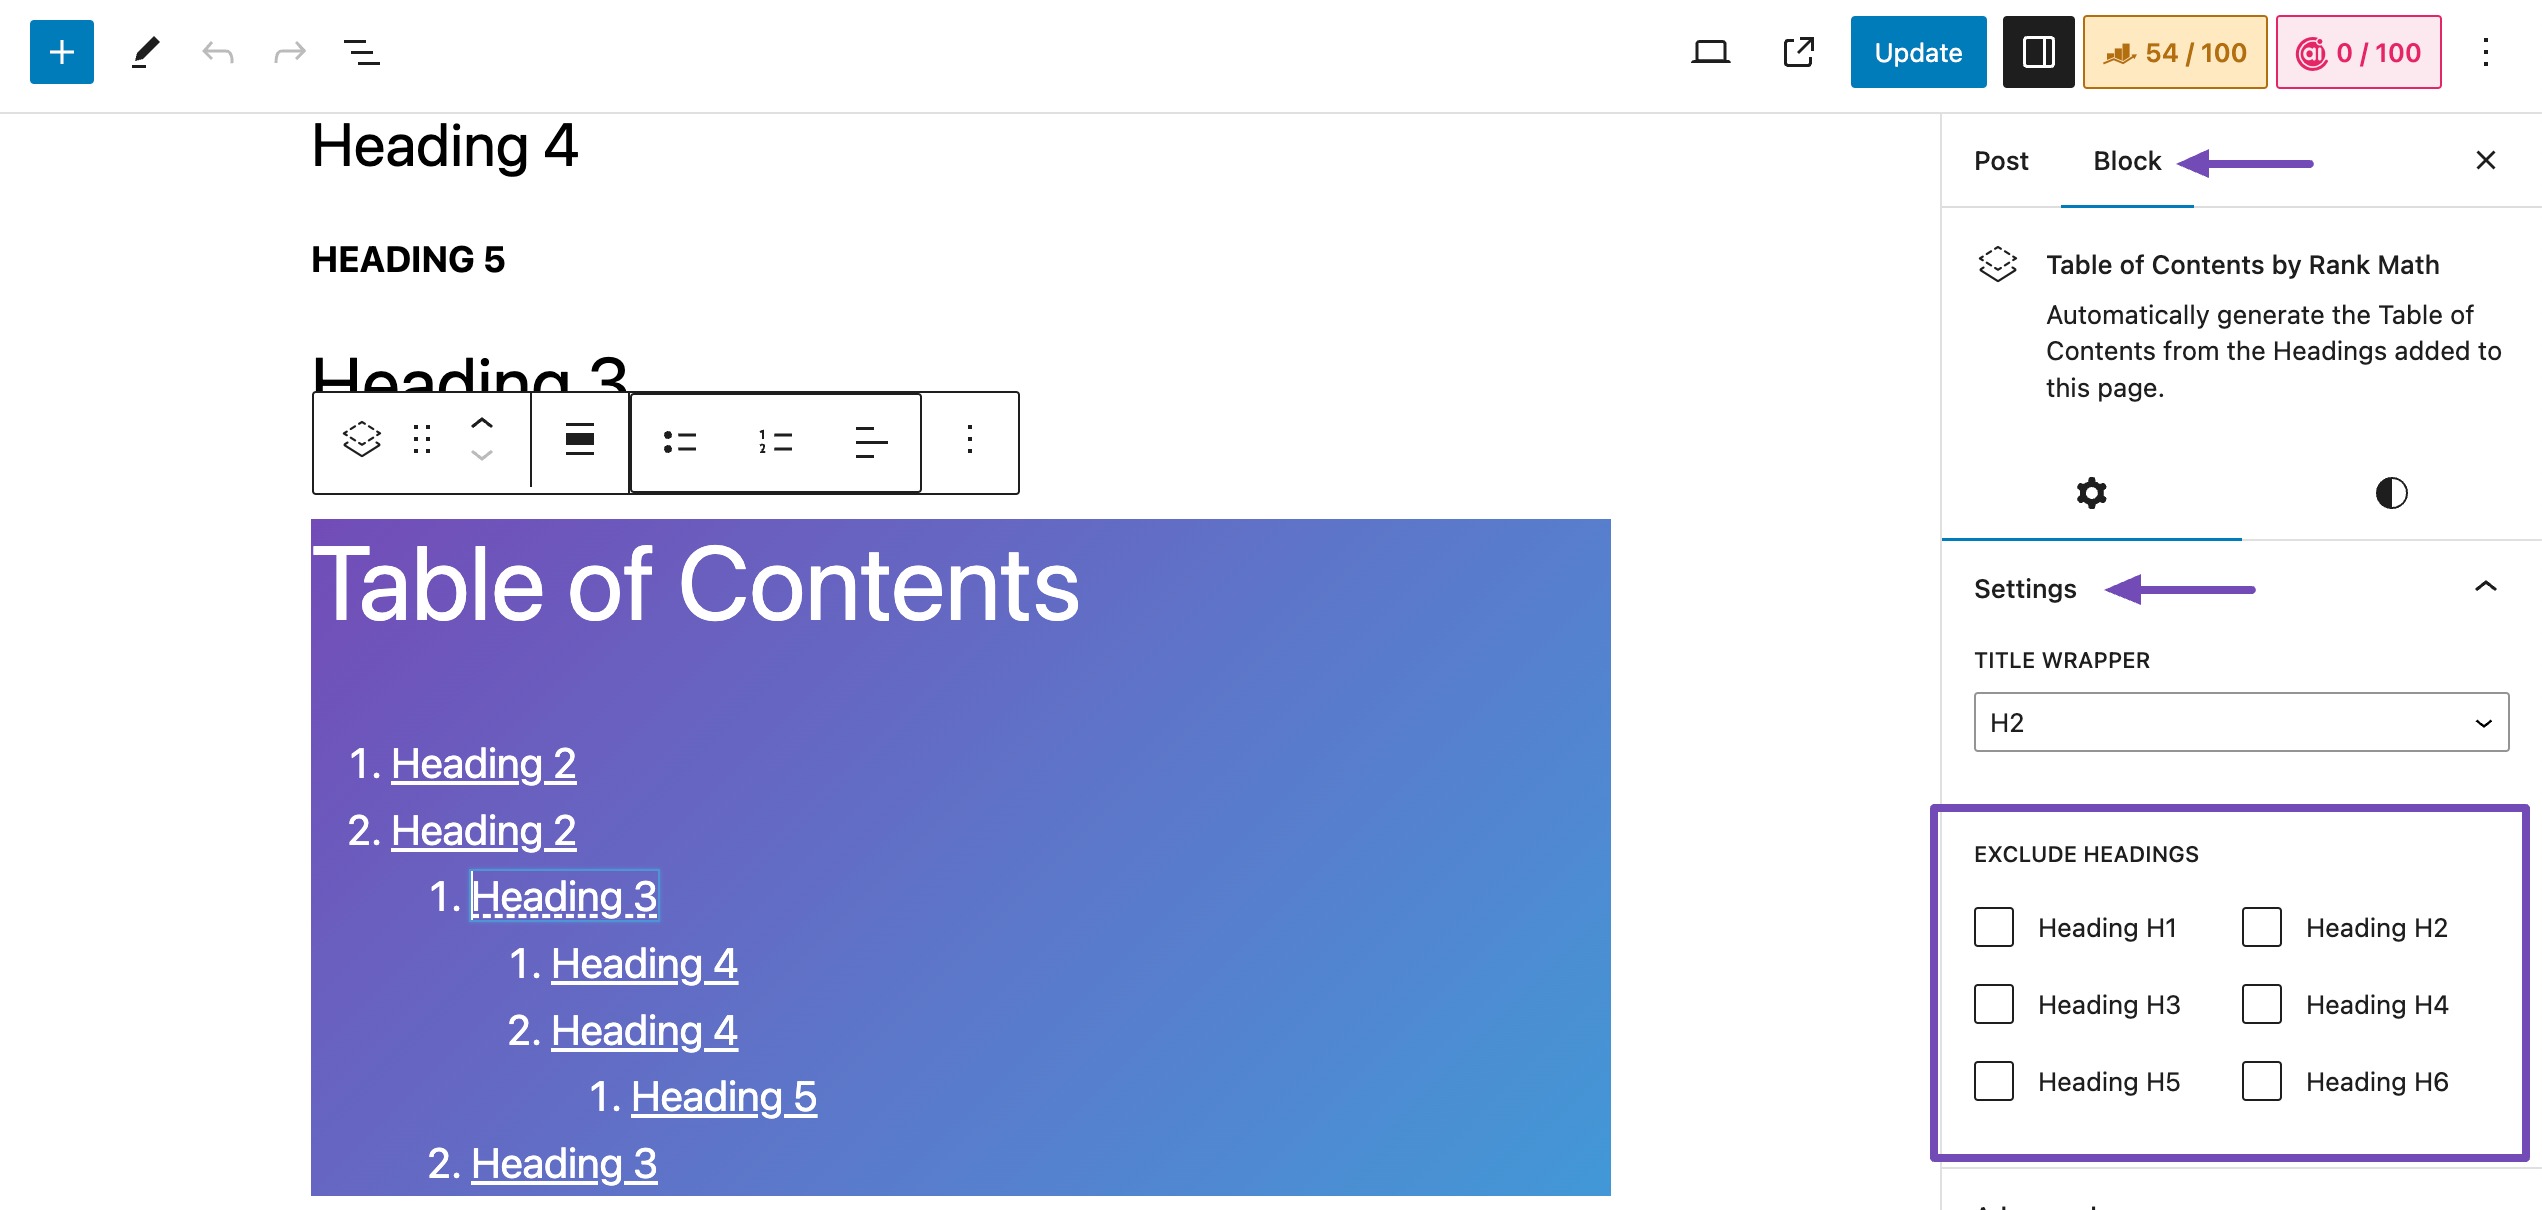
Note: Our team has identified a bug that may cause higher-level headings to disappear when you add a lower-level heading to your content before a higher-level one. We are working on this and will resolve it in a future update. In the meantime, you can monitor our changelog here.
7.3 How to Make the Table of Contents Block Collapsible
The Table of Contents by Rank Math block does not collapse by default. You can make it collapsible by adding the below filter to your rank-math.php file. You can refer to this guide on adding filters to your site.
/**
 * Convert Rank Math FAQ Block Into Accordion
 */
function turn_rm_toc_collapsable() {
    ?>
    <script>
        jQuery(document).ready(function() {
            var tocItems = jQuery("div.wp-block-rank-math-toc-block");
            tocItems.bind("click", function(event) {
                var nav = jQuery(this).find("nav");
                if (nav.css("overflow") == "hidden") {
                    nav.css("overflow", "visible");
                    nav.css("max-height", "100vh");
                } else {
                    nav.css("overflow", "hidden");
                    nav.css("max-height", "0");
                }
            });
        });

    </script>
    <?php
}
add_action( 'wp_footer', 'turn_rm_toc_collapsable' );
Once done, add the below CSS code to your theme’s style.css file.
.wp-block-rank-math-toc-block {
	position:relative;
}

.wp-block-rank-math-toc-block h2 {
    background: #f1f2f6;
    padding: 10px 12px 10px 18px;
    cursor: pointer;
    font-size: 18px !important;
    font-weight: normal !important;
    position:relative;
    margin-bottom: 0;
}
.wp-block-rank-math-toc-block h2:before {
	display:inline-block;
	content: "";
        width: 0;
	height: 0;
	border-style: solid;
	border-width: 6px 0 6px 12px;
	border-color: transparent transparent transparent #000000;
	margin-right: 8px;
}

.wp-block-rank-math-toc-block nav{
	padding: 10px 10px 0px 10px;
	max-height: 0;
	overflow:hidden;
}
.wp-block-rank-math-toc-block input:checked+h2~nav {
	max-height: 100vh;
	overflow:visible;
}
8 Frequently Asked Questions
Is There a Filter Available to Modify the Table of Contents?
No, there is currently no way to modify the table of contents via filters. You can refer this to customize the Table of Contents block.
How to Fix ‘Add Heading Blocks to This Page to Generate the Table of Contents’ Error?
Rank Math’s Table of Contents block will display an error message ‘Add Heading blocks to this page to generate the Table of Contents’ if your article has no headings. You can resolve this by adding one or more headings to your article.
Can I Add Multiple Rank Math TOC Blocks to My Content?
You can add only one Rank Math TOC block per article. Once done, the Rank Math TOC block will be disabled, and you cannot add another one to the content.
9 Conclusion
A table of contents improves your SEO and makes it easier for your readers to navigate your content, allowing them to read exactly what they want. Following this step-by-step guide, you can add a Table of Contents by Rank Math to your WordPress posts and pages.
If you still have questions regarding the Tables of Contents – you’re always more than welcome to contact our dedicated support team. We’re available 24/7, 365 days a year…